Overview
Okta Device Trust issues a certificate to enrolled devices to prove they’re managed by your MDM. That same certificate can authenticate the device to a Meraki wireless network over 802.1X, giving you certificate-based Wi-Fi with no RADIUS server to stand up and no per-device licensing to buy.
This walkthrough covers pulling the Okta certificate chain, configuring a Meraki SSID for Enterprise with Local Auth, and then building the client-side profile that ties them together in Jamf for macOS, or Intune for Windows. The Meraki configuration is the same either way, so pick whichever MDM section applies to you.
Prerequisites
- Okta Identity Engine with Device Trust configured per Okta’s documentation
- Jamf Pro with access to Configuration Profiles (macOS), or Microsoft Intune with Okta Device Trust configured (Windows)
- Meraki MR access points
- Admin access to all three consoles
How It Works
When a Mac enrolls in Jamf and Device Trust is active, Okta provisions a certificate to the device over SCEP. Meraki’s local authentication validates that certificate against the Okta intermediate CA you upload to the dashboard using an internal RADIUS server, no external RADIUS backend involved. On the client side, the Jamf profile pins the Meraki RADIUS server’s certificate common name, so the Mac only trusts the intended authentication server.
Part 1: Getting the Certificates
You need three certificates: the Okta intermediate, the Okta root, and the IdenTrust Commercial Root CA that anchors Okta’s chain.
The Okta Intermediate Certificate
Navigate to your Okta Admin Console: https://<your-org>-admin.okta.com/admin/access/device-management#certificateAuthority
You’ll find the Okta CA listed under the Certificate authority tab, marked (For endpoint management), with its status and expiration date. Use the download action on the right to save it.
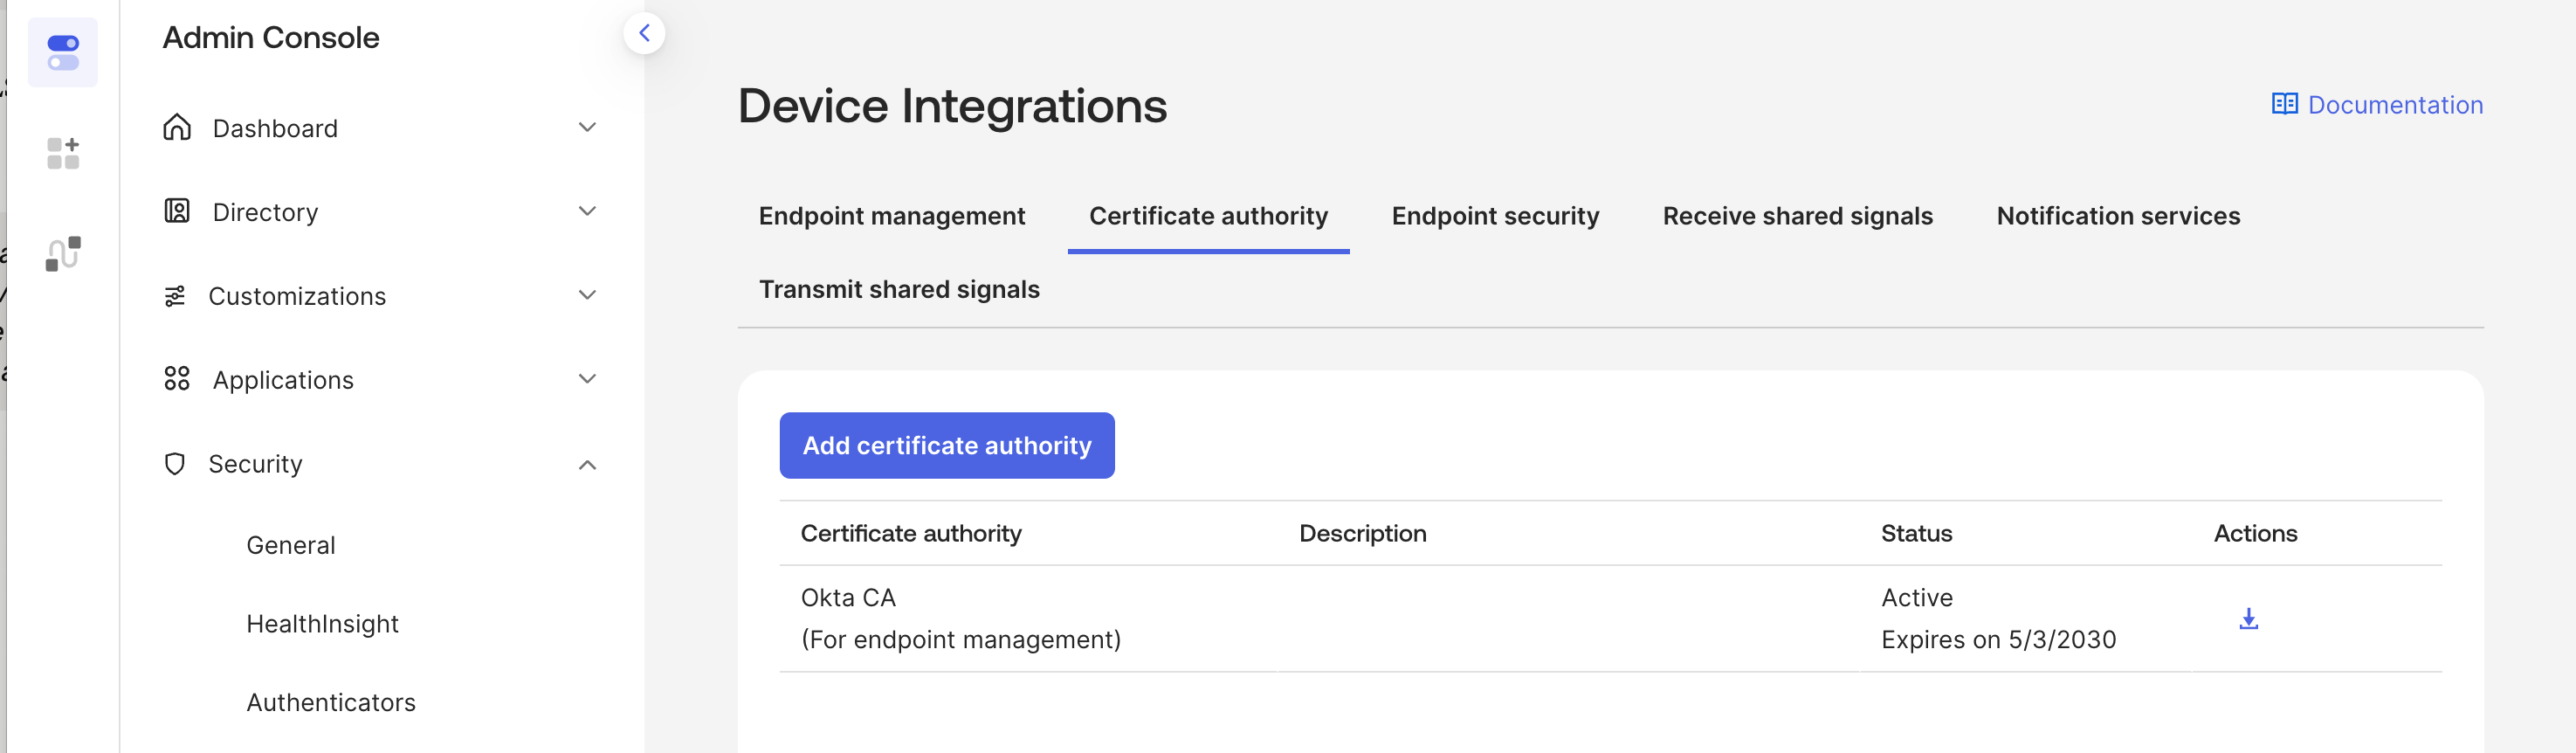
Save it as company-okta-intermediate.cer. Note that despite the label, this is the intermediate CA, not the root.
The Okta Root Certificate
Hit the Okta API in your browser: https://<your-org>-admin.okta.com/api/v1/certificateAuthorities?type=ROOT
Look at the _links.cert.href value in the response, that’s the direct download link for the root certificate. You’ll need to change the base URL from company.okta.com to company-admin.okta.com
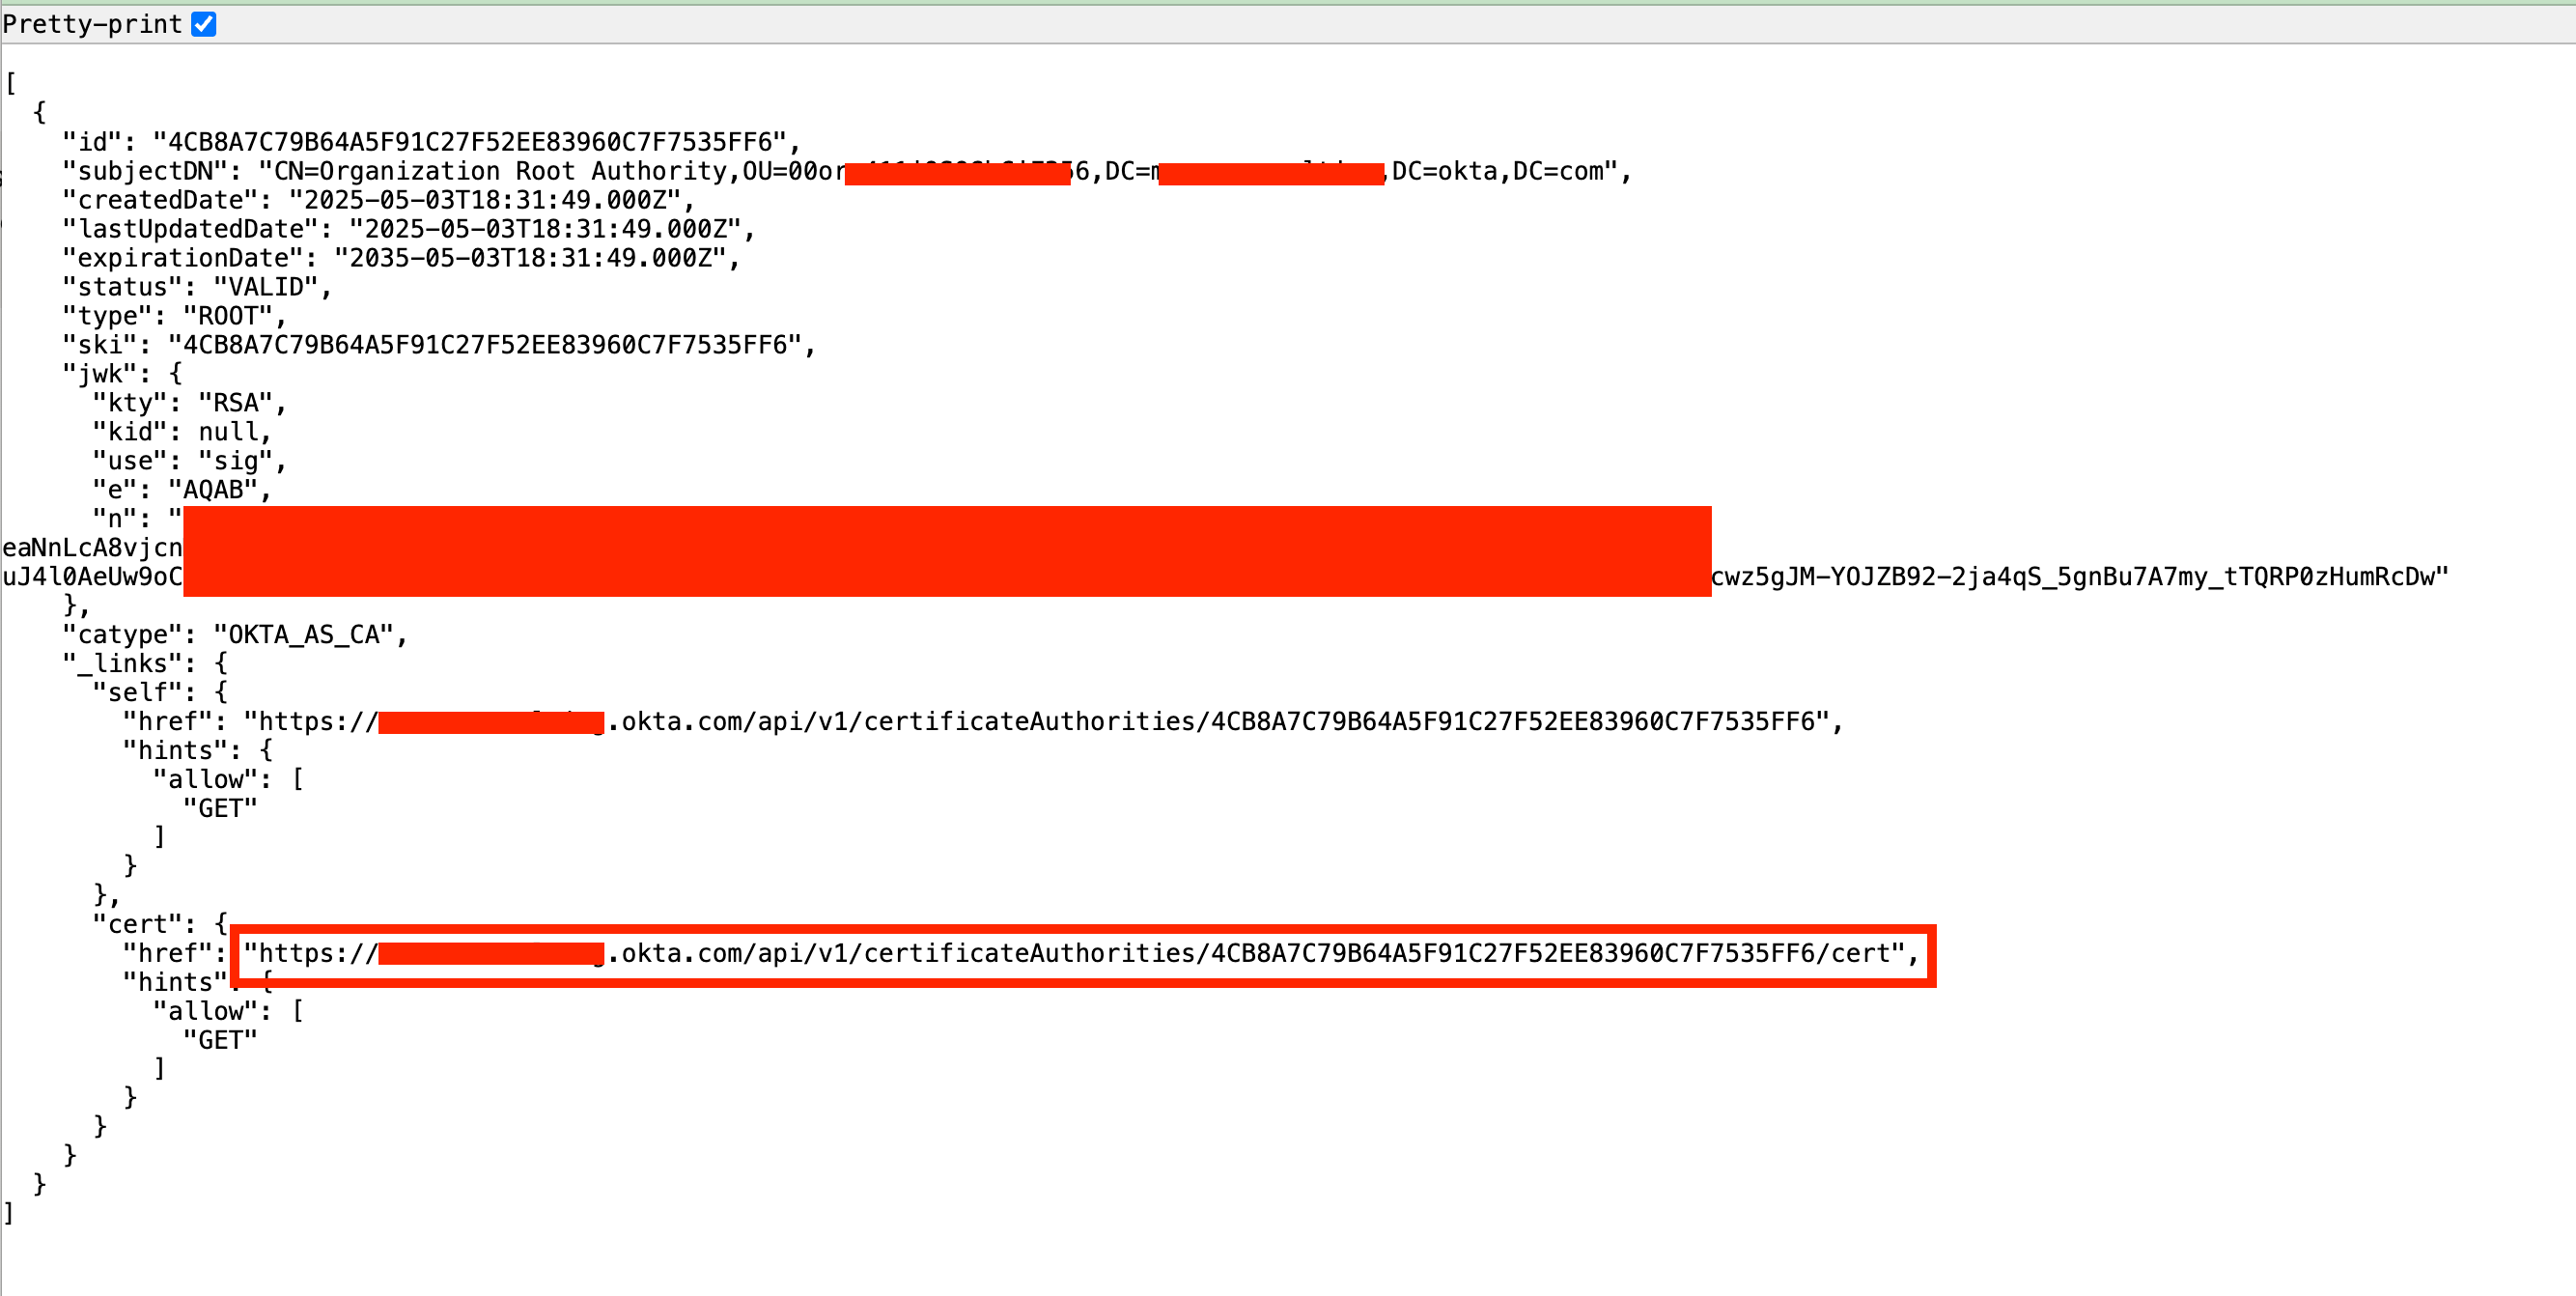
So in this example the final URL will be https://company-admin.com.com/api/v1/certificateAuthorities/4CB8A7C79B64A5F91C27F52EE83960C7F7535FF6/cert
Open that URL and save the result as company-okta-root.cer.
The IdenTrust Commercial Root CA
Download the bundle from IdenTrust:
https://www.identrust.com/sites/default/files/resources/IdenTrustCommercialRootCA_0.p7b
It arrives as PKCS#7, so convert it for Jamf Pro:
openssl pkcs7 -inform DER -print_certs \ -in ~/Downloads/IdenTrustCommercialRootCA_0.p7b \ -out ~/Downloads/IdenTrust-Commercial-Root-CA.cer
Part 2: Configuring Meraki Local Authentication
Enable Enterprise with Local Auth
Create or select your SSID, then go to its Access Control page and set Security to Enterprise with → Local Auth.
Configure it as follows:
- Certificate authentication: Enabled
- Password authentication: Disabled
- Cache timeout: 86400 seconds
- LDAP verification: Do not verify certificate with LDAP
- OCSP verification: Do not verify certificate with OCSP
- Client Certificate CA: upload
company-okta-intermediate.cer
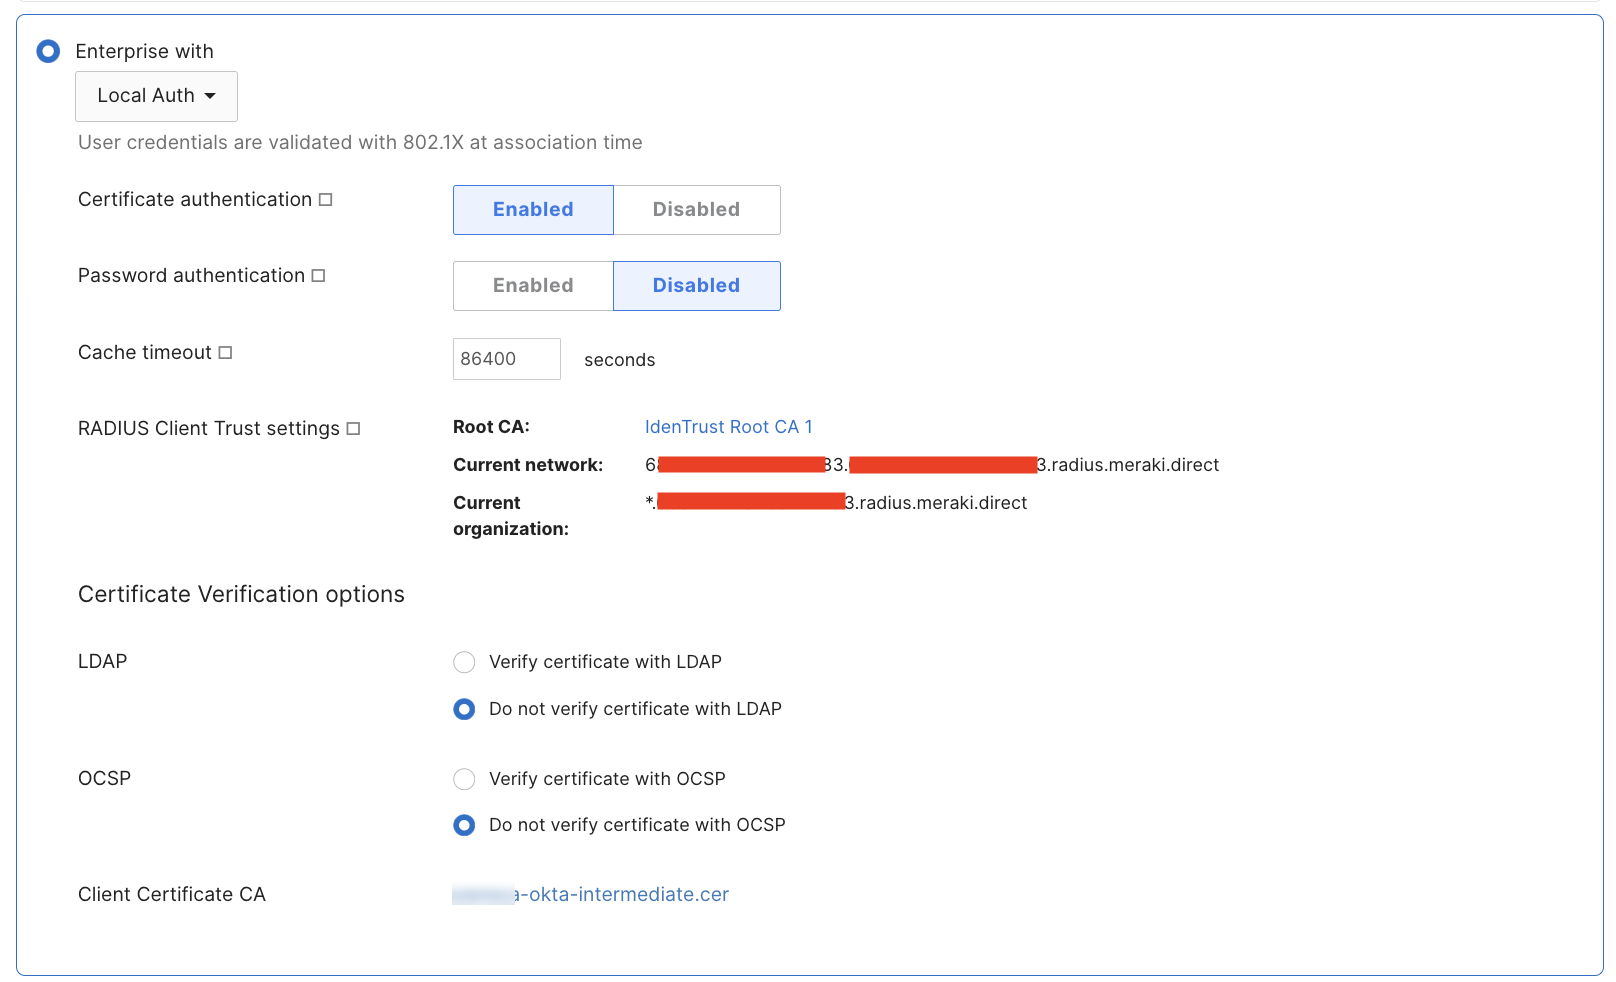
Copy the RADIUS Client Trust Values
Copy the Current organization value in the RADIUS Client Trust settings section. Save this for later, you’ll paste it into Jamf as the trusted server certificate name. Using the organization value rather than the network value means the profile keeps working if you add the SSID to other networks in the same org.
Set WPA3
Still on the same page, set WPA encryption to WPA3 only. Related settings:
- 802.11r: Enabled
- 802.11w: Required (reject unsupported clients)
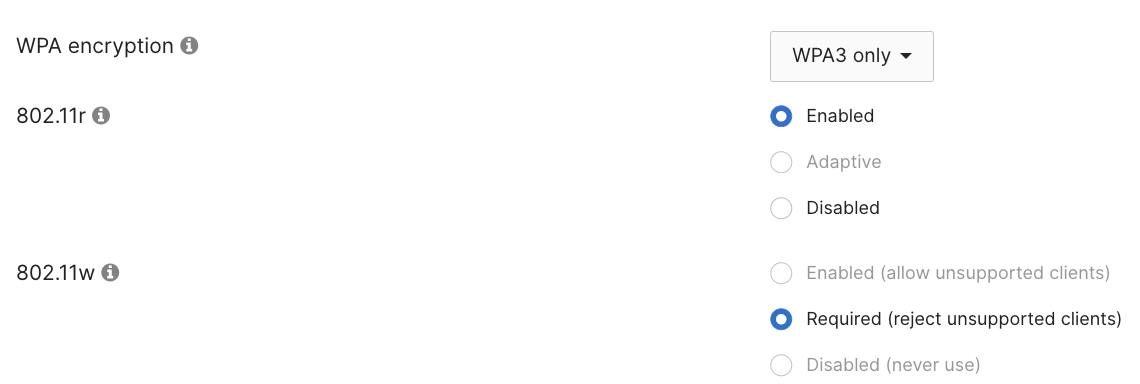
WPA3 is not optional if you want 6 GHz. Wi-Fi 6E and Wi-Fi 7 access points will not bring up a 6 GHz radio on an SSID that permits WPA2. If you’re running WPA2/WPA3 mixed mode, you’re not using the 6 GHz band.
Part 3: Configure Jamf
Open Computers › Configuration Profiles and edit your existing Okta Device Trust profile.
Add the Certificate Payloads
Add three Certificate payloads, one per certificate:
| Certificate Name | File | Notes |
|---|---|---|
| Okta Intermediate Cert | company-okta-intermediate.cer | Allow all apps access |
| Okta Root Cert | company-okta-root.cer | Allow all apps access |
| IdenTrustCommercialRootCA | IdenTrust-Commercial-Root-CA.cer | Allow all apps access |
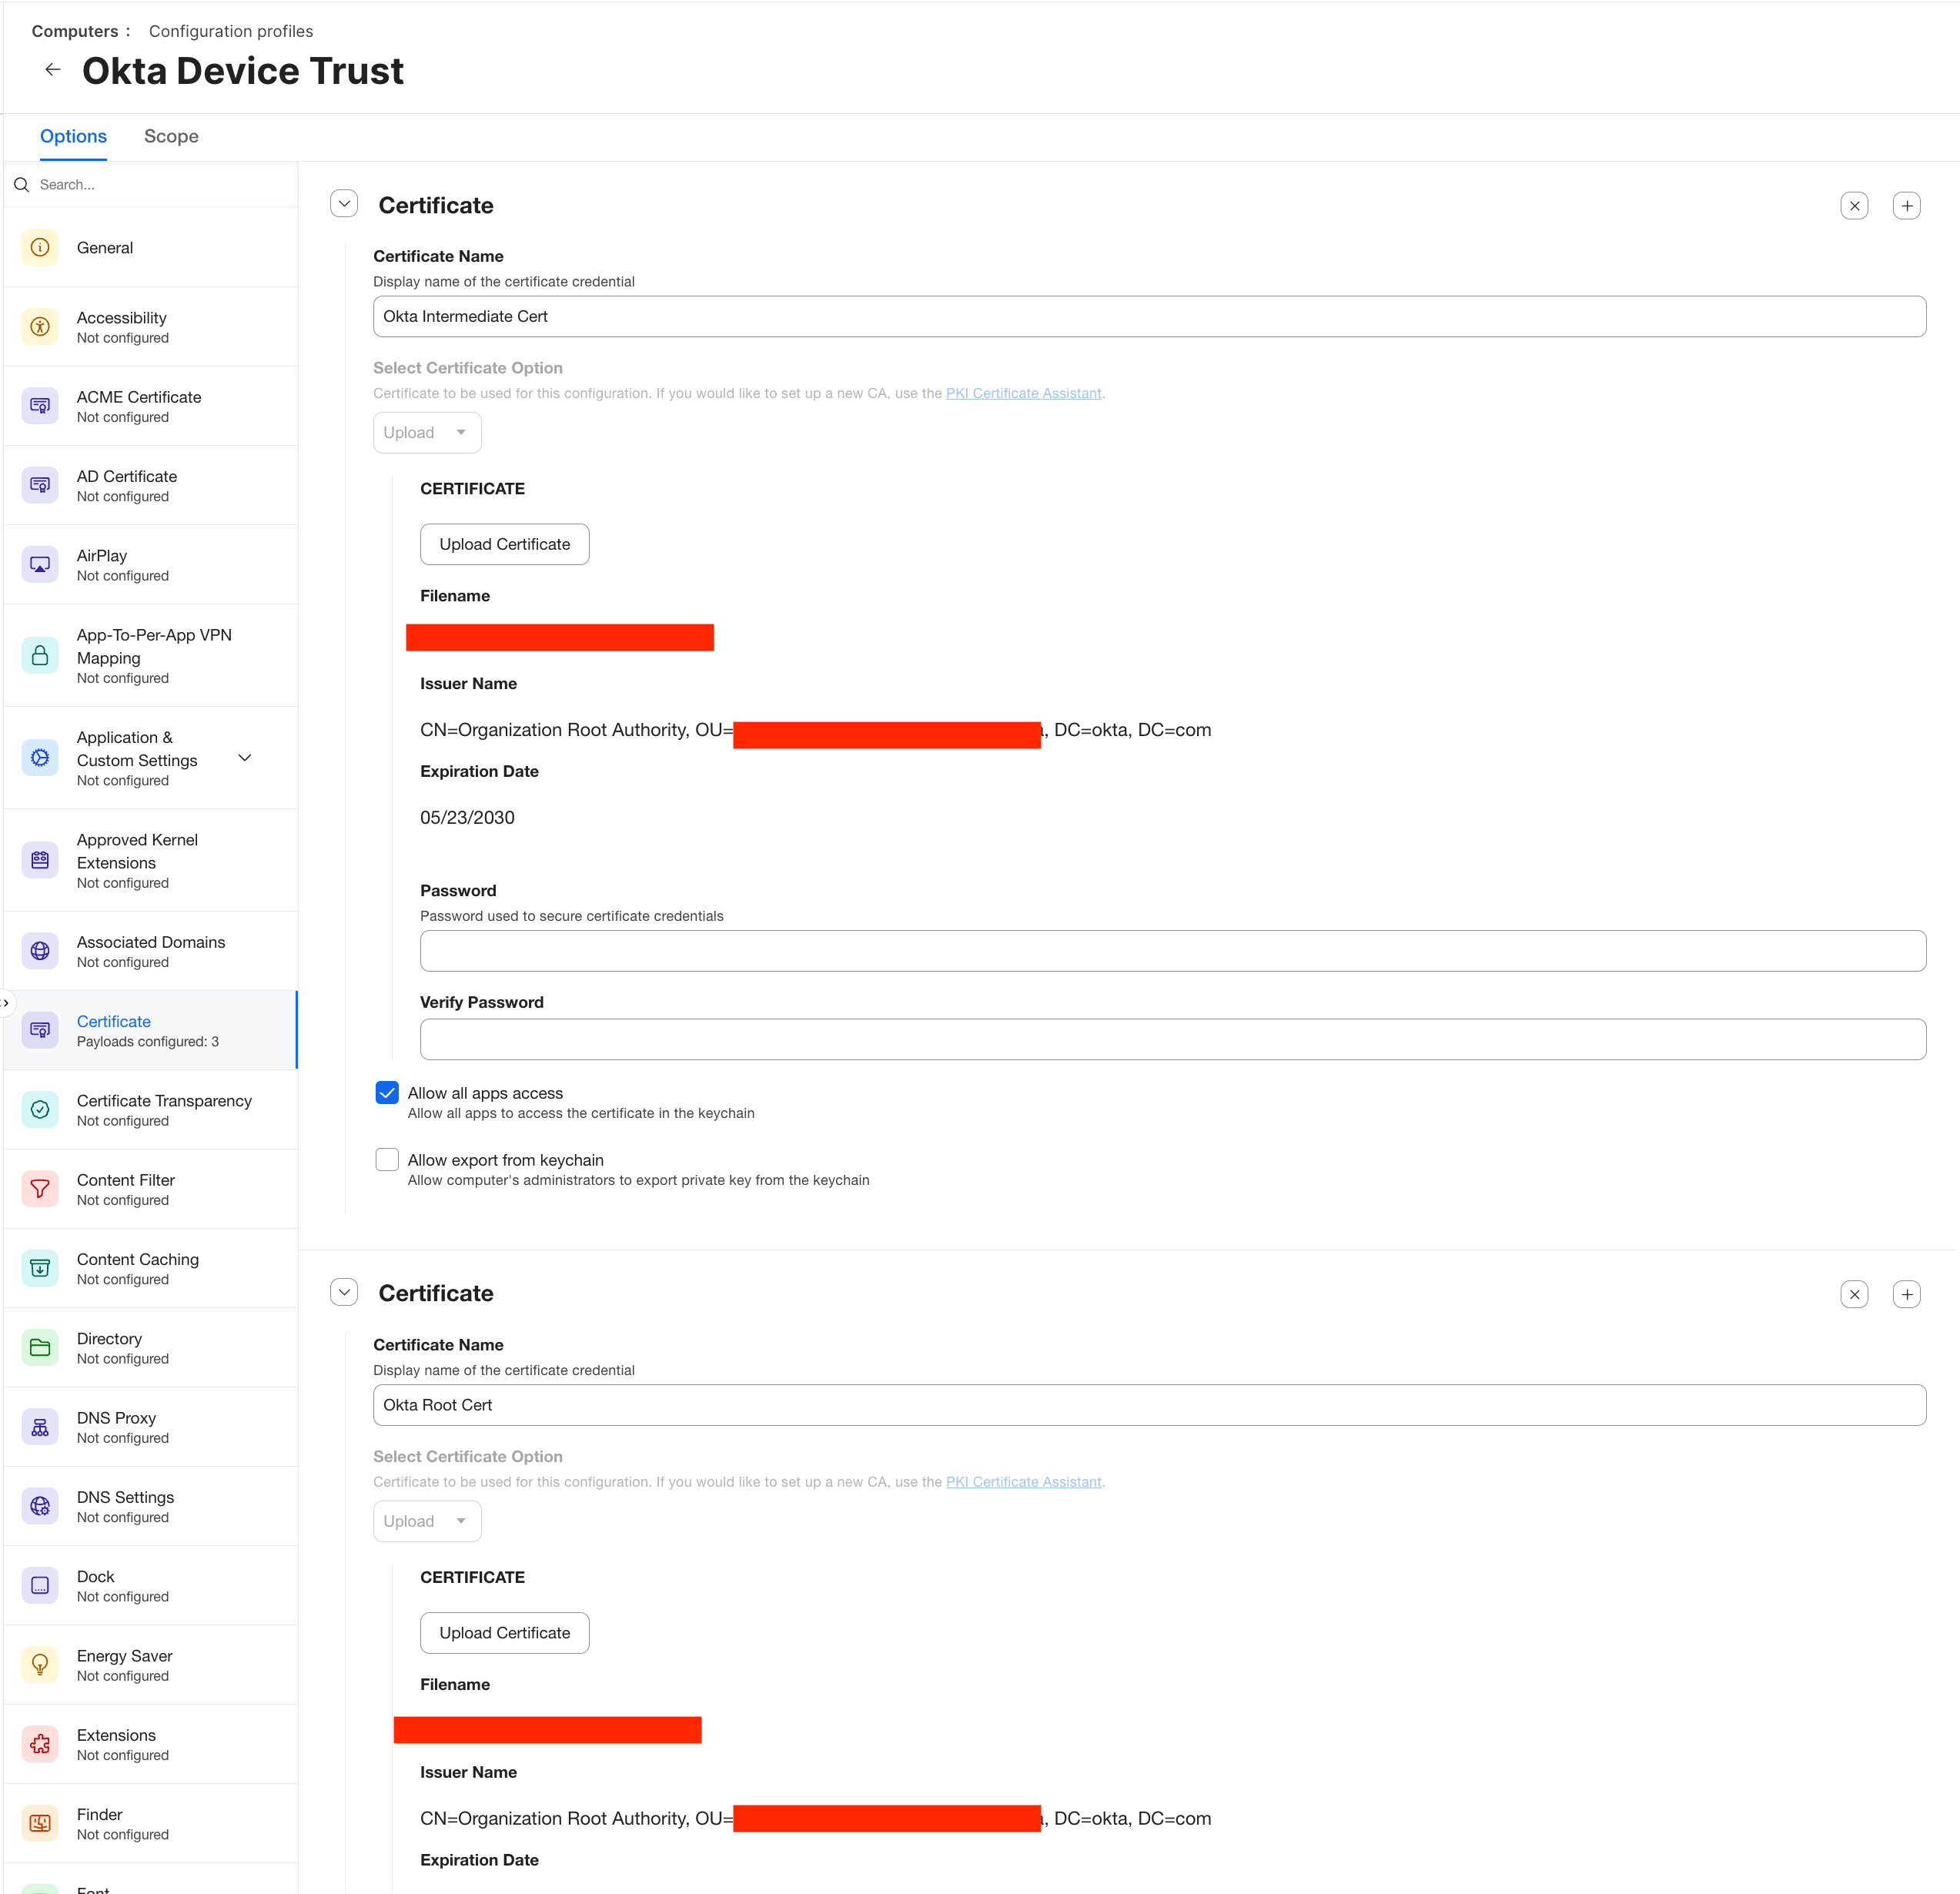
The sidebar should now read Certificate — Payloads configured: 3.
Add the Network Payload
Add a Network payload:
- Network Interface: Wi-Fi
- SSID: your Meraki SSID (e.g.
Company Secure) - Hidden Network: unchecked
- Auto Join: checked
- Disable MAC Address Randomization (macOS 15+): checked
- Proxy Setup: None
- Security Type: WPA3 Enterprise
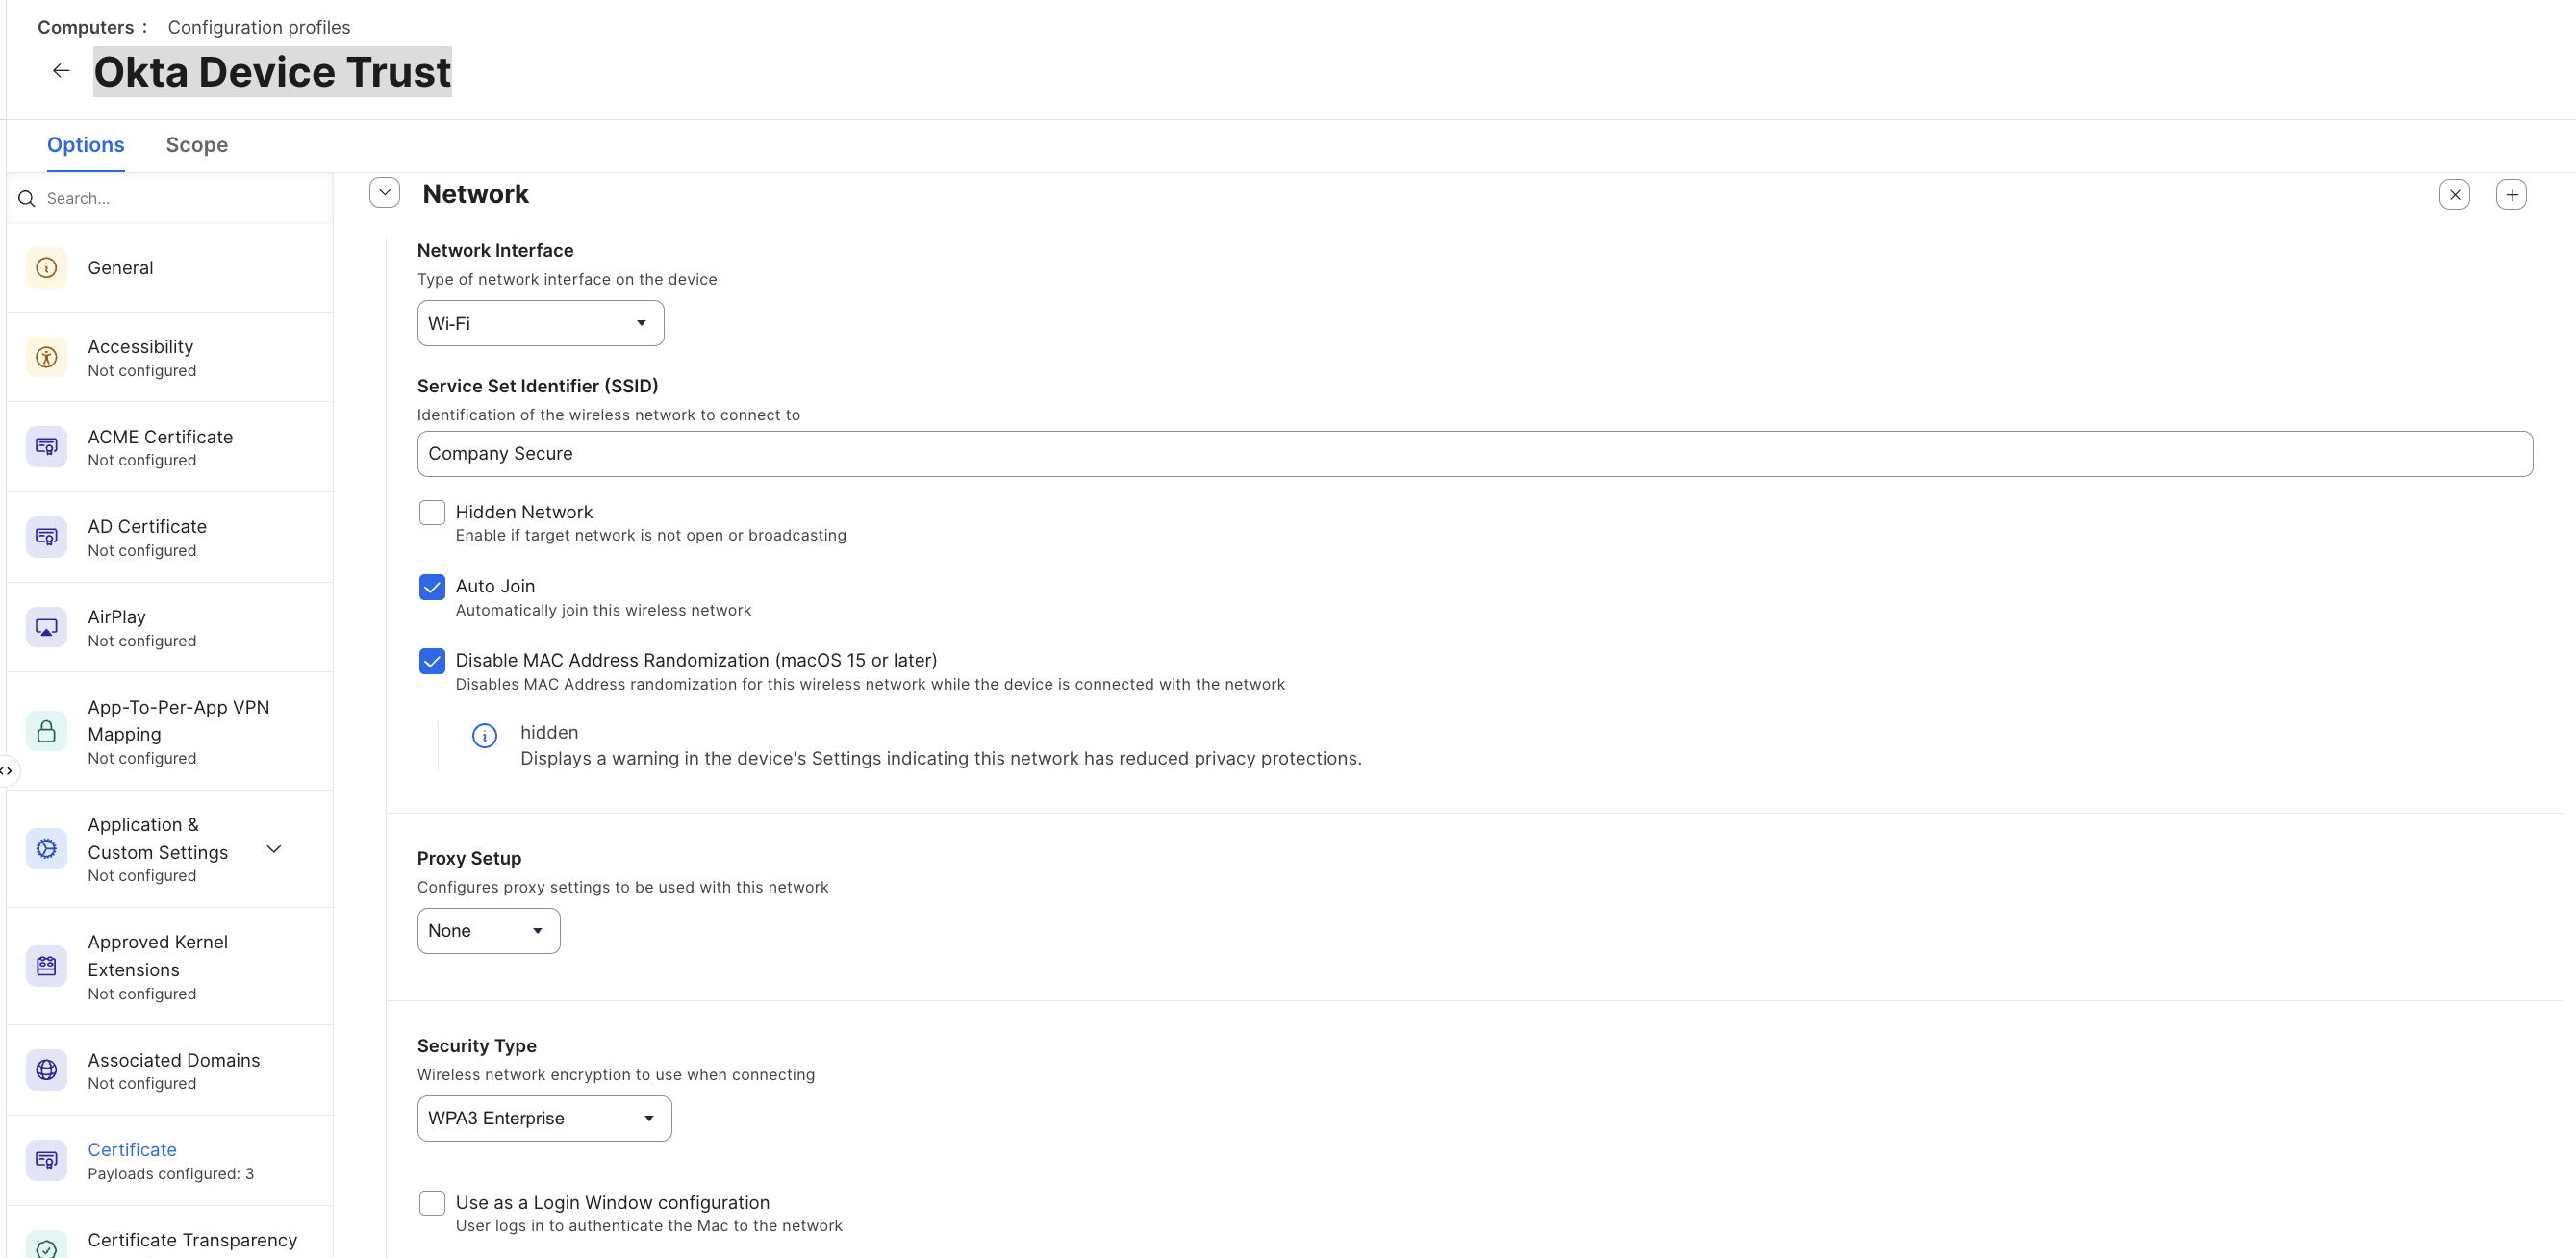
A note on MAC randomization: disabling it makes the client’s MAC stable, which keeps Meraki client history, group policies, and per-client troubleshooting coherent across reconnects. macOS will show a reduced-privacy warning for the network in Settings, which is expected.
Network Security → Protocols
Under Network Security Settings, on the Protocols tab:
- Accepted EAP Types: TLS only
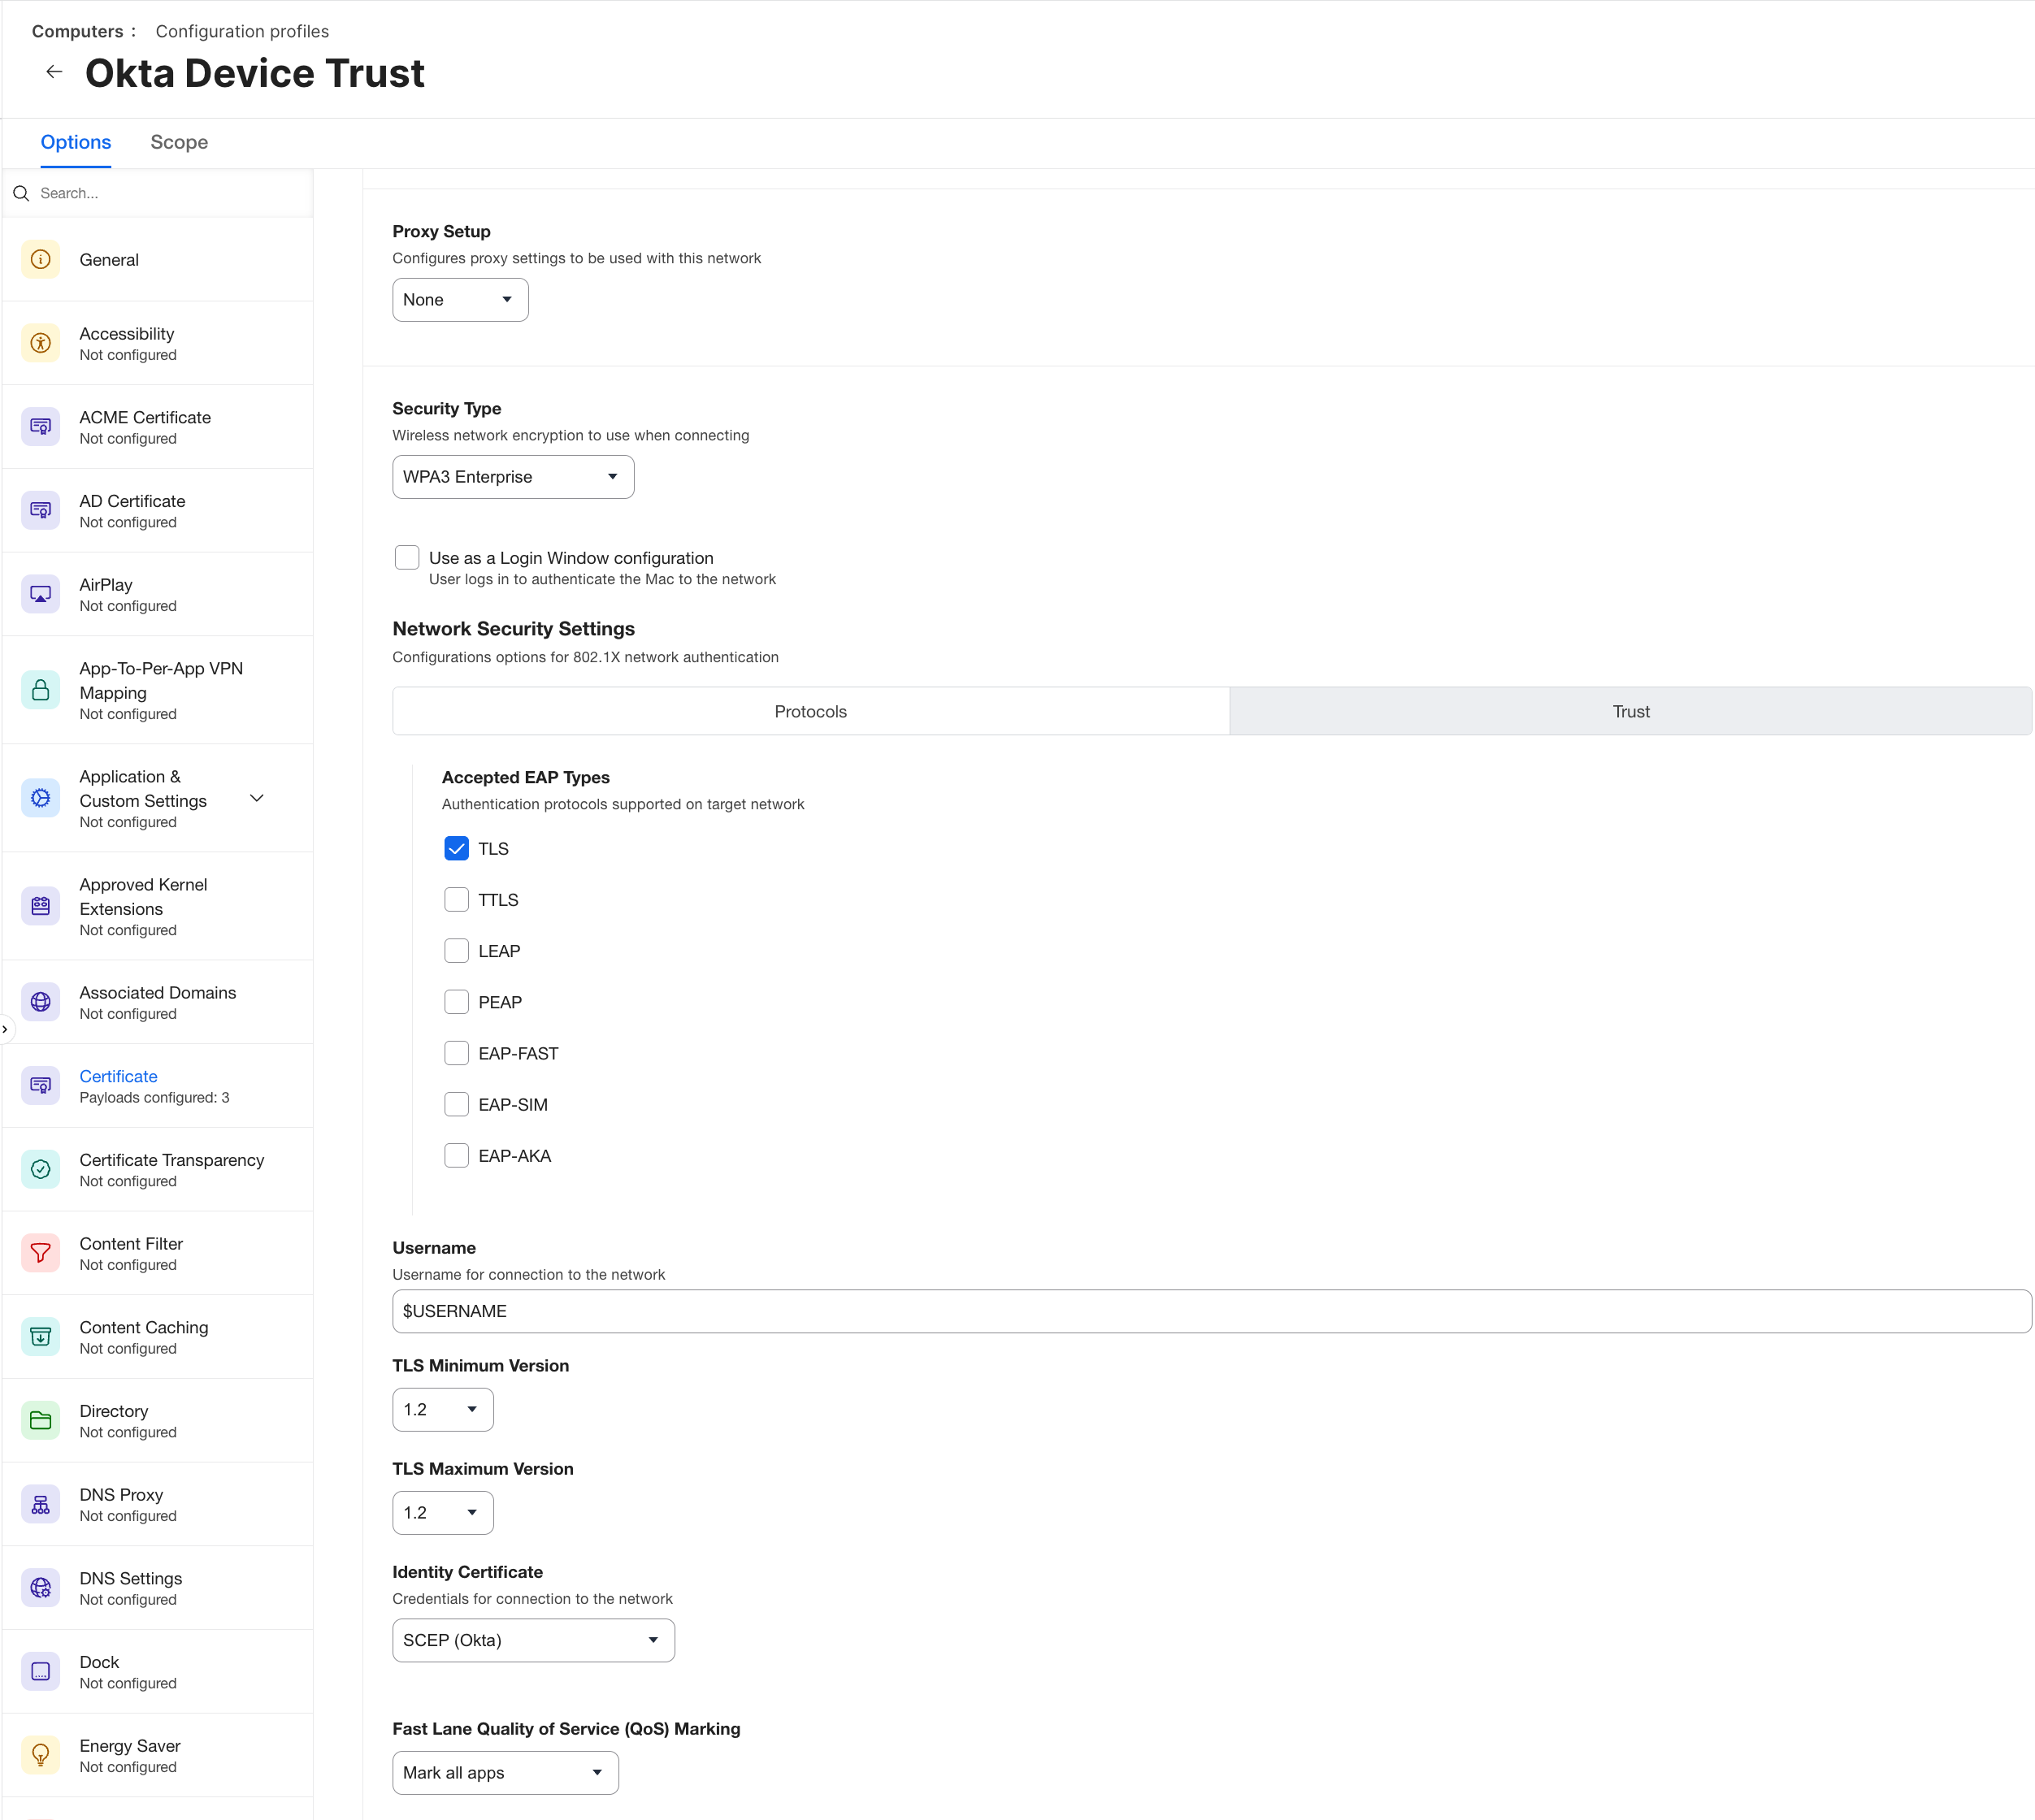
Network Security → Trust
Switch to the Trust tab:
- Username:
$USERNAME - TLS Minimum Version: 1.2
- TLS Maximum Version: 1.2
- Identity Certificate: SCEP (Okta): this points at the SCEP payload already in this profile used for Okta Trust.
- Trusted Certificates: check IdenTrustCommercialRootCA
- Trusted Server Certificate Names: add the Current organization value you copied from Meraki (
*.<org-id>.radius.meraki.direct) - Allow Trust Exceptions: unchecked
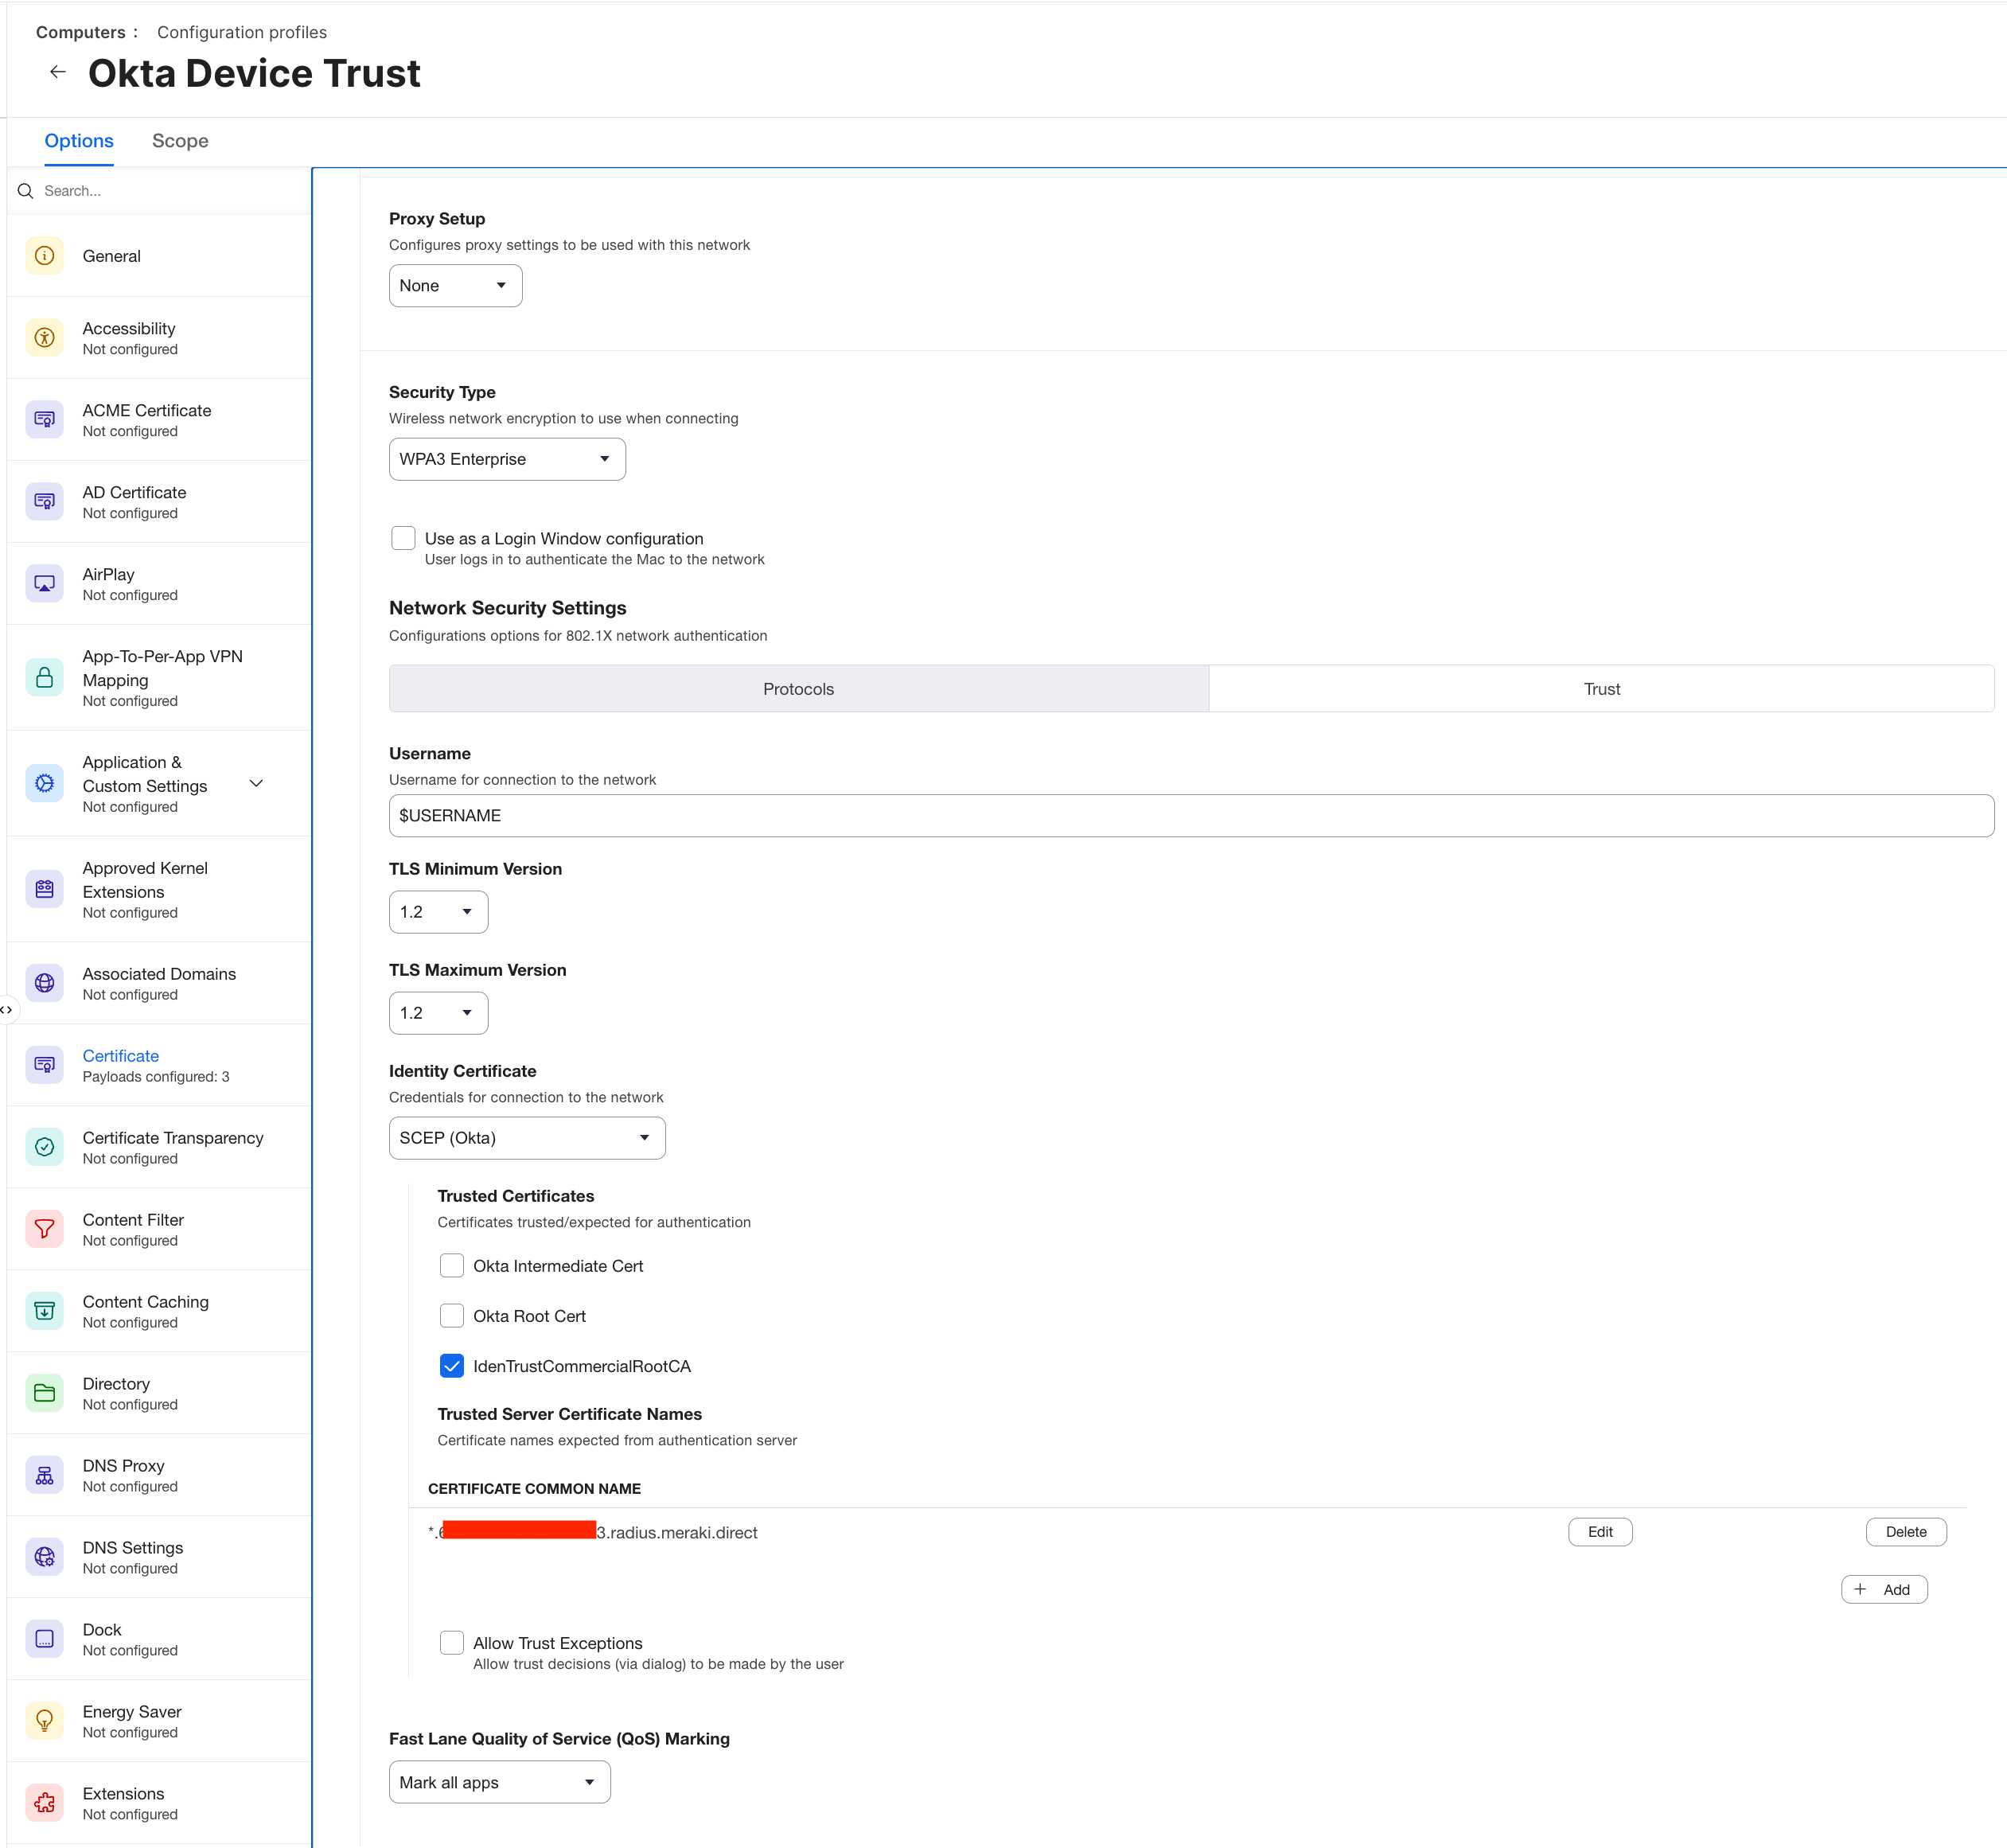
Leaving Allow Trust Exceptions unchecked is deliberate. With it enabled, a user could be prompted to accept an unexpected server certificate and click through it, which defeats the point of pinning the name in the first place.
Save the profile and scope it to a pilot group.
Part 4: Configure Intune
Before any of this, get Device Trust working in Intune first. Okta’s documentation covers the whole setup, including the SCEP connector and the certificate profile that issues the client identity certificate:
Once Device Trust is live and devices are receiving their SCEP certificate from Okta, pick up here.
What You’re Deploying
Four profiles, all under Devices › Configuration:
| Profile | Type | Certificate | Store |
|---|---|---|---|
| Company Okta Root Certificate | Trusted certificate | company-okta-root.cer | Root |
| Company Okta Intermediate Cert | Trusted certificate | company-okta-intermediate.cer | Intermediate |
| Meraki Local Auth Root Certificate | Trusted certificate | IdenTrust-Commercial-Root-CA.cer | Root |
| Company Wi-Fi | Wi-Fi | — | — |
The first two establish the chain for the client’s own identity certificate. The third is what the client uses to validate the Meraki RADIUS server, it’s the IdenTrust root you converted in Part 1, named here for the job it does rather than for its issuer.
Deploy the Okta Root Certificate
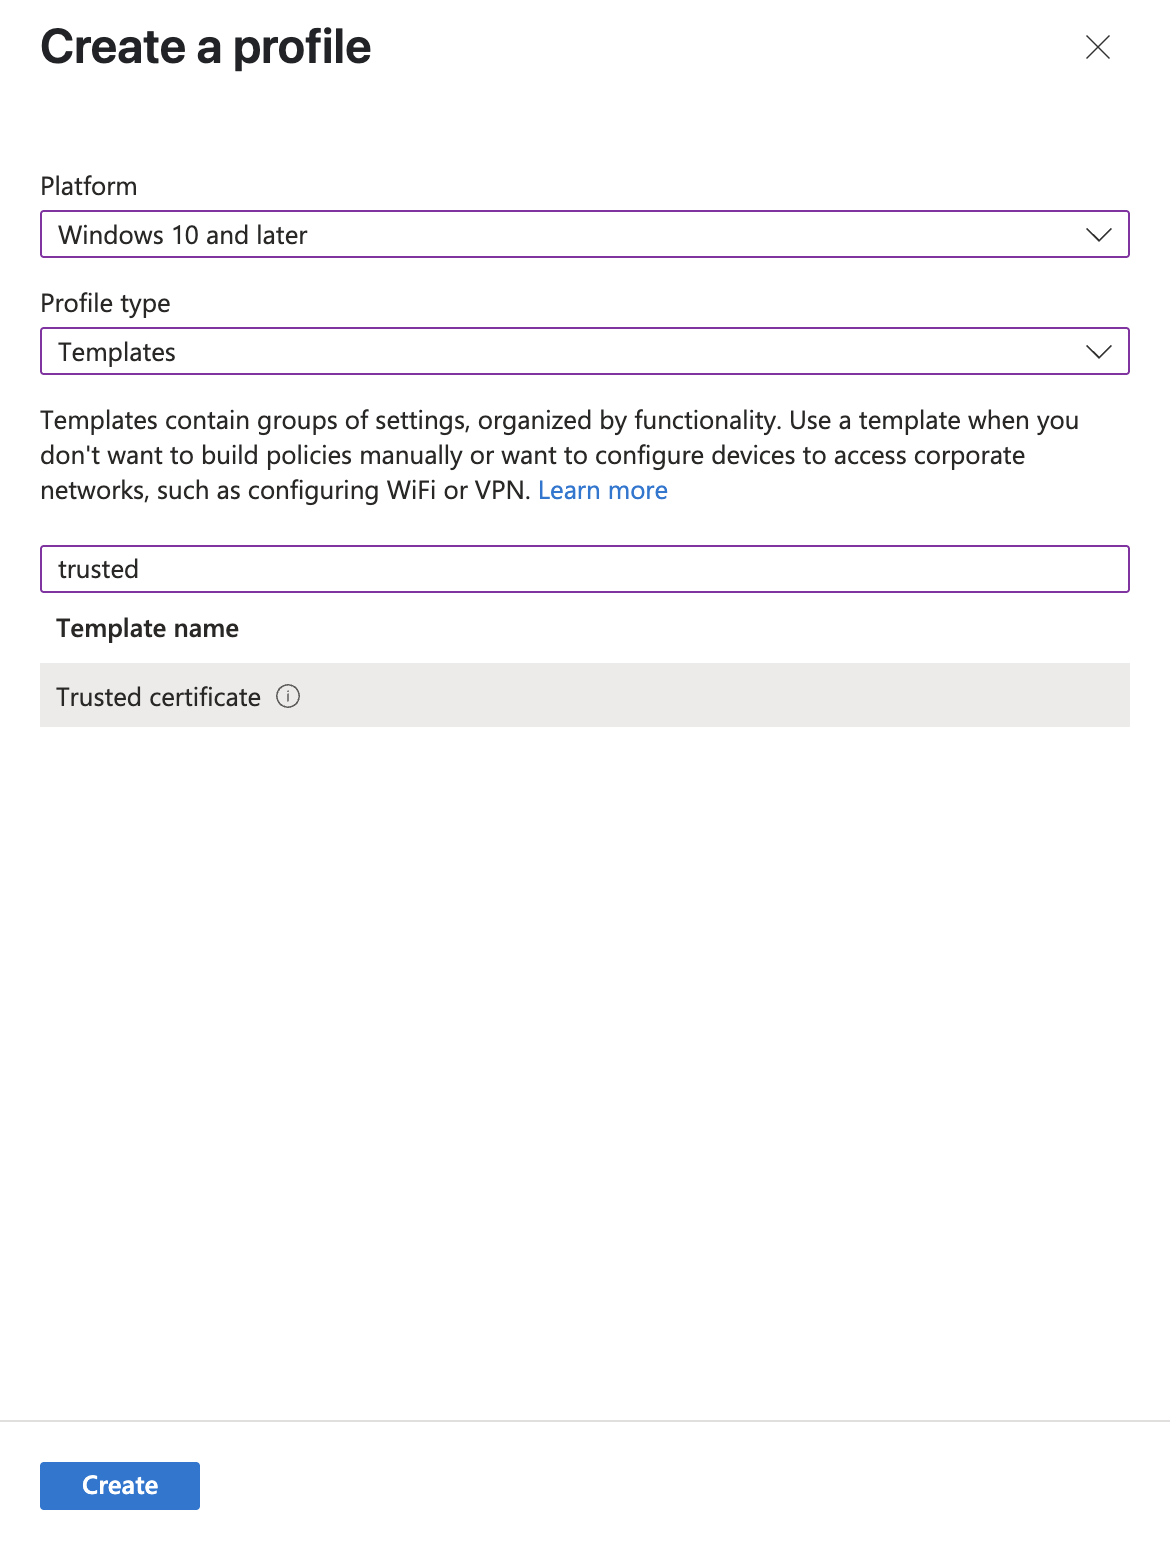
Go to Devices › Configuration › Create › New Policy. Set Platform to Windows 10 and later and Profile type to Templates, then search the template list for trusted and pick Trusted certificate.
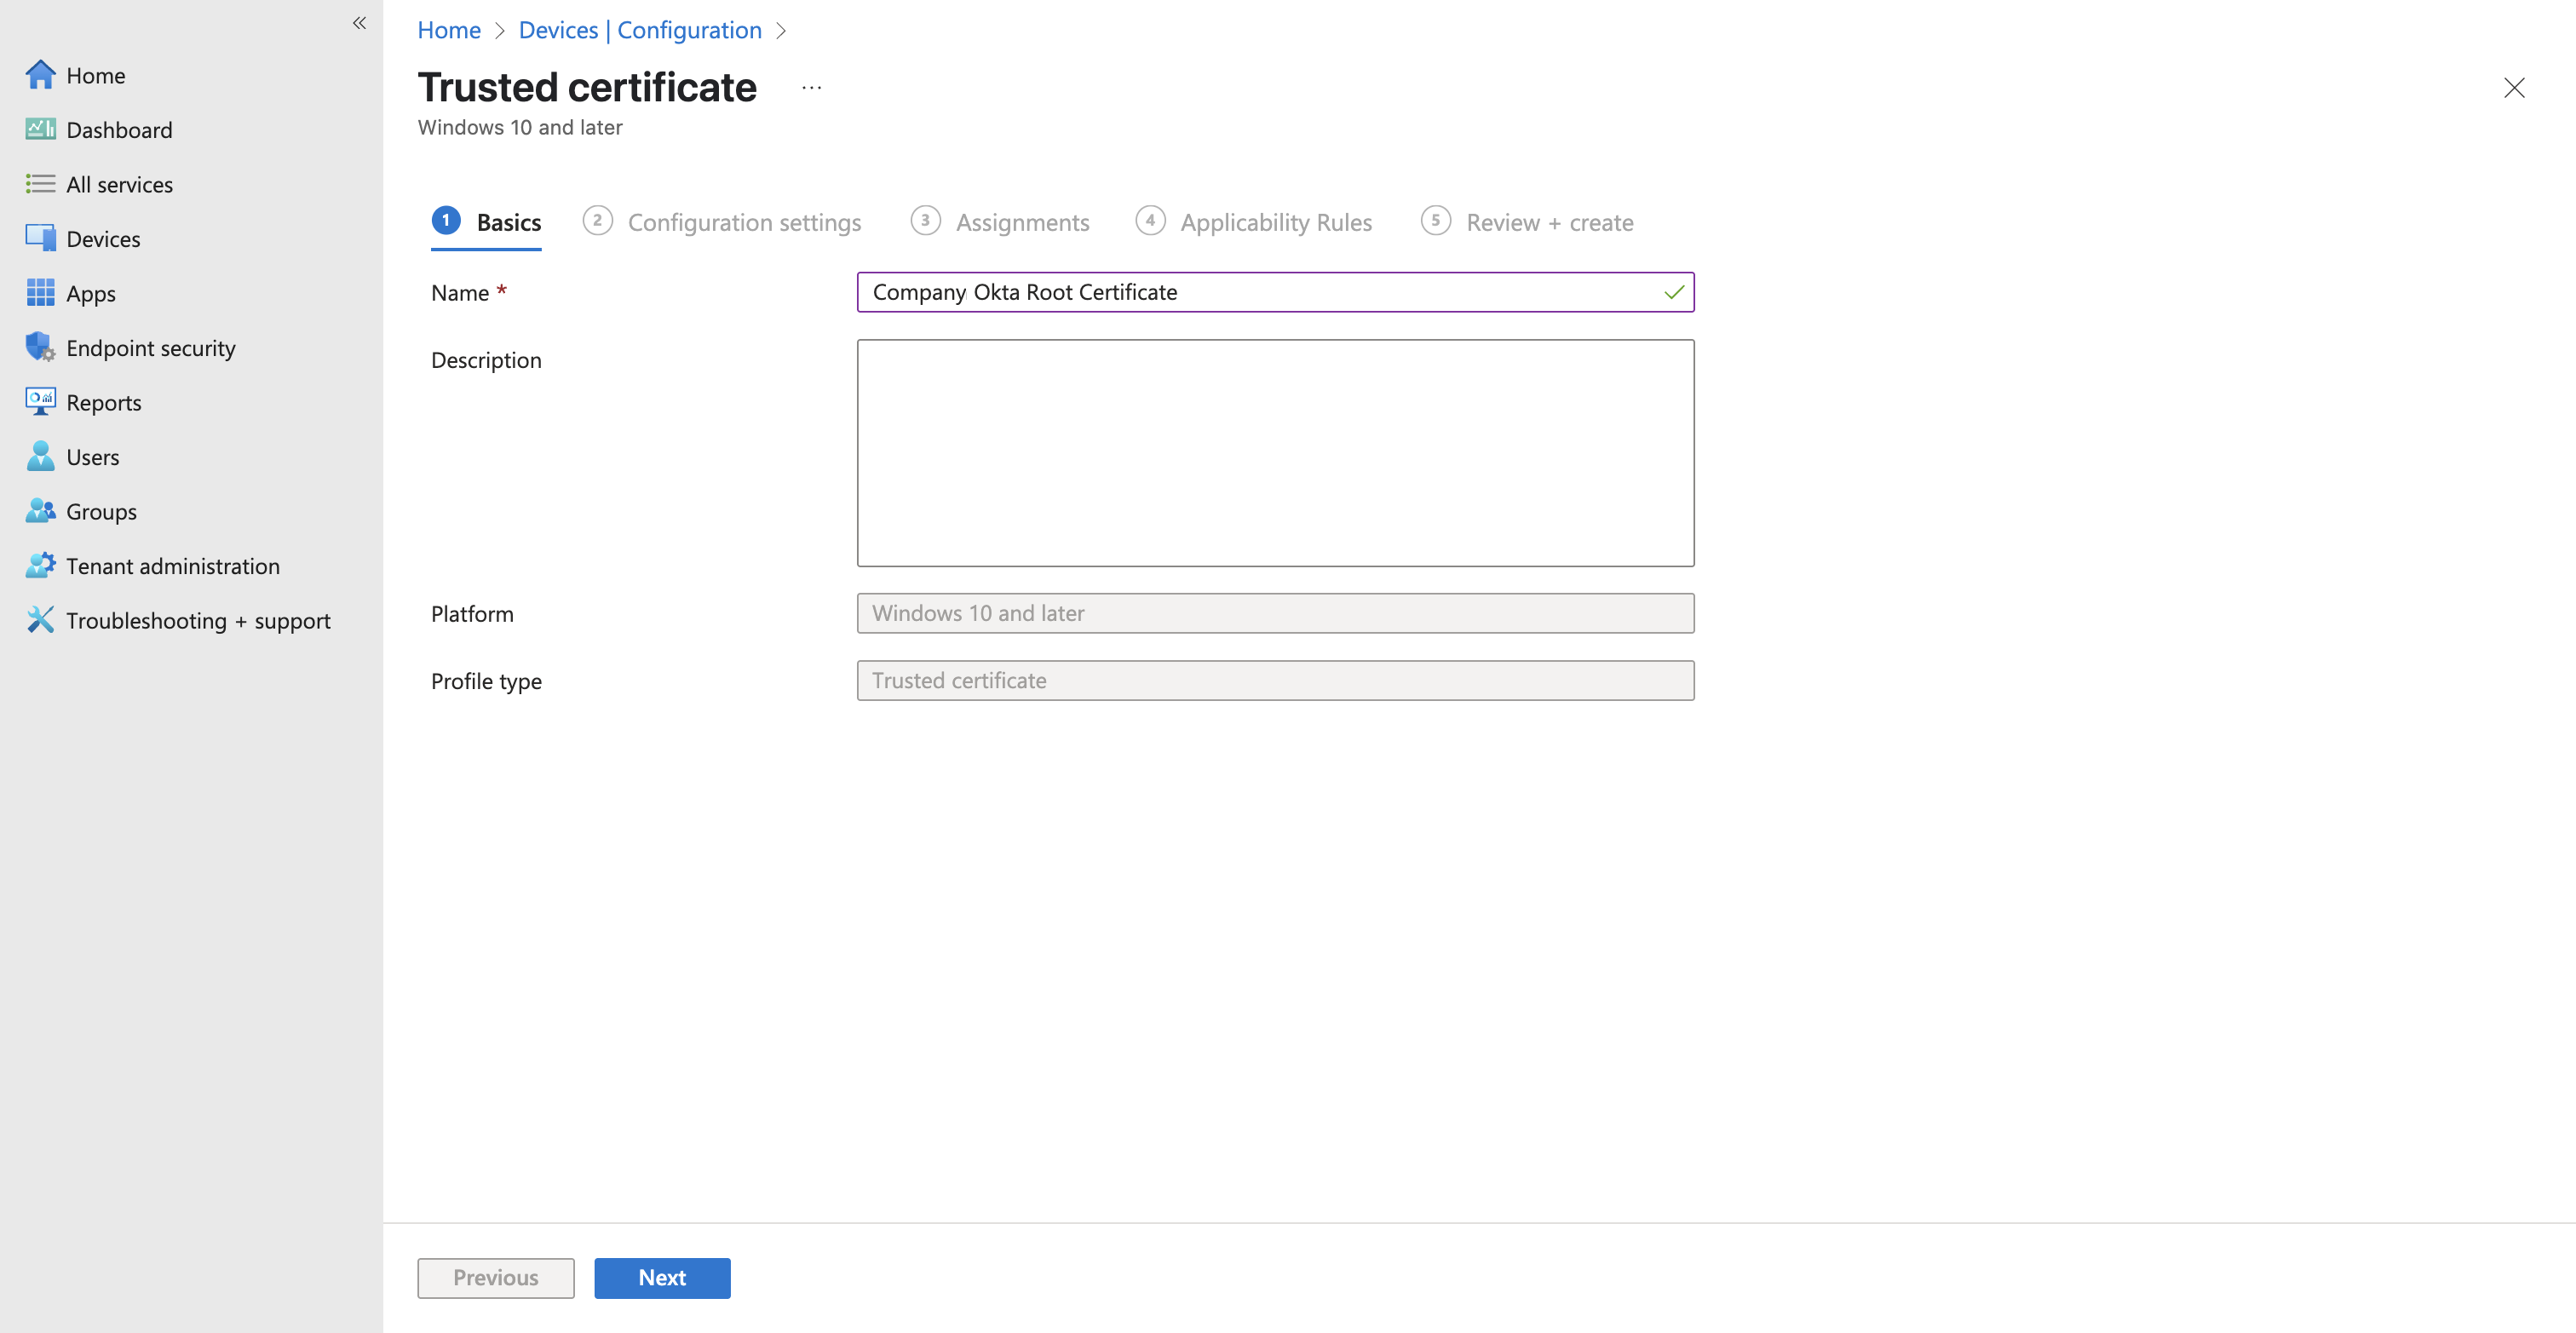
On Basics, name it something you’ll recognize in a list of thirty policies, Company Okta Root Certificate works.
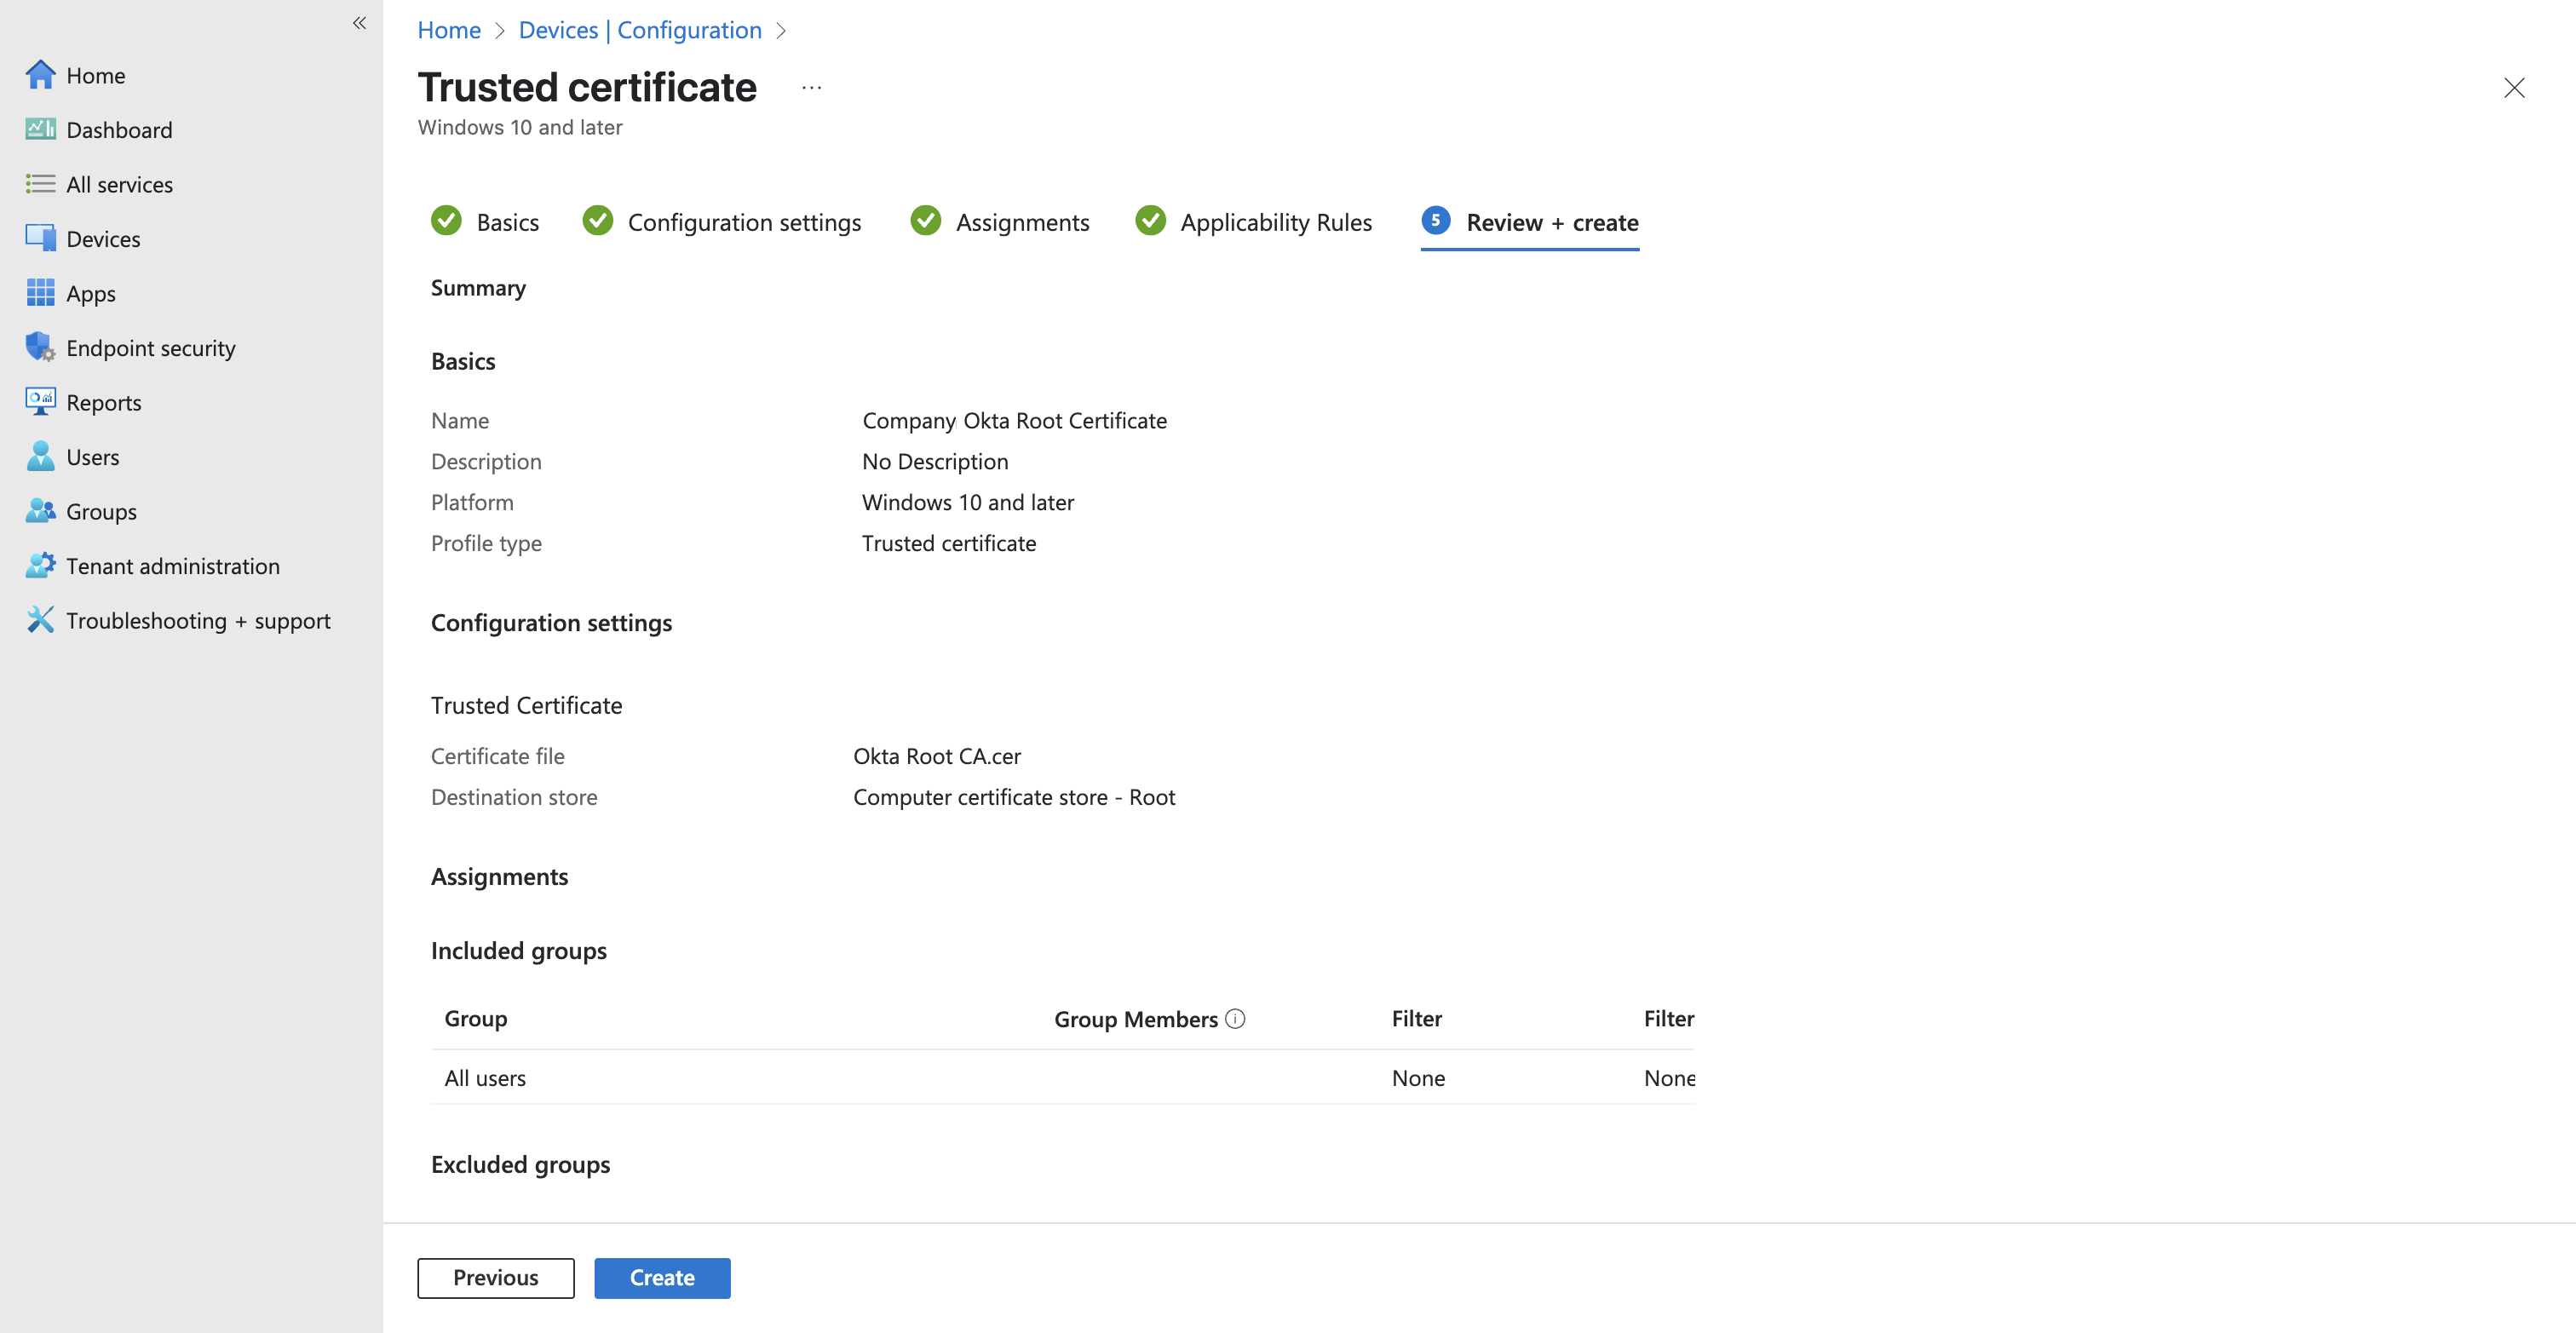
On Configuration settings, upload company-okta-root.cer and set Destination store to Computer certificate store – Root.
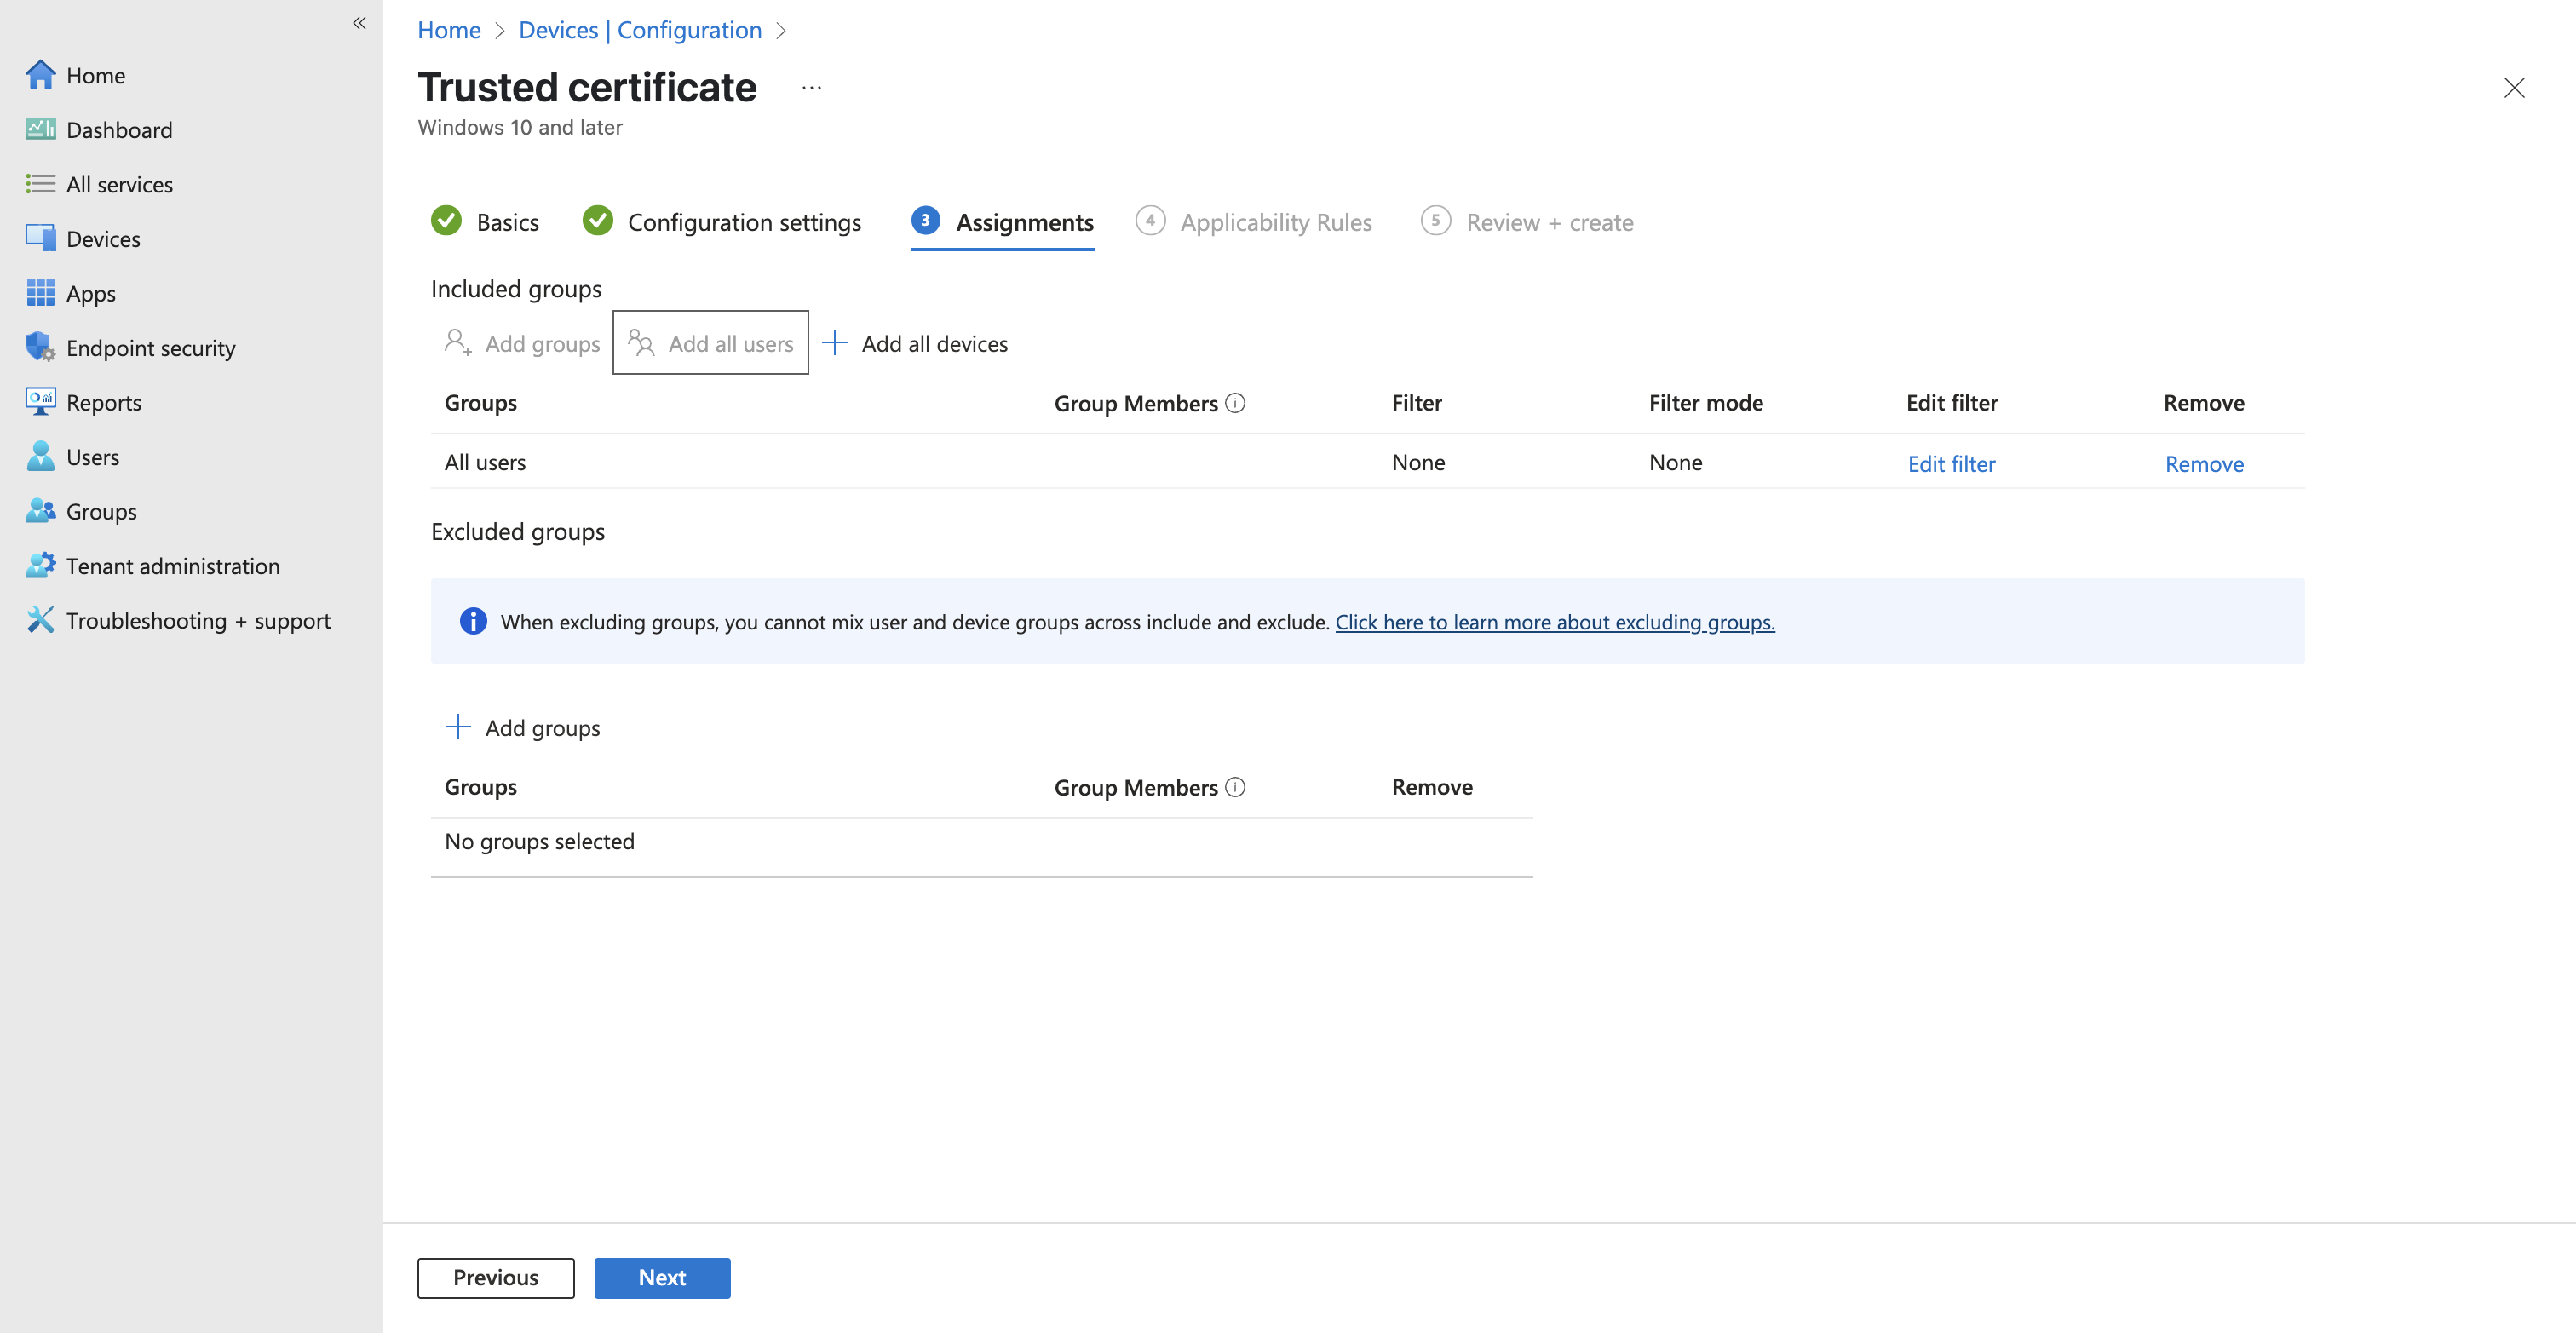
On Assignments, use Add all users. Skip Applicability Rules entirely, there’s nothing to scope here, since the certificate is harmless on any Windows device.
Review and create.
Deploy the Okta Intermediate Certificate
Same flow, one setting different. Create another Trusted certificate profile, name it Company Okta Intermediate Cert, upload company-okta-intermediate.cer, and set Destination store to Computer certificate store – Intermediate.
This is the easy one to get wrong. An intermediate CA dropped into the Root store will often appear to work and Windows will chain through it, but you’ve just told the machine to trust that CA as a root, which is not what you meant. Put it in Intermediate.
Assign to all users, review, create.
Deploy the IdenTrust Root for Server Validation
One more Trusted certificate profile. Name it for its purpose: Meraki Local Auth Root Certificate and upload IdenTrust-Commercial-Root-CA.cer, and set Destination store to Computer certificate store – Root.
Assign to all users, review, create.
Build the Wi-Fi Profile
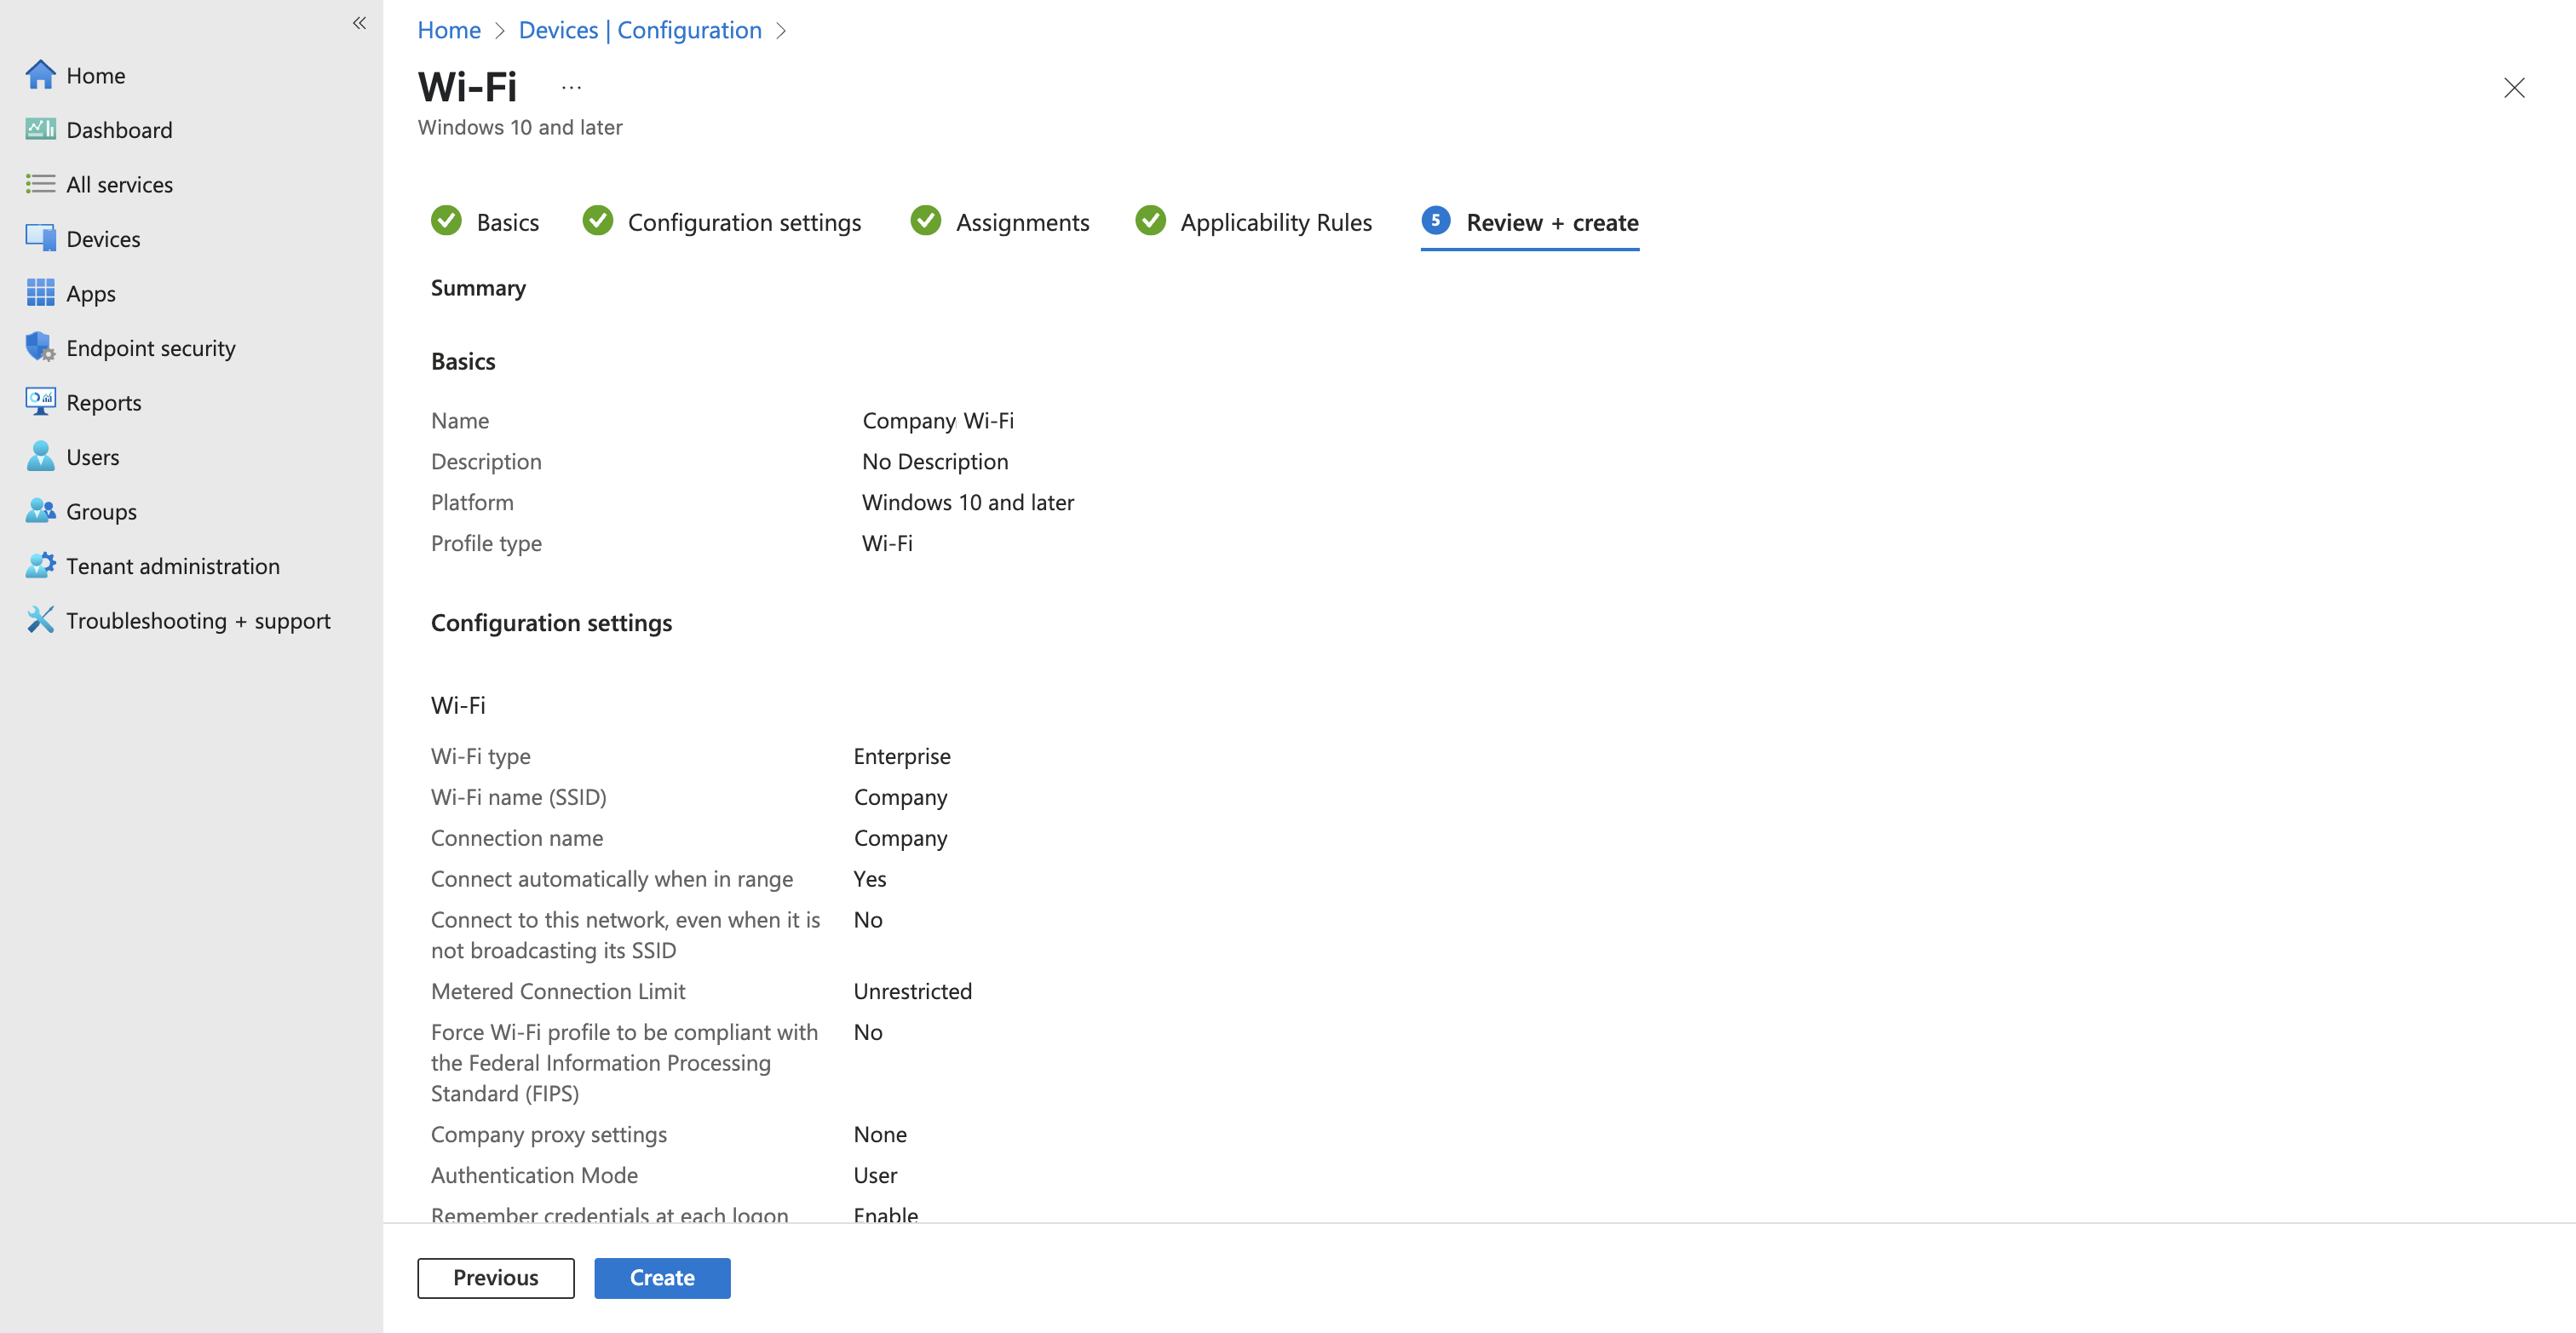
Create one more profile: Windows 10 and later → Templates → Wi-Fi. Name it Company Wi-Fi.
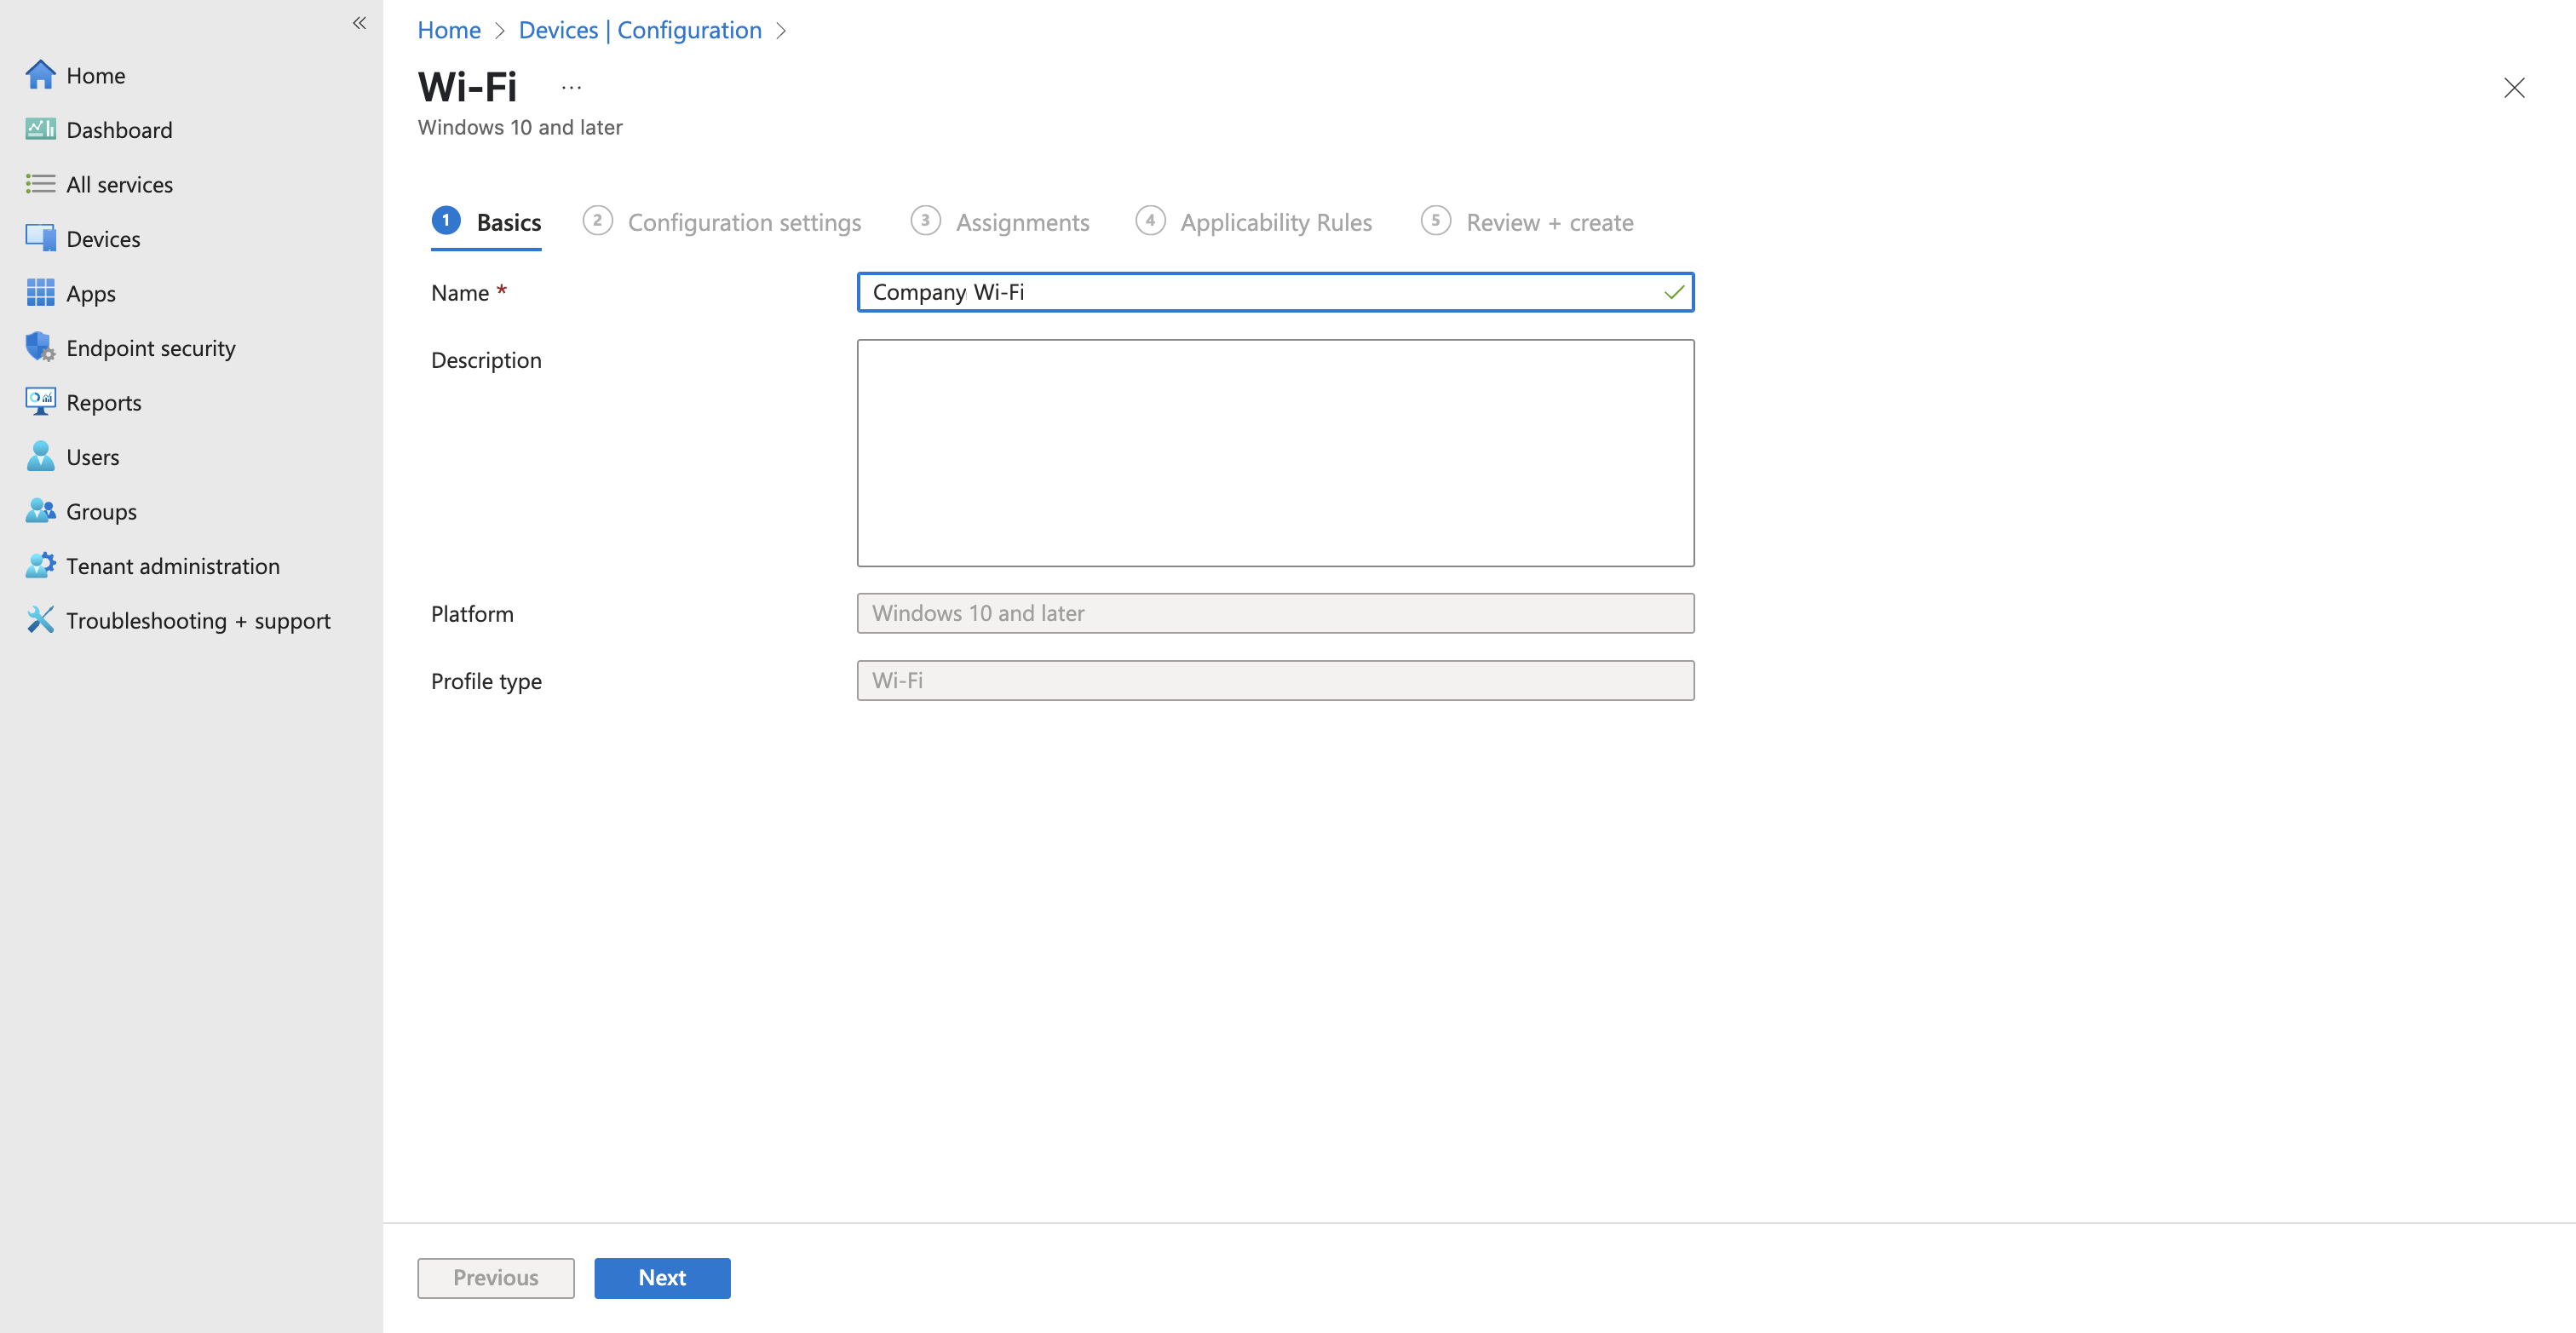
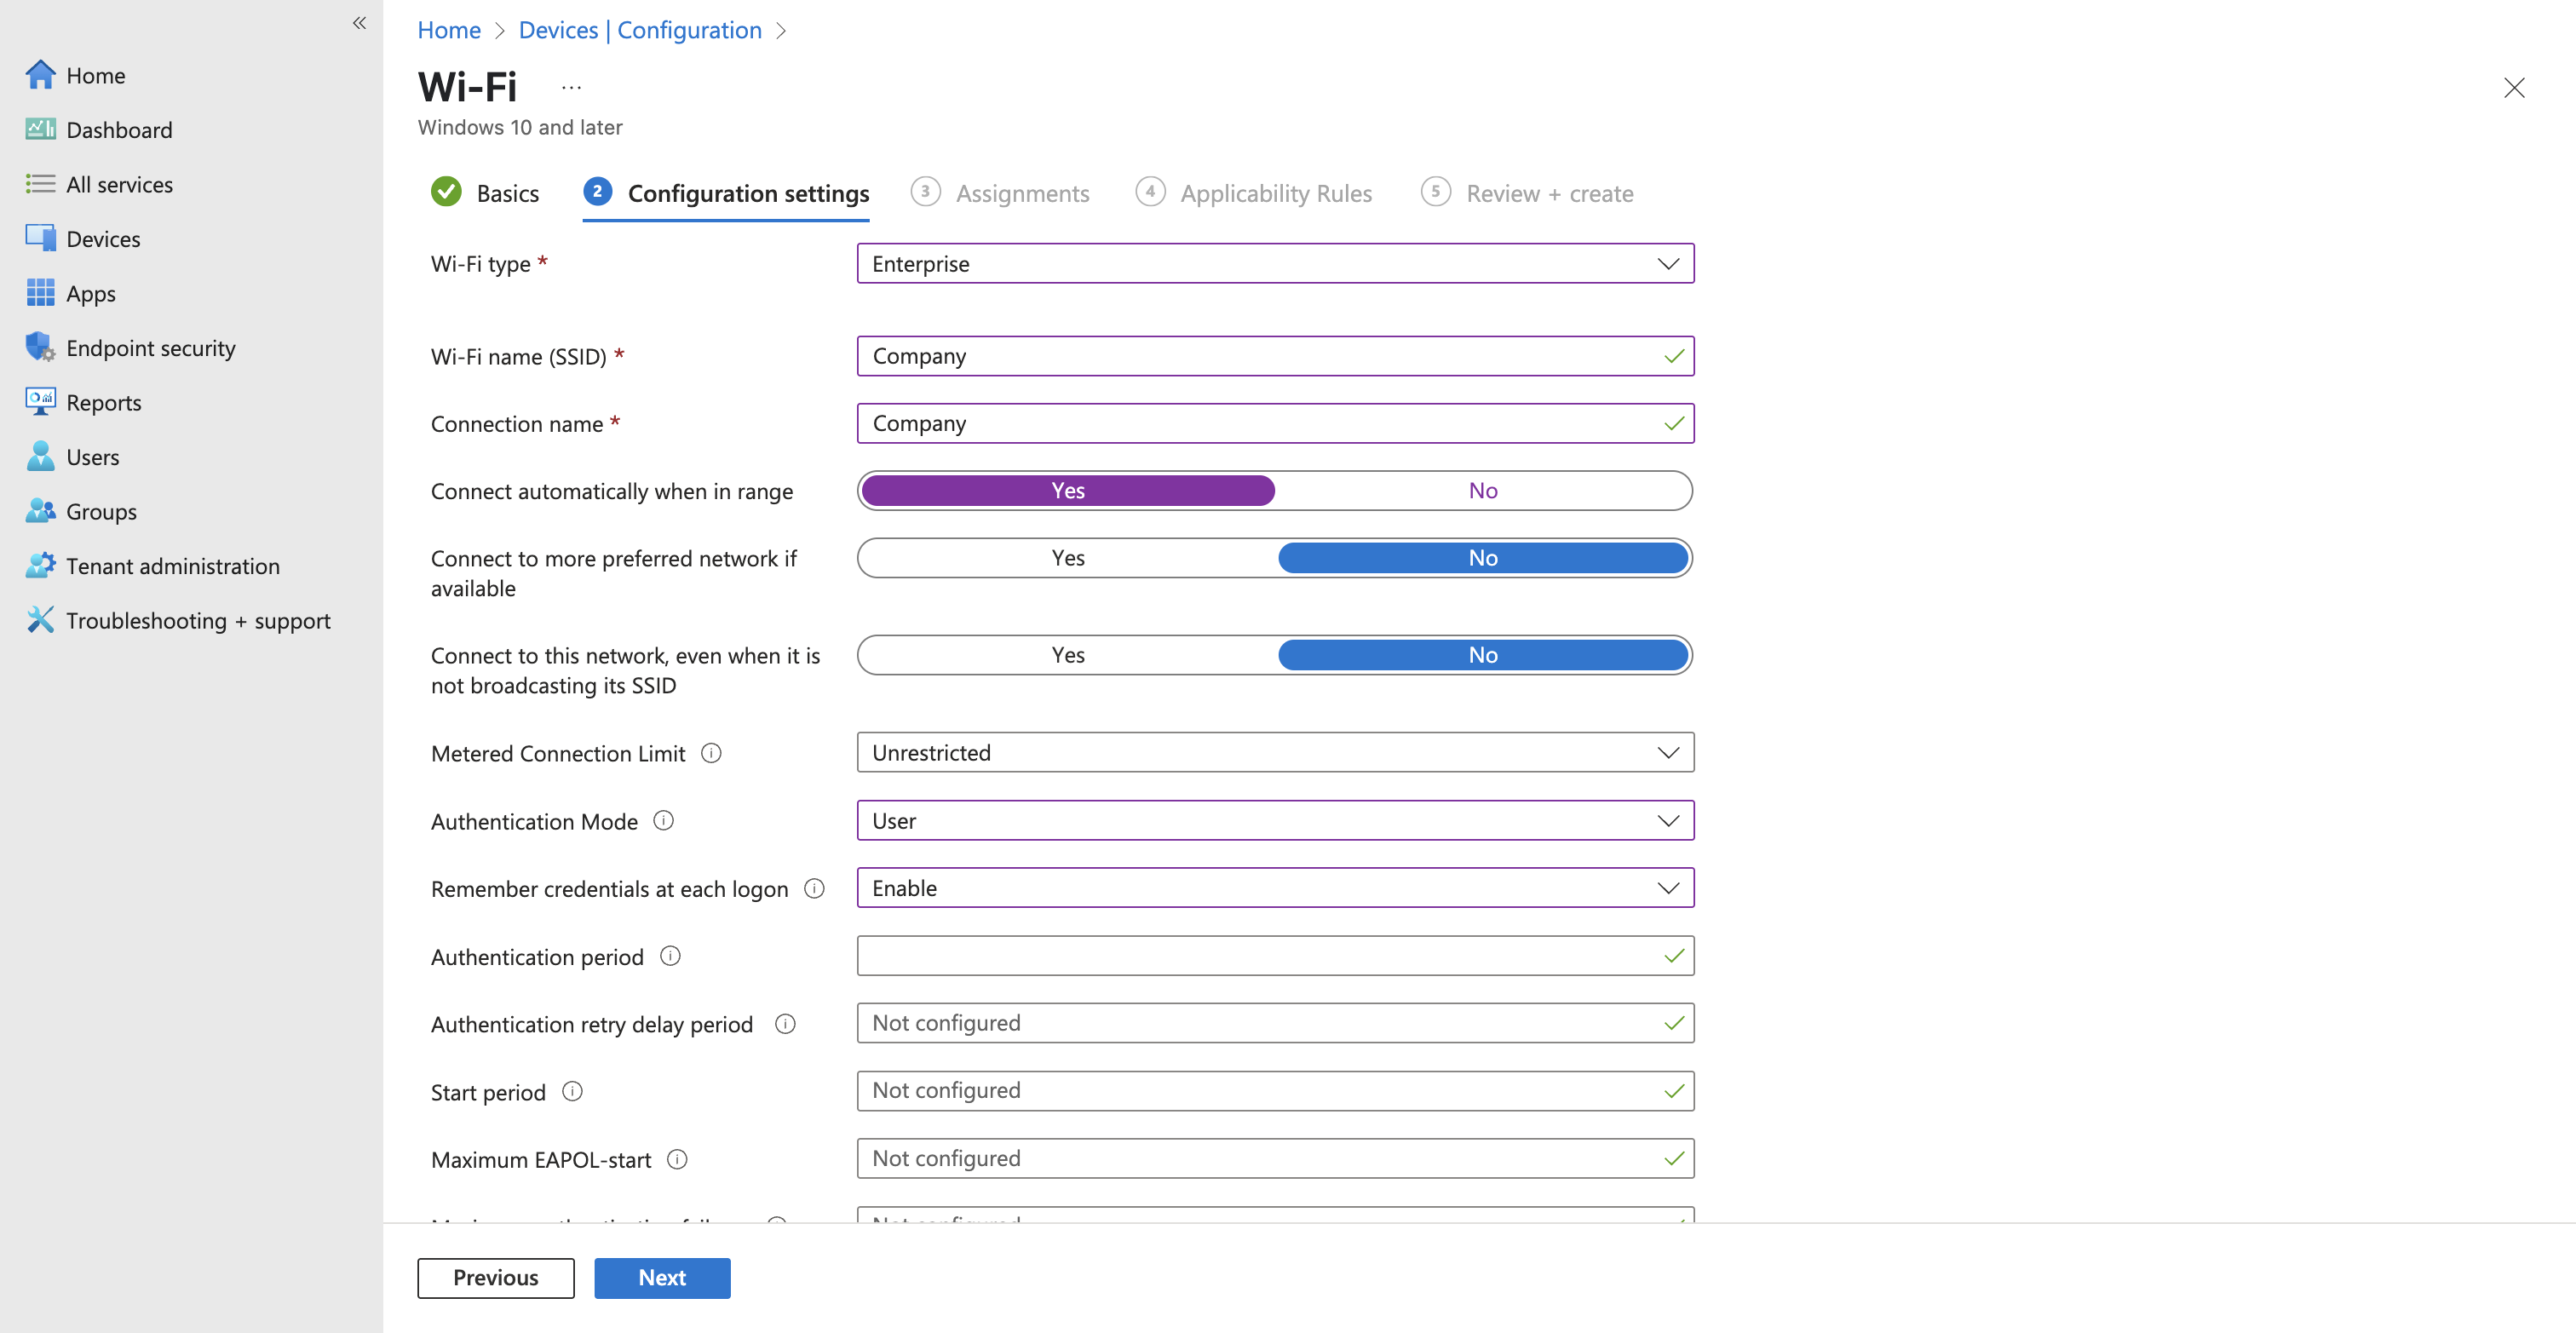
On Configuration settings:
| Setting | Value |
|---|---|
| Wi-Fi type | Enterprise |
| Wi-Fi name (SSID) | your Meraki SSID |
| Connection name | same as SSID |
| Connect automatically when in range | Yes |
| Connect to more preferred network if available | No |
| Connect to this network, even when it is not broadcasting its SSID | No |
| Metered Connection Limit | Unrestricted |
| Authentication Mode | User |
| Remember credentials at each logon | Enable |
| Authentication period / retry delay / start period / EAPOL-start | Not configured |
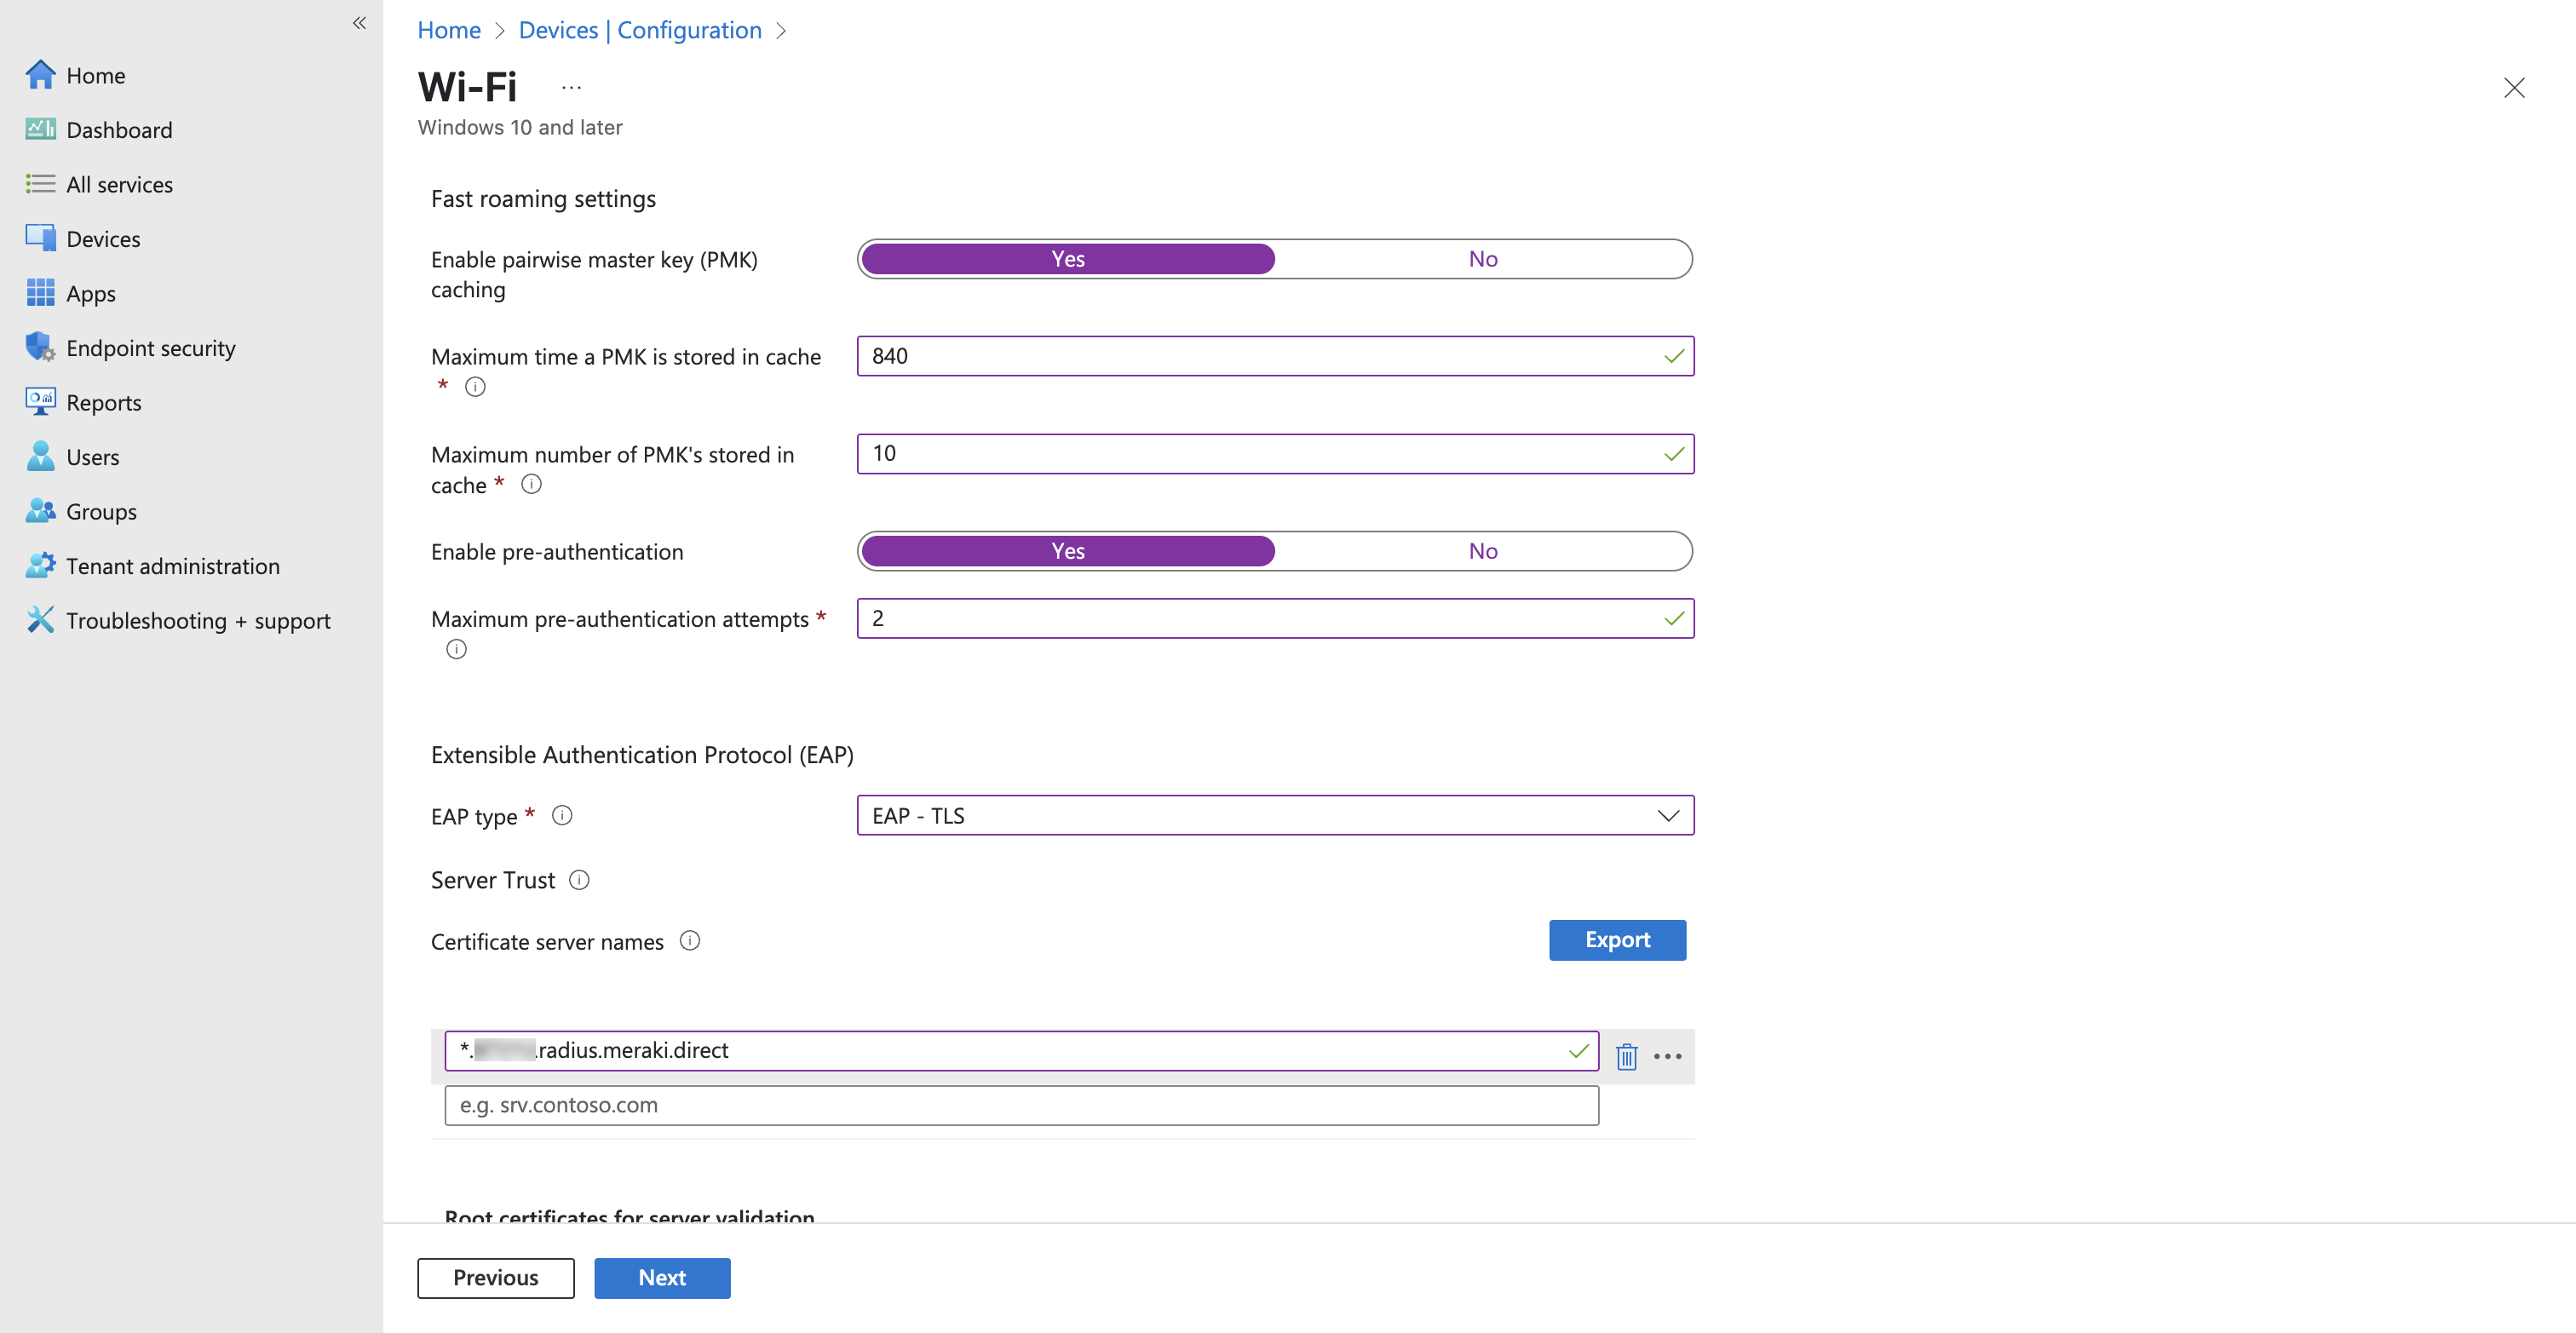
Scroll to Fast roaming settings:
| Setting | Value |
|---|---|
| Enable pairwise master key (PMK) caching | Yes |
| Maximum time a PMK is stored in cache | 840 |
| Maximum number of PMKs stored in cache | 10 |
| Enable pre-authentication | Yes |
| Maximum pre-authentication attempts | 2 |
PMK caching is what keeps a full TLS handshake from firing on every roam between access points. On a certificate-based network the handshake is more expensive than PSK, so this matters more here than it would on a passphrase SSID.
Then under Extensible Authentication Protocol (EAP), set EAP type to EAP – TLS.
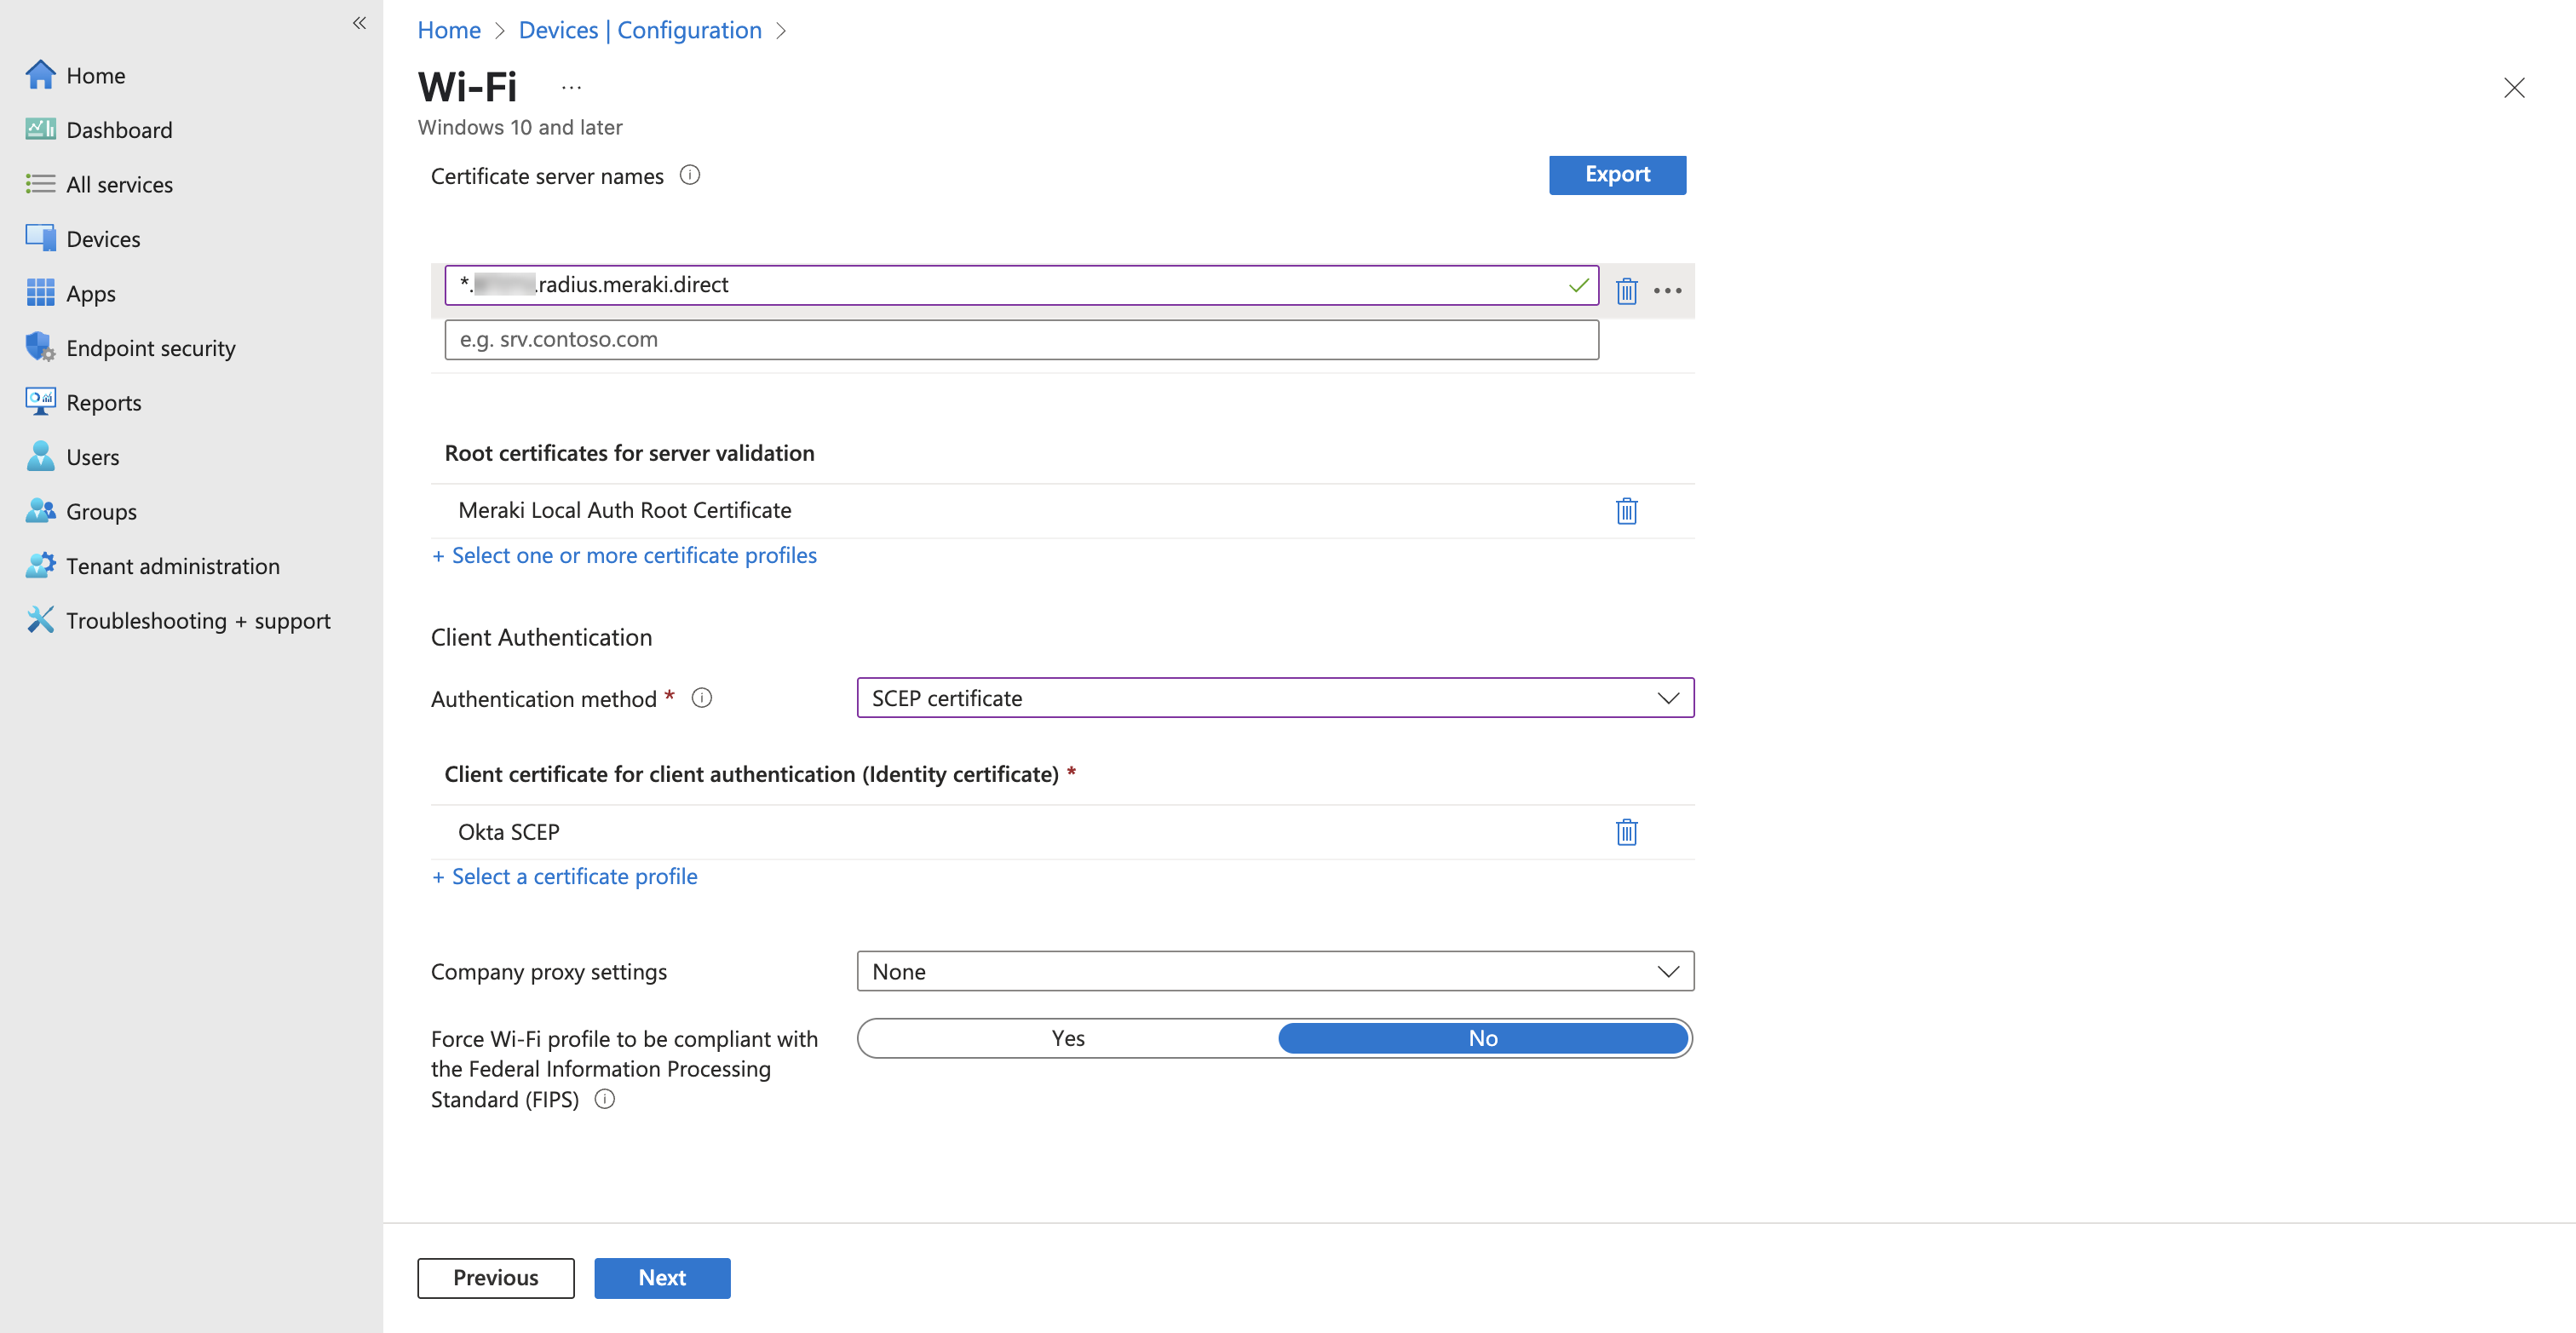
Server Trust and Client Authentication
This is the part that mirrors the Jamf Trust tab, and it’s where the Meraki values you copied in Part 2 come in.
Under Server Trust:
- Certificate server names: paste the Current organization value from the Meraki RADIUS Client Trust settings:
*.<org-id>.radius.meraki.direct - Root certificates for server validation: click Select one or more certificate profiles and pick the Meraki Local Auth Root Certificate profile you created above
Under Client Authentication:
- Authentication method: SCEP certificate
- Client certificate for client authentication (Identity certificate): select your Okta SCEP certificate profile
- Company proxy settings: None
- Force Wi-Fi profile to be compliant with FIPS: No
Two things worth calling out. First, the Certificate server names field is the pin and without it, the client will accept any server presenting a certificate that chains to IdenTrust, which is a very large set of servers. Use the organization-scoped value, not the network-scoped one, for the same reason as in the Jamf profile.
Second, Authentication Mode: User combined with a SCEP identity certificate means the client presents the user’s certificate. If your Device Trust setup issues a device certificate instead, set Authentication Mode to Machine and point the identity certificate at the corresponding profile, otherwise the client will have nothing to present at logon.
Assign to all users, review, and create.
Verifying on Windows
On a target machine, run certlm.msc and confirm all three certificates landed in the right stores: the Okta root and IdenTrust root under Trusted Root Certification Authorities, and the Okta intermediate under Intermediate Certification Authorities. Then check that the Okta SCEP client certificate is present under Personal.
If the client certificate is missing, the problem is upstream in Device Trust, not in anything above.
Once the certificates are in place, the SSID should appear and connect without a credential prompt. From an elevated prompt, netsh wlan show interfaces will confirm the authentication method in use.
Troubleshooting
Client won’t associate at all. Check that the profile actually installed, and that all three certificate payloads are present. A missing root in the chain is the most common cause.
Client associates, then immediately drops. Usually a name mismatch. Compare the Trusted Server Certificate Name in Jamf against the Meraki Current organization value character for character and it’s easy to grab the network value instead of the org value.
“Could not authenticate” with no useful detail. Verify the Identity Certificate in the Network payload is set to the SCEP (Okta) payload and not left at None. Also confirm the device actually received its SCEP certificate from Okta; if Device Trust never provisioned, there’s no client identity to present.
Certificate expired. Note the expiration dates when you upload certs, Okta’s intermediate and root have different lifespans, and the IdenTrust root has its own. Put the earliest one in your calendar.
Why This Approach
The usual path to certificate-based Wi-Fi is a RADIUS server: either self-hosted NPS/FreeRADIUS with the operational burden that implies, or a cloud RADIUS service with per-device pricing. This setup uses infrastructure you already pay for: Okta issues the certificates, Jamf delivers them, and Meraki validates them locally on the access point. No new servers, no new licenses, and no shared PSK sitting in a password manager waiting to leak.

