Certificate-Based Wi-Fi Auth with Okta Device Trust and Meraki

Overview

Okta Device Trust issues a certificate to enrolled devices to prove they’re managed by your MDM. That same certificate can authenticate the device to a Meraki wireless network over 802.1X, giving you certificate-based Wi-Fi with no RADIUS server to stand up and no per-device licensing to buy.

This walkthrough covers pulling the Okta certificate chain, configuring a Meraki SSID for Enterprise with Local Auth, and then building the client-side profile that ties them together in Jamf for macOS, or Intune for Windows. The Meraki configuration is the same either way, so pick whichever MDM section applies to you.

Prerequisites

  • Okta Identity Engine with Device Trust configured per Okta’s documentation
  • Jamf Pro with access to Configuration Profiles (macOS), or Microsoft Intune with Okta Device Trust configured (Windows)
  • Meraki MR access points
  • Admin access to all three consoles

How It Works

When a Mac enrolls in Jamf and Device Trust is active, Okta provisions a certificate to the device over SCEP. Meraki’s local authentication validates that certificate against the Okta intermediate CA you upload to the dashboard using an internal RADIUS server, no external RADIUS backend involved. On the client side, the Jamf profile pins the Meraki RADIUS server’s certificate common name, so the Mac only trusts the intended authentication server.


Part 1: Getting the Certificates

You need three certificates: the Okta intermediate, the Okta root, and the IdenTrust Commercial Root CA that anchors Okta’s chain.

The Okta Intermediate Certificate

Navigate to your Okta Admin Console: https://<your-org>-admin.okta.com/admin/access/device-management#certificateAuthority

You’ll find the Okta CA listed under the Certificate authority tab, marked (For endpoint management), with its status and expiration date. Use the download action on the right to save it.
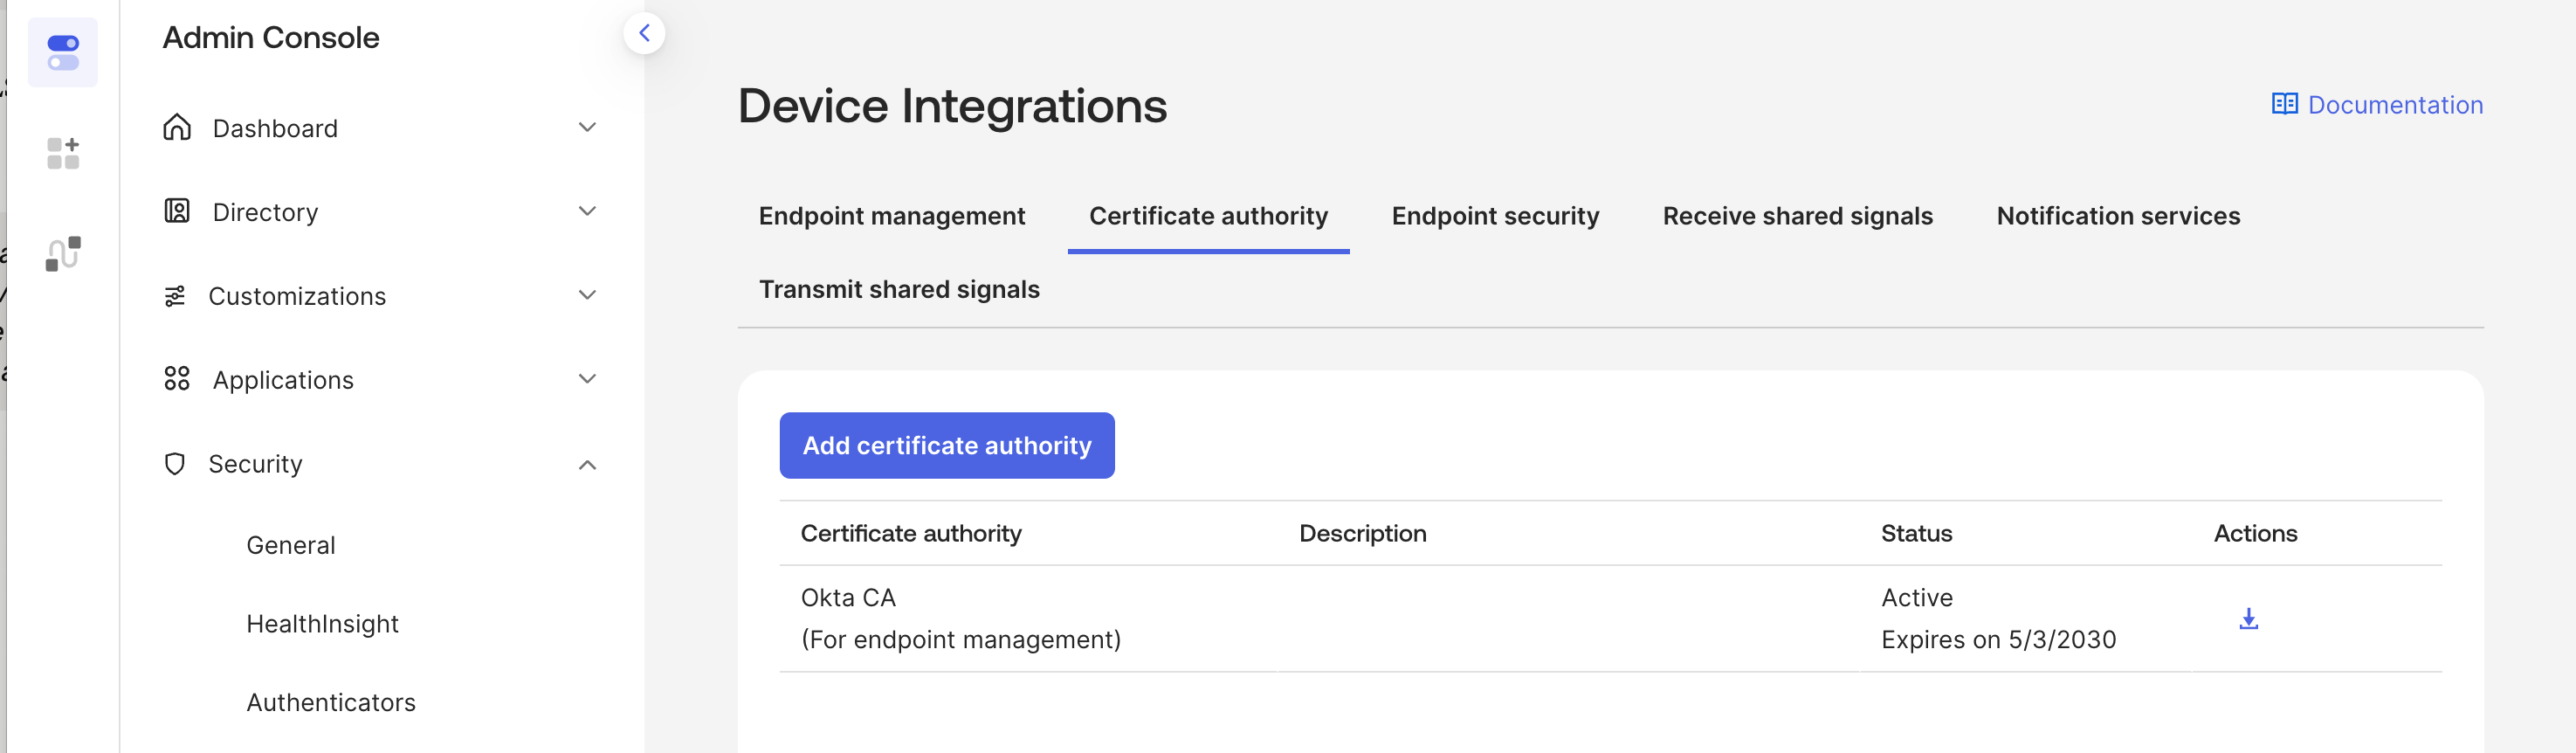
Okta Admin Console Device Integrations page, Certificate authority tab, showing the Okta CA with Active status and expiration date

Save it as company-okta-intermediate.cer. Note that despite the label, this is the intermediate CA, not the root.

The Okta Root Certificate

Hit the Okta API in your browser: https://<your-org>-admin.okta.com/api/v1/certificateAuthorities?type=ROOT

Look at the _links.cert.href value in the response, that’s the direct download link for the root certificate. You’ll need to change the base URL from company.okta.com to company-admin.okta.com
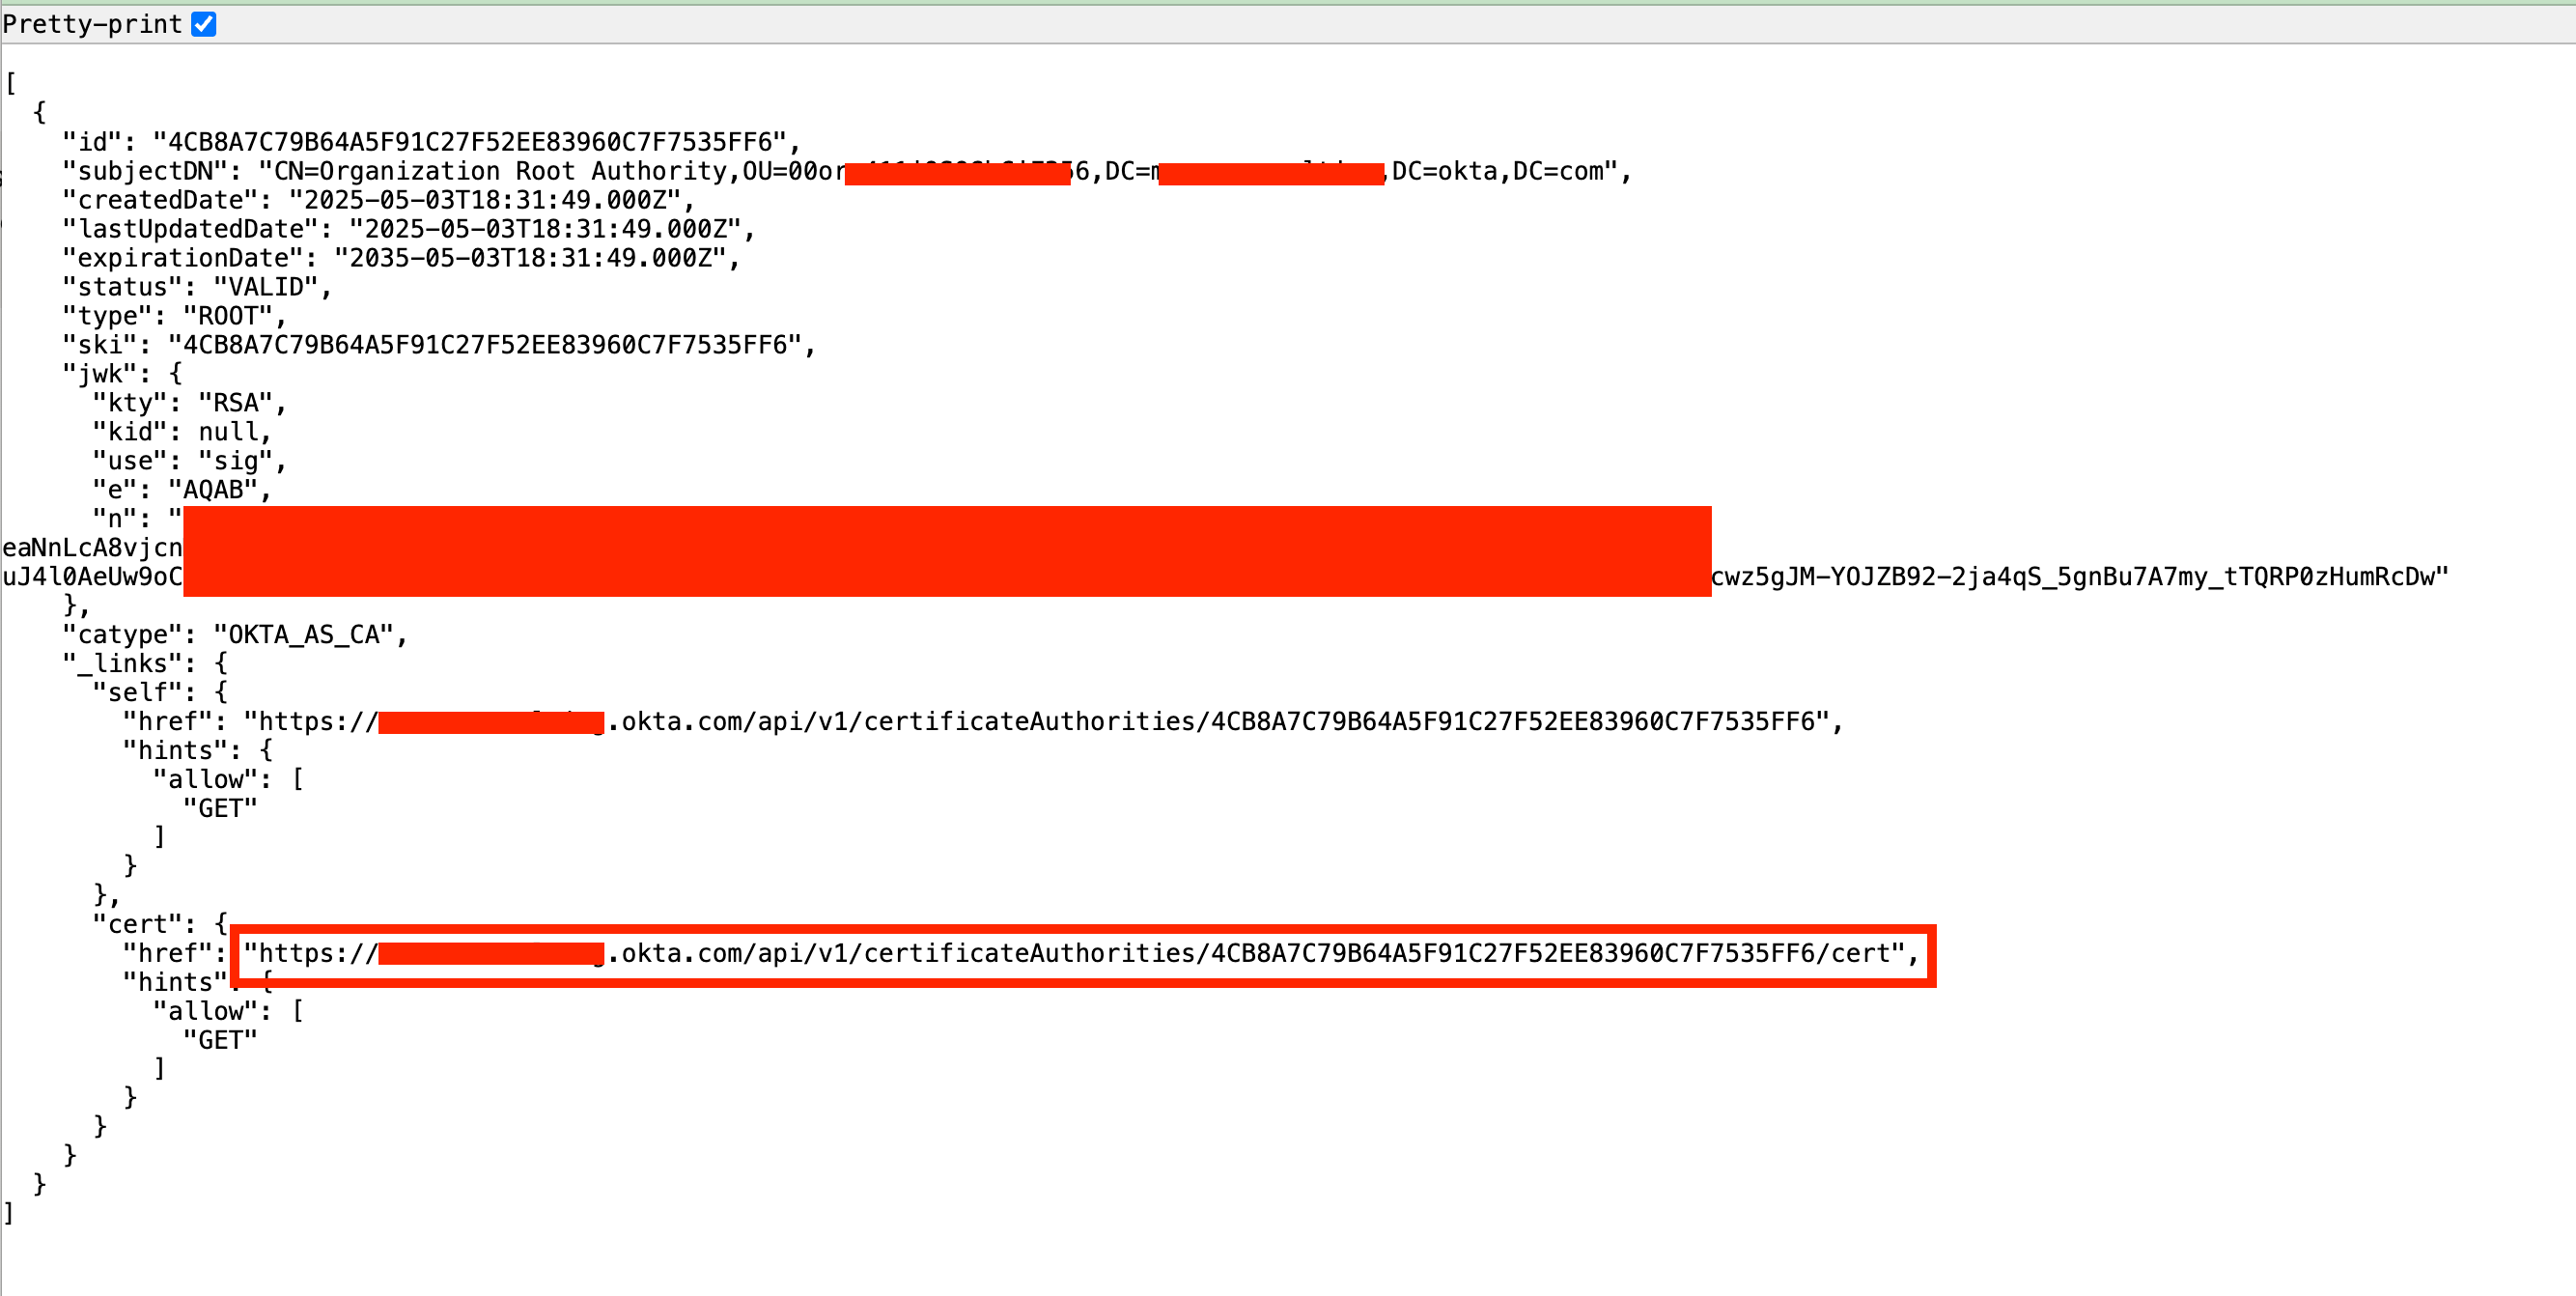
Okta certificate authorities API response in a browser, showing the root certificate download link

So in this example the final URL will be https://company-admin.com.com/api/v1/certificateAuthorities/4CB8A7C79B64A5F91C27F52EE83960C7F7535FF6/cert

Open that URL and save the result as company-okta-root.cer.

The IdenTrust Commercial Root CA

Download the bundle from IdenTrust:

https://www.identrust.com/sites/default/files/resources/IdenTrustCommercialRootCA_0.p7b

It arrives as PKCS#7, so convert it for Jamf Pro:

openssl pkcs7 -inform DER -print_certs \
-in ~/Downloads/IdenTrustCommercialRootCA_0.p7b \
-out ~/Downloads/IdenTrust-Commercial-Root-CA.cer

Part 2: Configuring Meraki Local Authentication

Enable Enterprise with Local Auth

Create or select your SSID, then go to its Access Control page and set Security to Enterprise withLocal Auth.

Configure it as follows:

  • Certificate authentication: Enabled
  • Password authentication: Disabled
  • Cache timeout: 86400 seconds
  • LDAP verification: Do not verify certificate with LDAP
  • OCSP verification: Do not verify certificate with OCSP
  • Client Certificate CA: upload company-okta-intermediate.cer
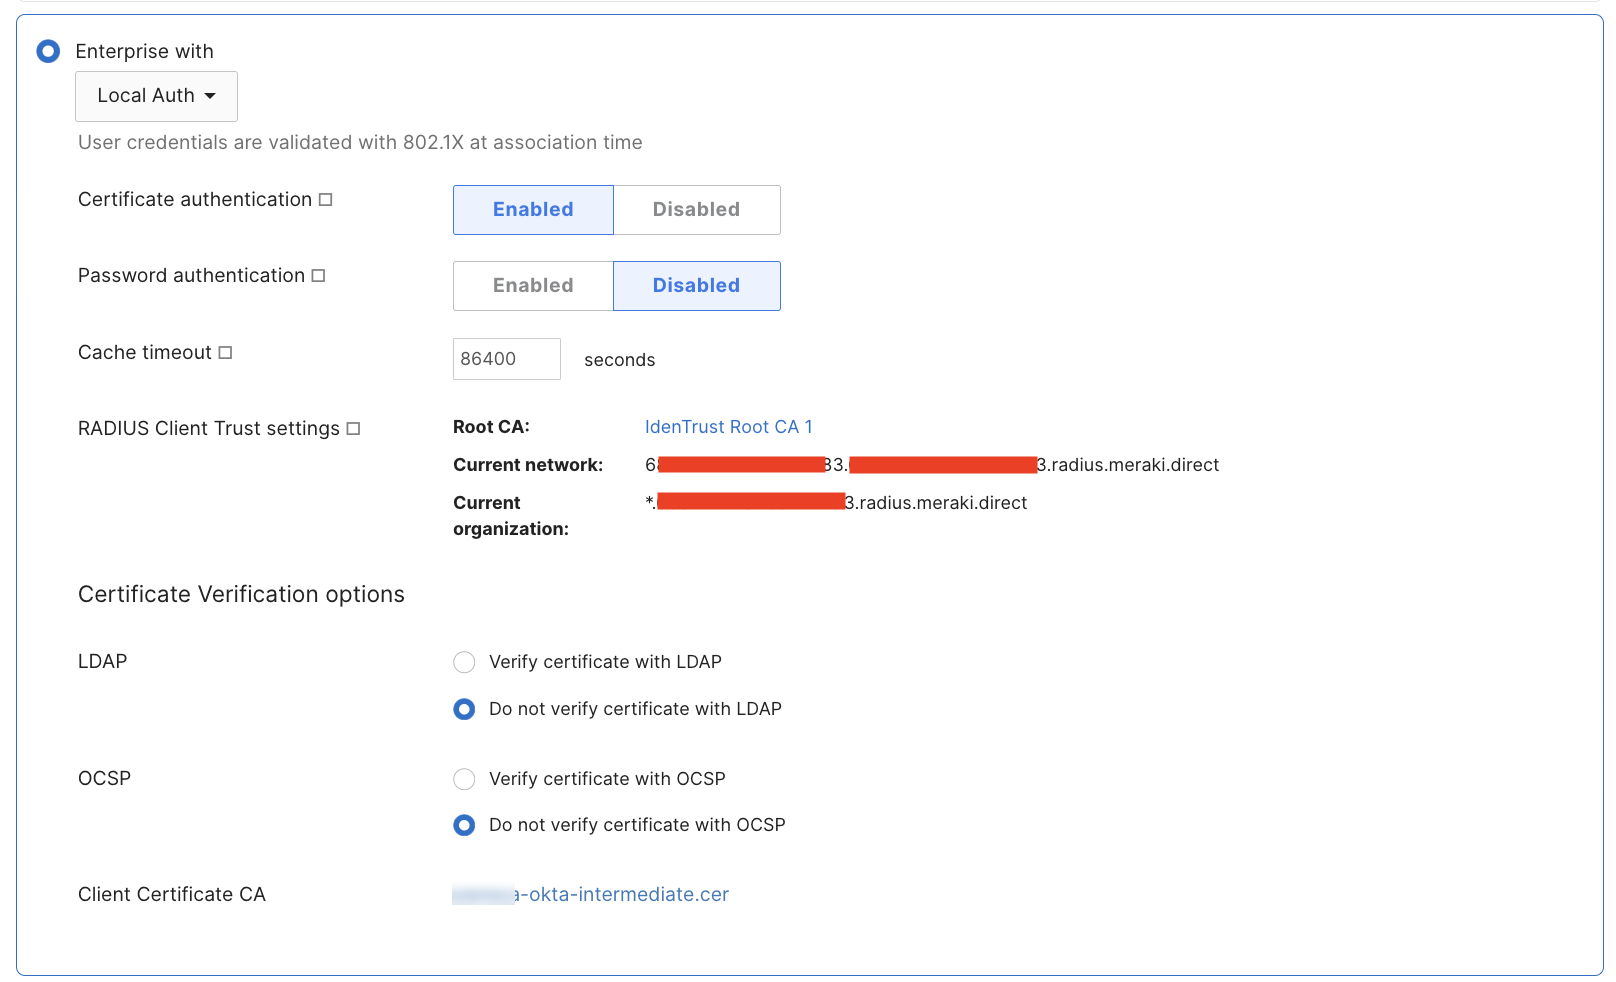
Meraki Access Control page set to Enterprise with Local Auth, certificate authentication enabled and password authentication disabled

Copy the RADIUS Client Trust Values

Copy the Current organization value in the RADIUS Client Trust settings section. Save this for later, you’ll paste it into Jamf as the trusted server certificate name. Using the organization value rather than the network value means the profile keeps working if you add the SSID to other networks in the same org.

Set WPA3

Still on the same page, set WPA encryption to WPA3 only. Related settings:

  • 802.11r: Enabled
  • 802.11w: Required (reject unsupported clients)
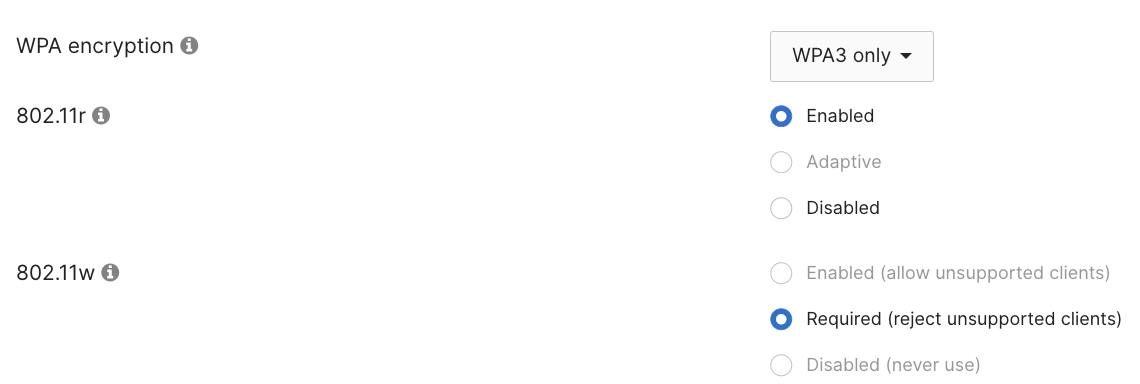
Meraki WPA encryption set to WPA3 only with 802.11r enabled and 802.11w required

WPA3 is not optional if you want 6 GHz. Wi-Fi 6E and Wi-Fi 7 access points will not bring up a 6 GHz radio on an SSID that permits WPA2. If you’re running WPA2/WPA3 mixed mode, you’re not using the 6 GHz band.


Part 3: Configure Jamf

Open Computers › Configuration Profiles and edit your existing Okta Device Trust profile.

Add the Certificate Payloads

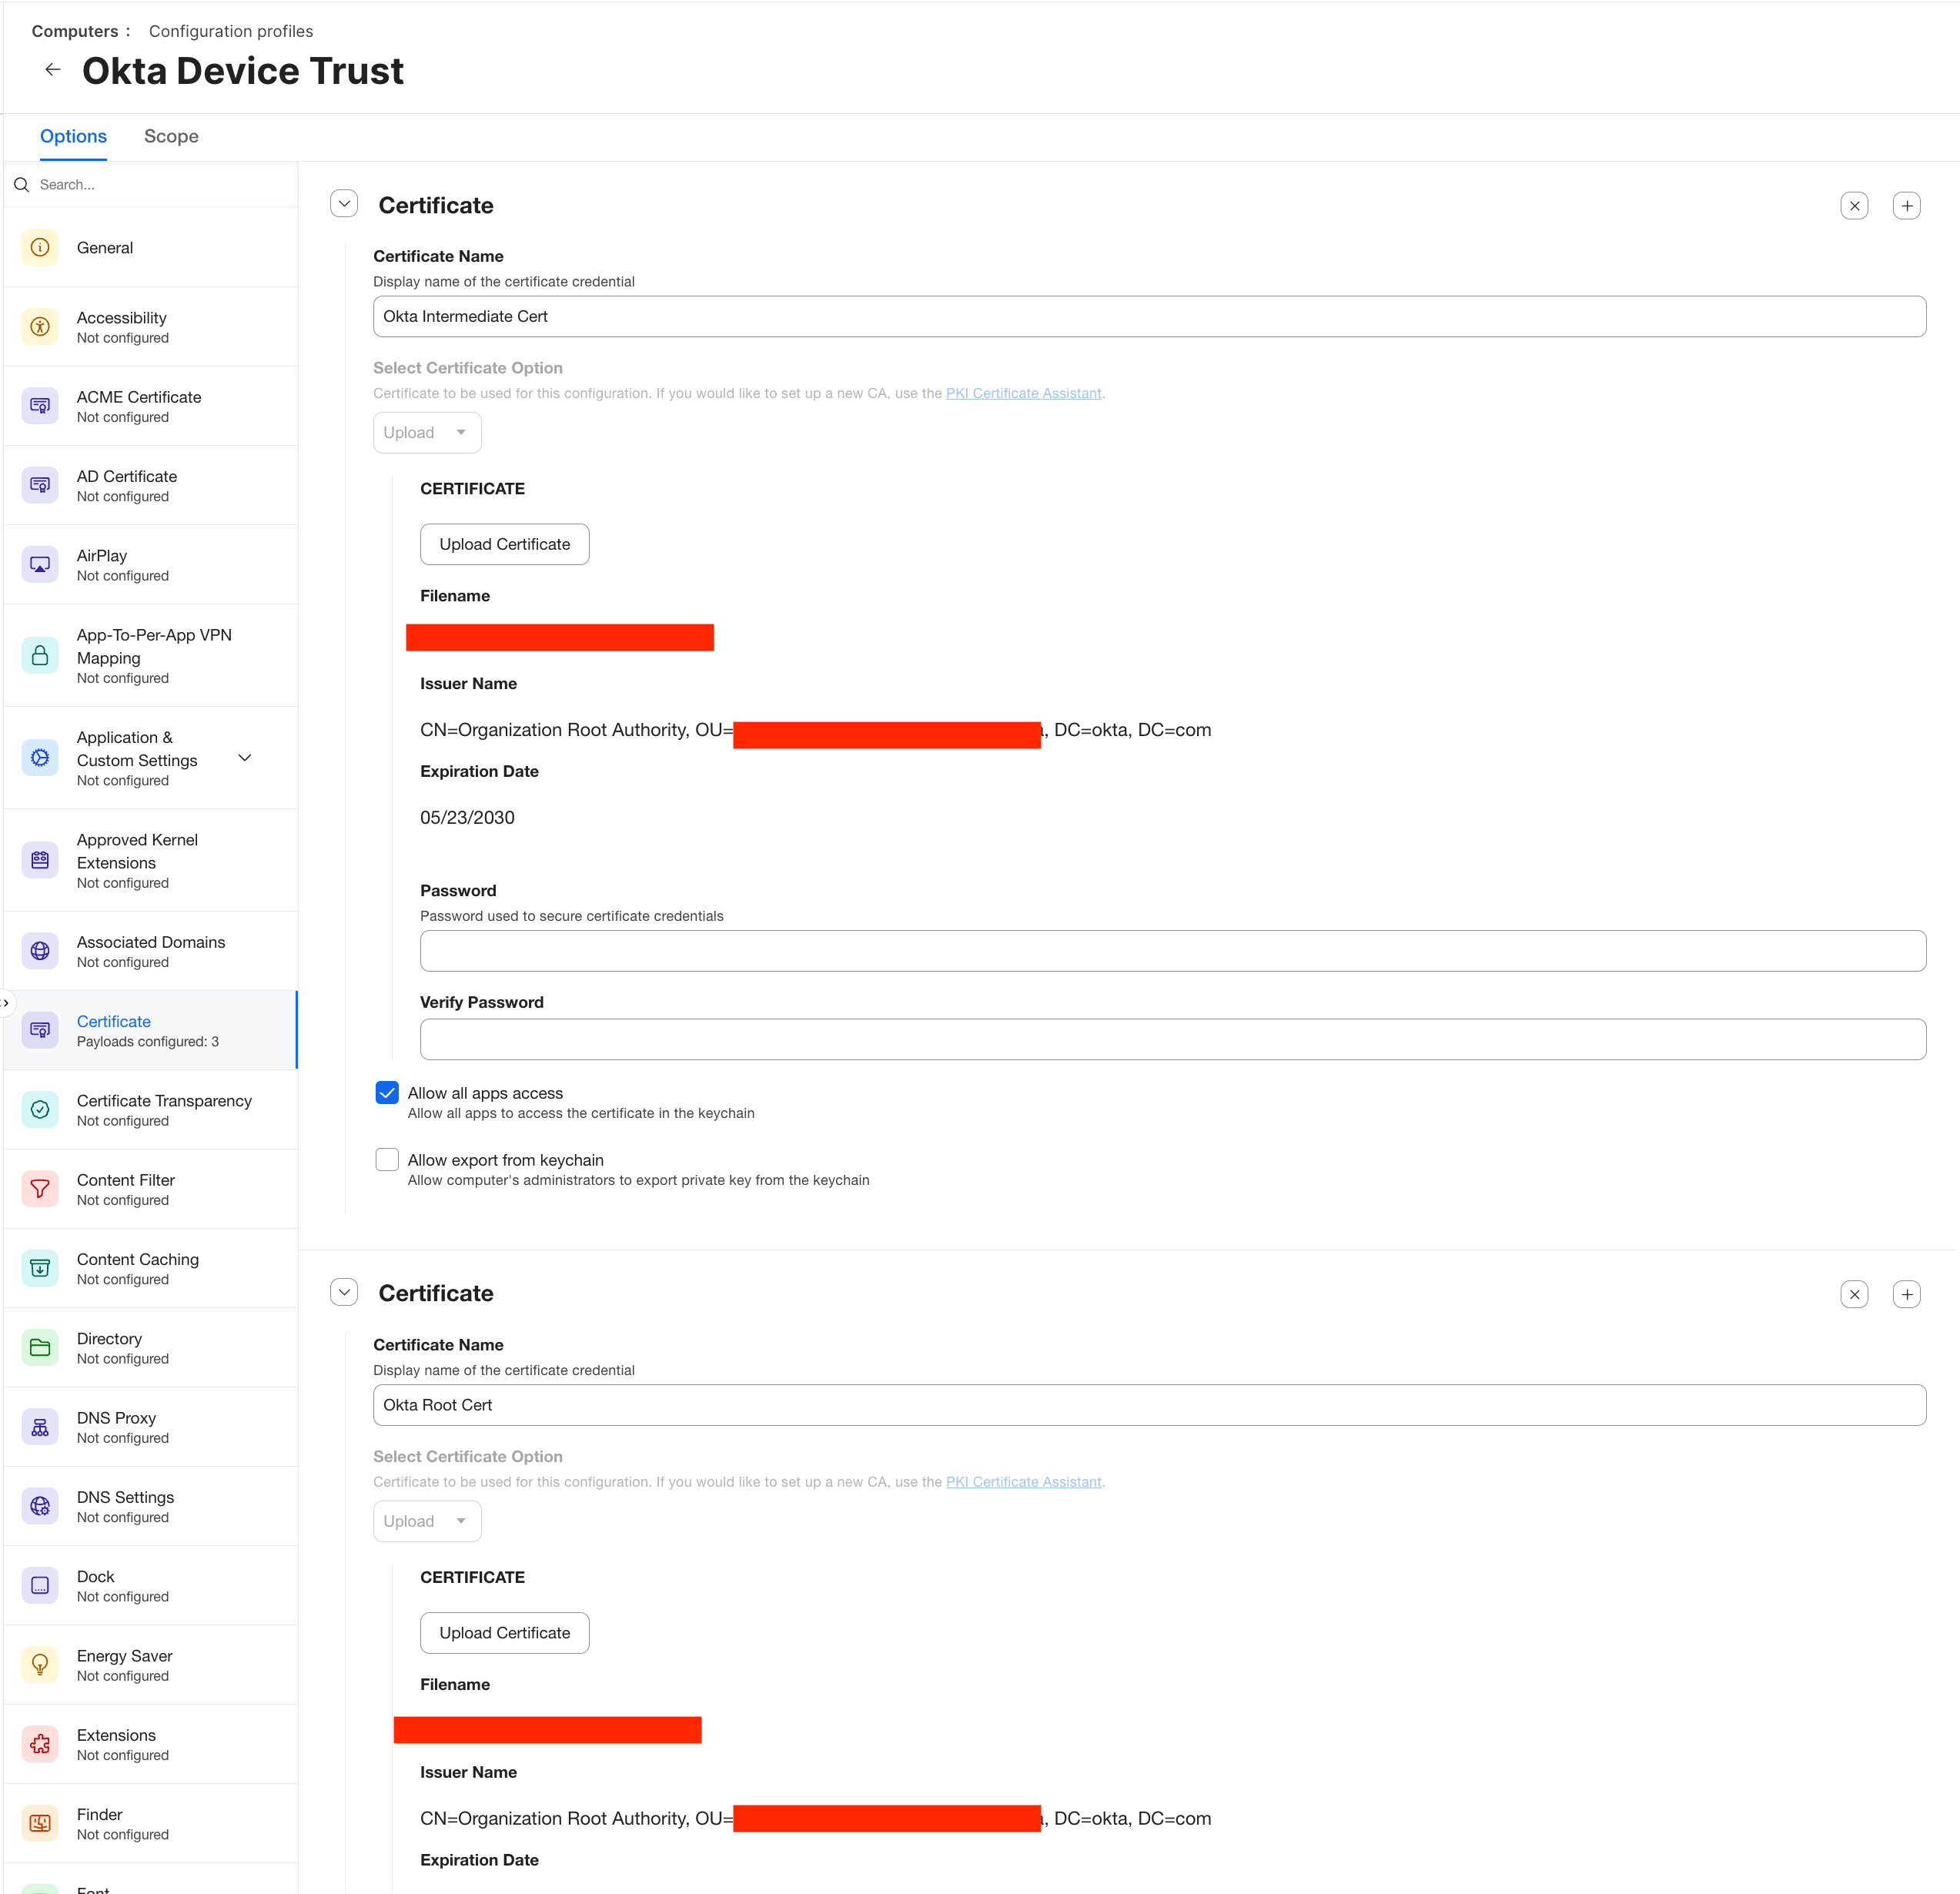
Add three Certificate payloads, one per certificate:

Certificate NameFileNotes
Okta Intermediate Certcompany-okta-intermediate.cerAllow all apps access
Okta Root Certcompany-okta-root.cerAllow all apps access
IdenTrustCommercialRootCAIdenTrust-Commercial-Root-CA.cerAllow all apps access
Jamf certificate payloads for the Okta intermediate and Okta root certificates, showing issuer names and expiration dates

The sidebar should now read Certificate — Payloads configured: 3.

Add the Network Payload

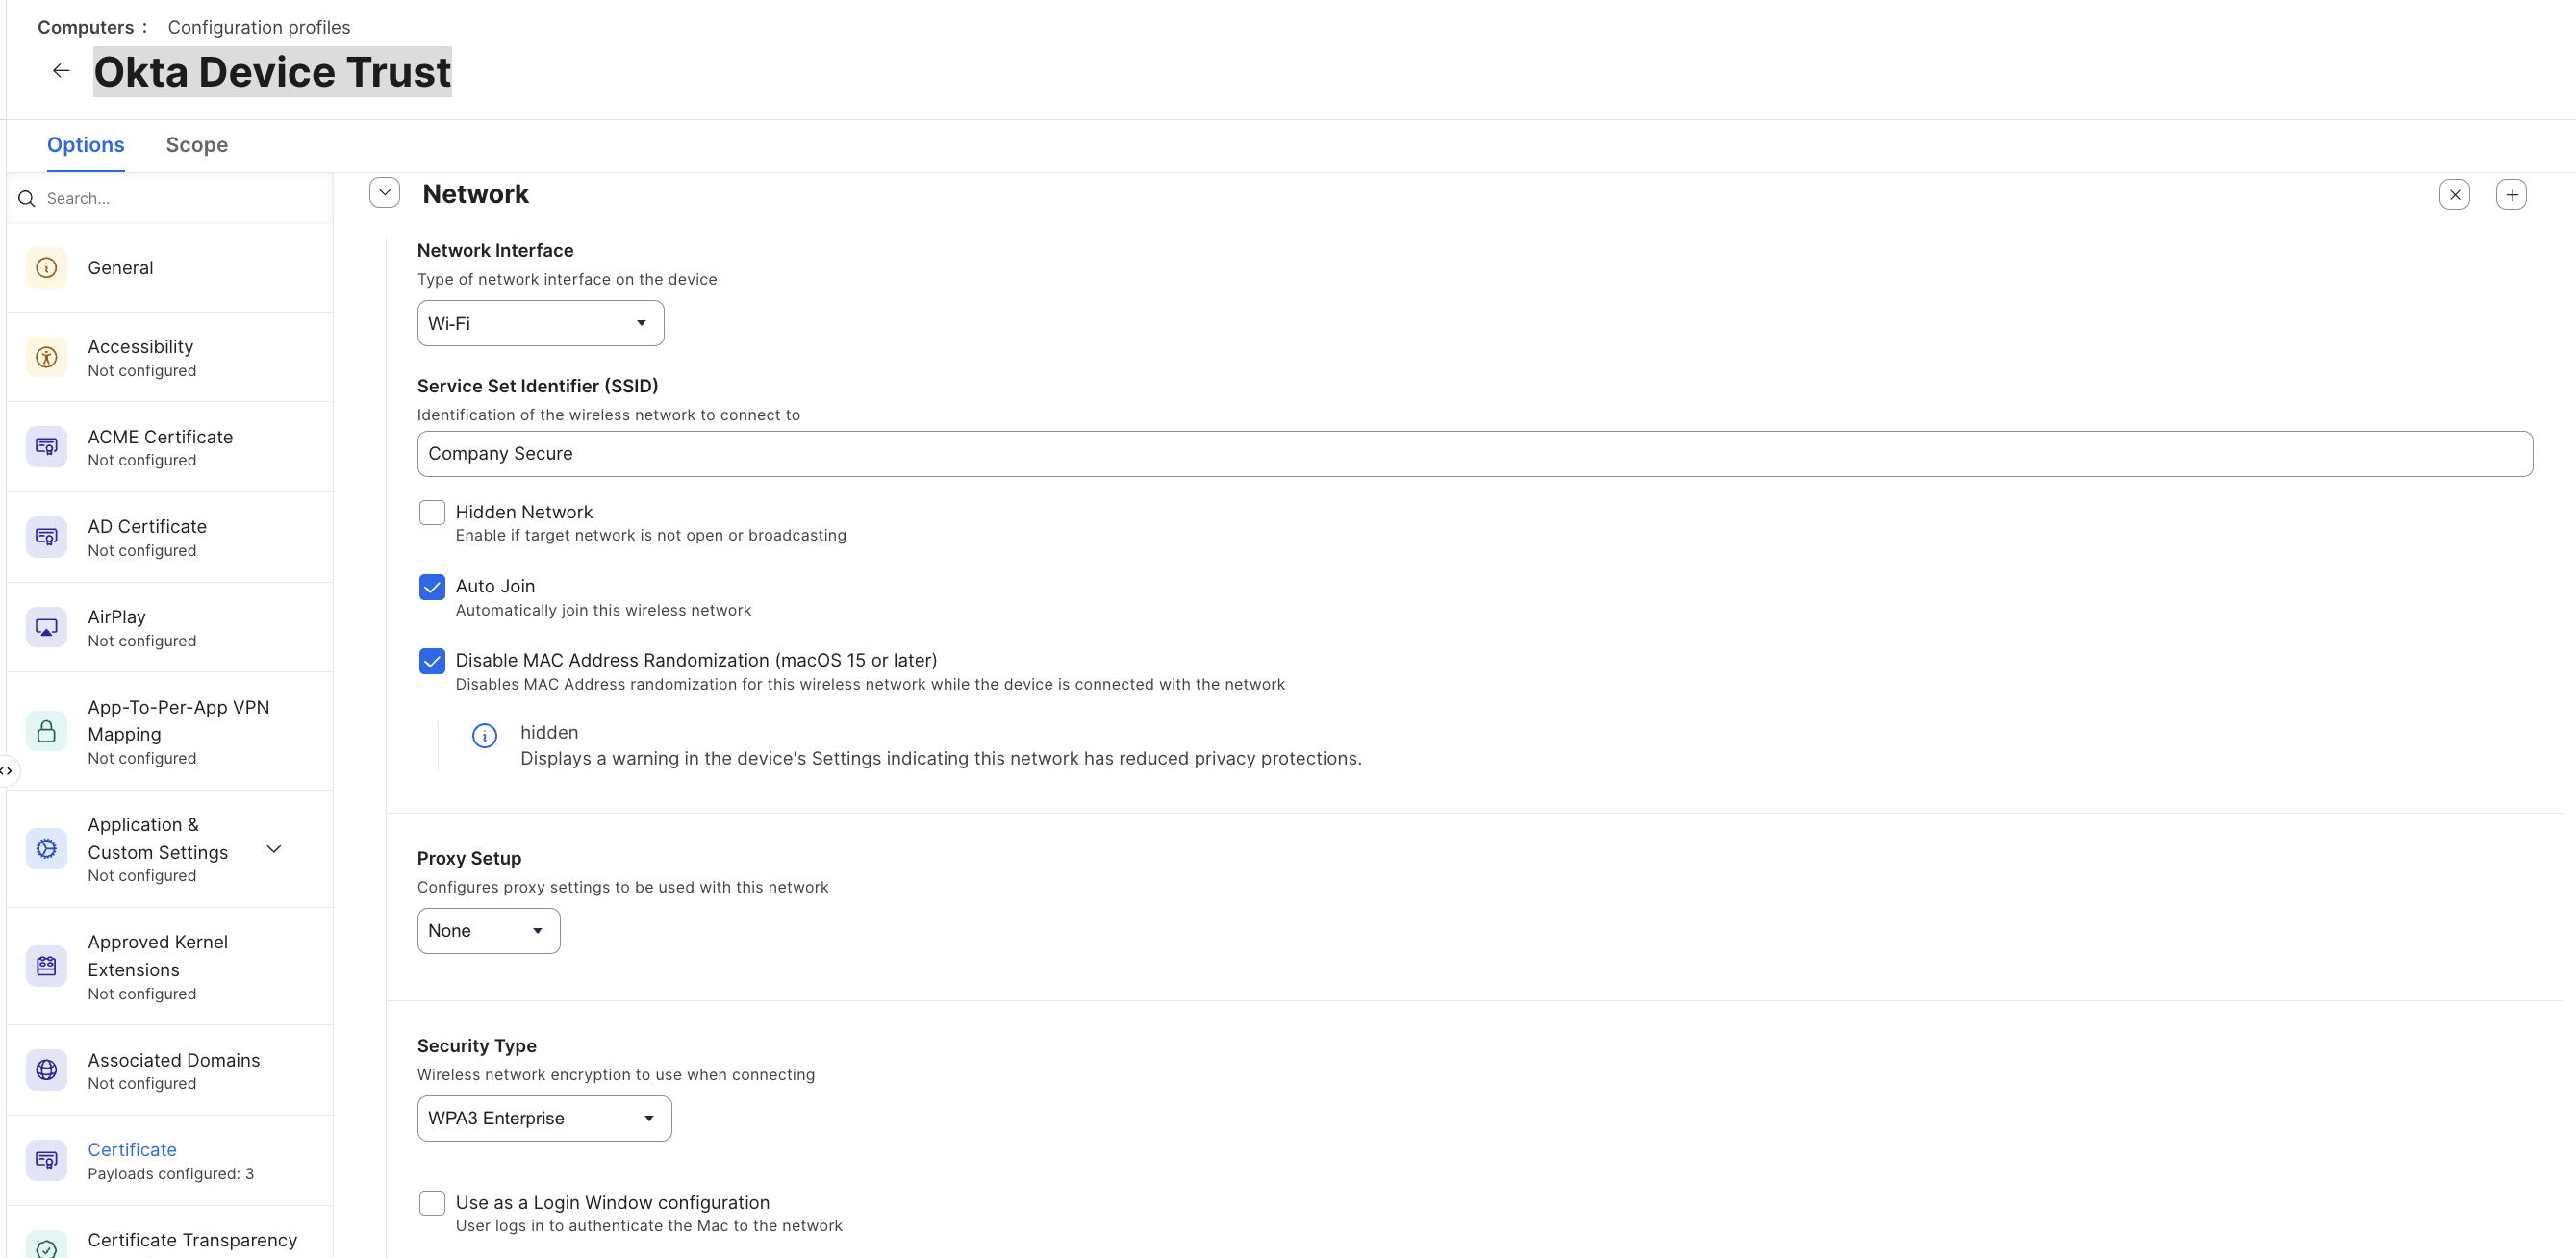
Add a Network payload:

  • Network Interface: Wi-Fi
  • SSID: your Meraki SSID (e.g. Company Secure)
  • Hidden Network: unchecked
  • Auto Join: checked
  • Disable MAC Address Randomization (macOS 15+): checked
  • Proxy Setup: None
  • Security Type: WPA3 Enterprise
Jamf Network payload with Wi-Fi interface, SSID, Auto Join, disabled MAC randomization, and WPA3 Enterprise security type

A note on MAC randomization: disabling it makes the client’s MAC stable, which keeps Meraki client history, group policies, and per-client troubleshooting coherent across reconnects. macOS will show a reduced-privacy warning for the network in Settings, which is expected.

Network Security → Protocols

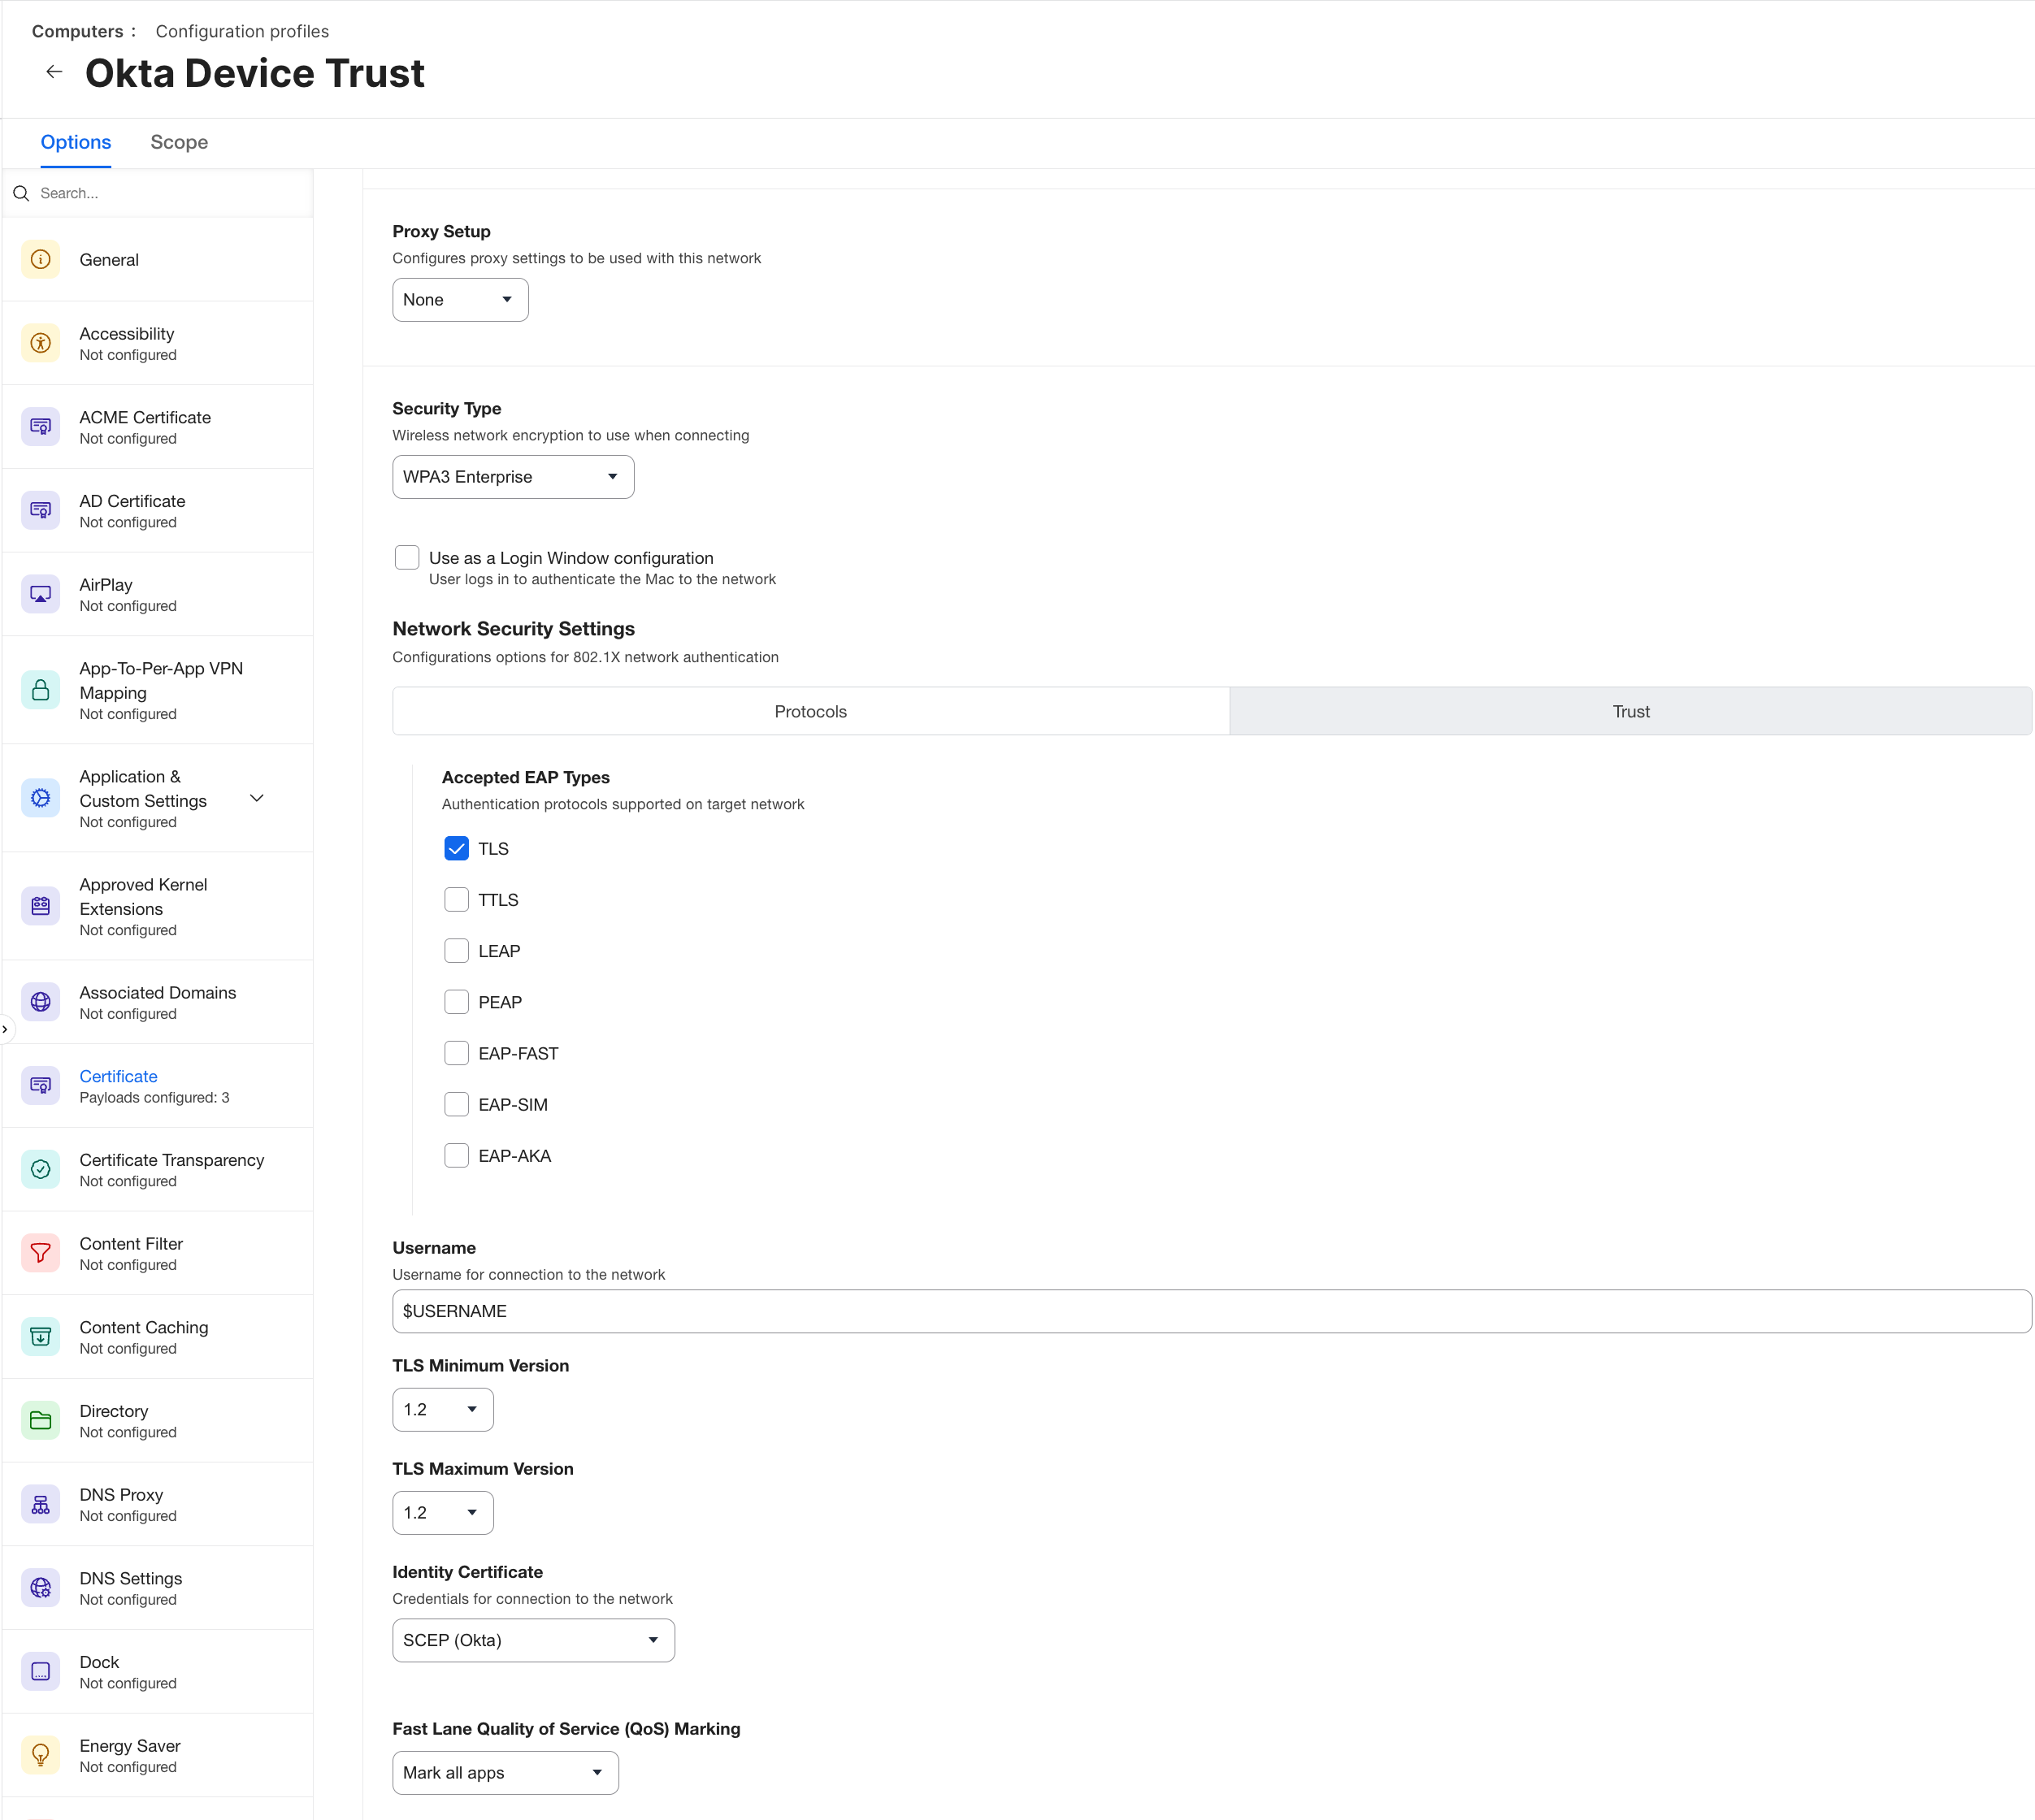
Under Network Security Settings, on the Protocols tab:

  • Accepted EAP Types: TLS only
Jamf Network Security Protocols tab with only TLS checked under accepted EAP types

Network Security → Trust

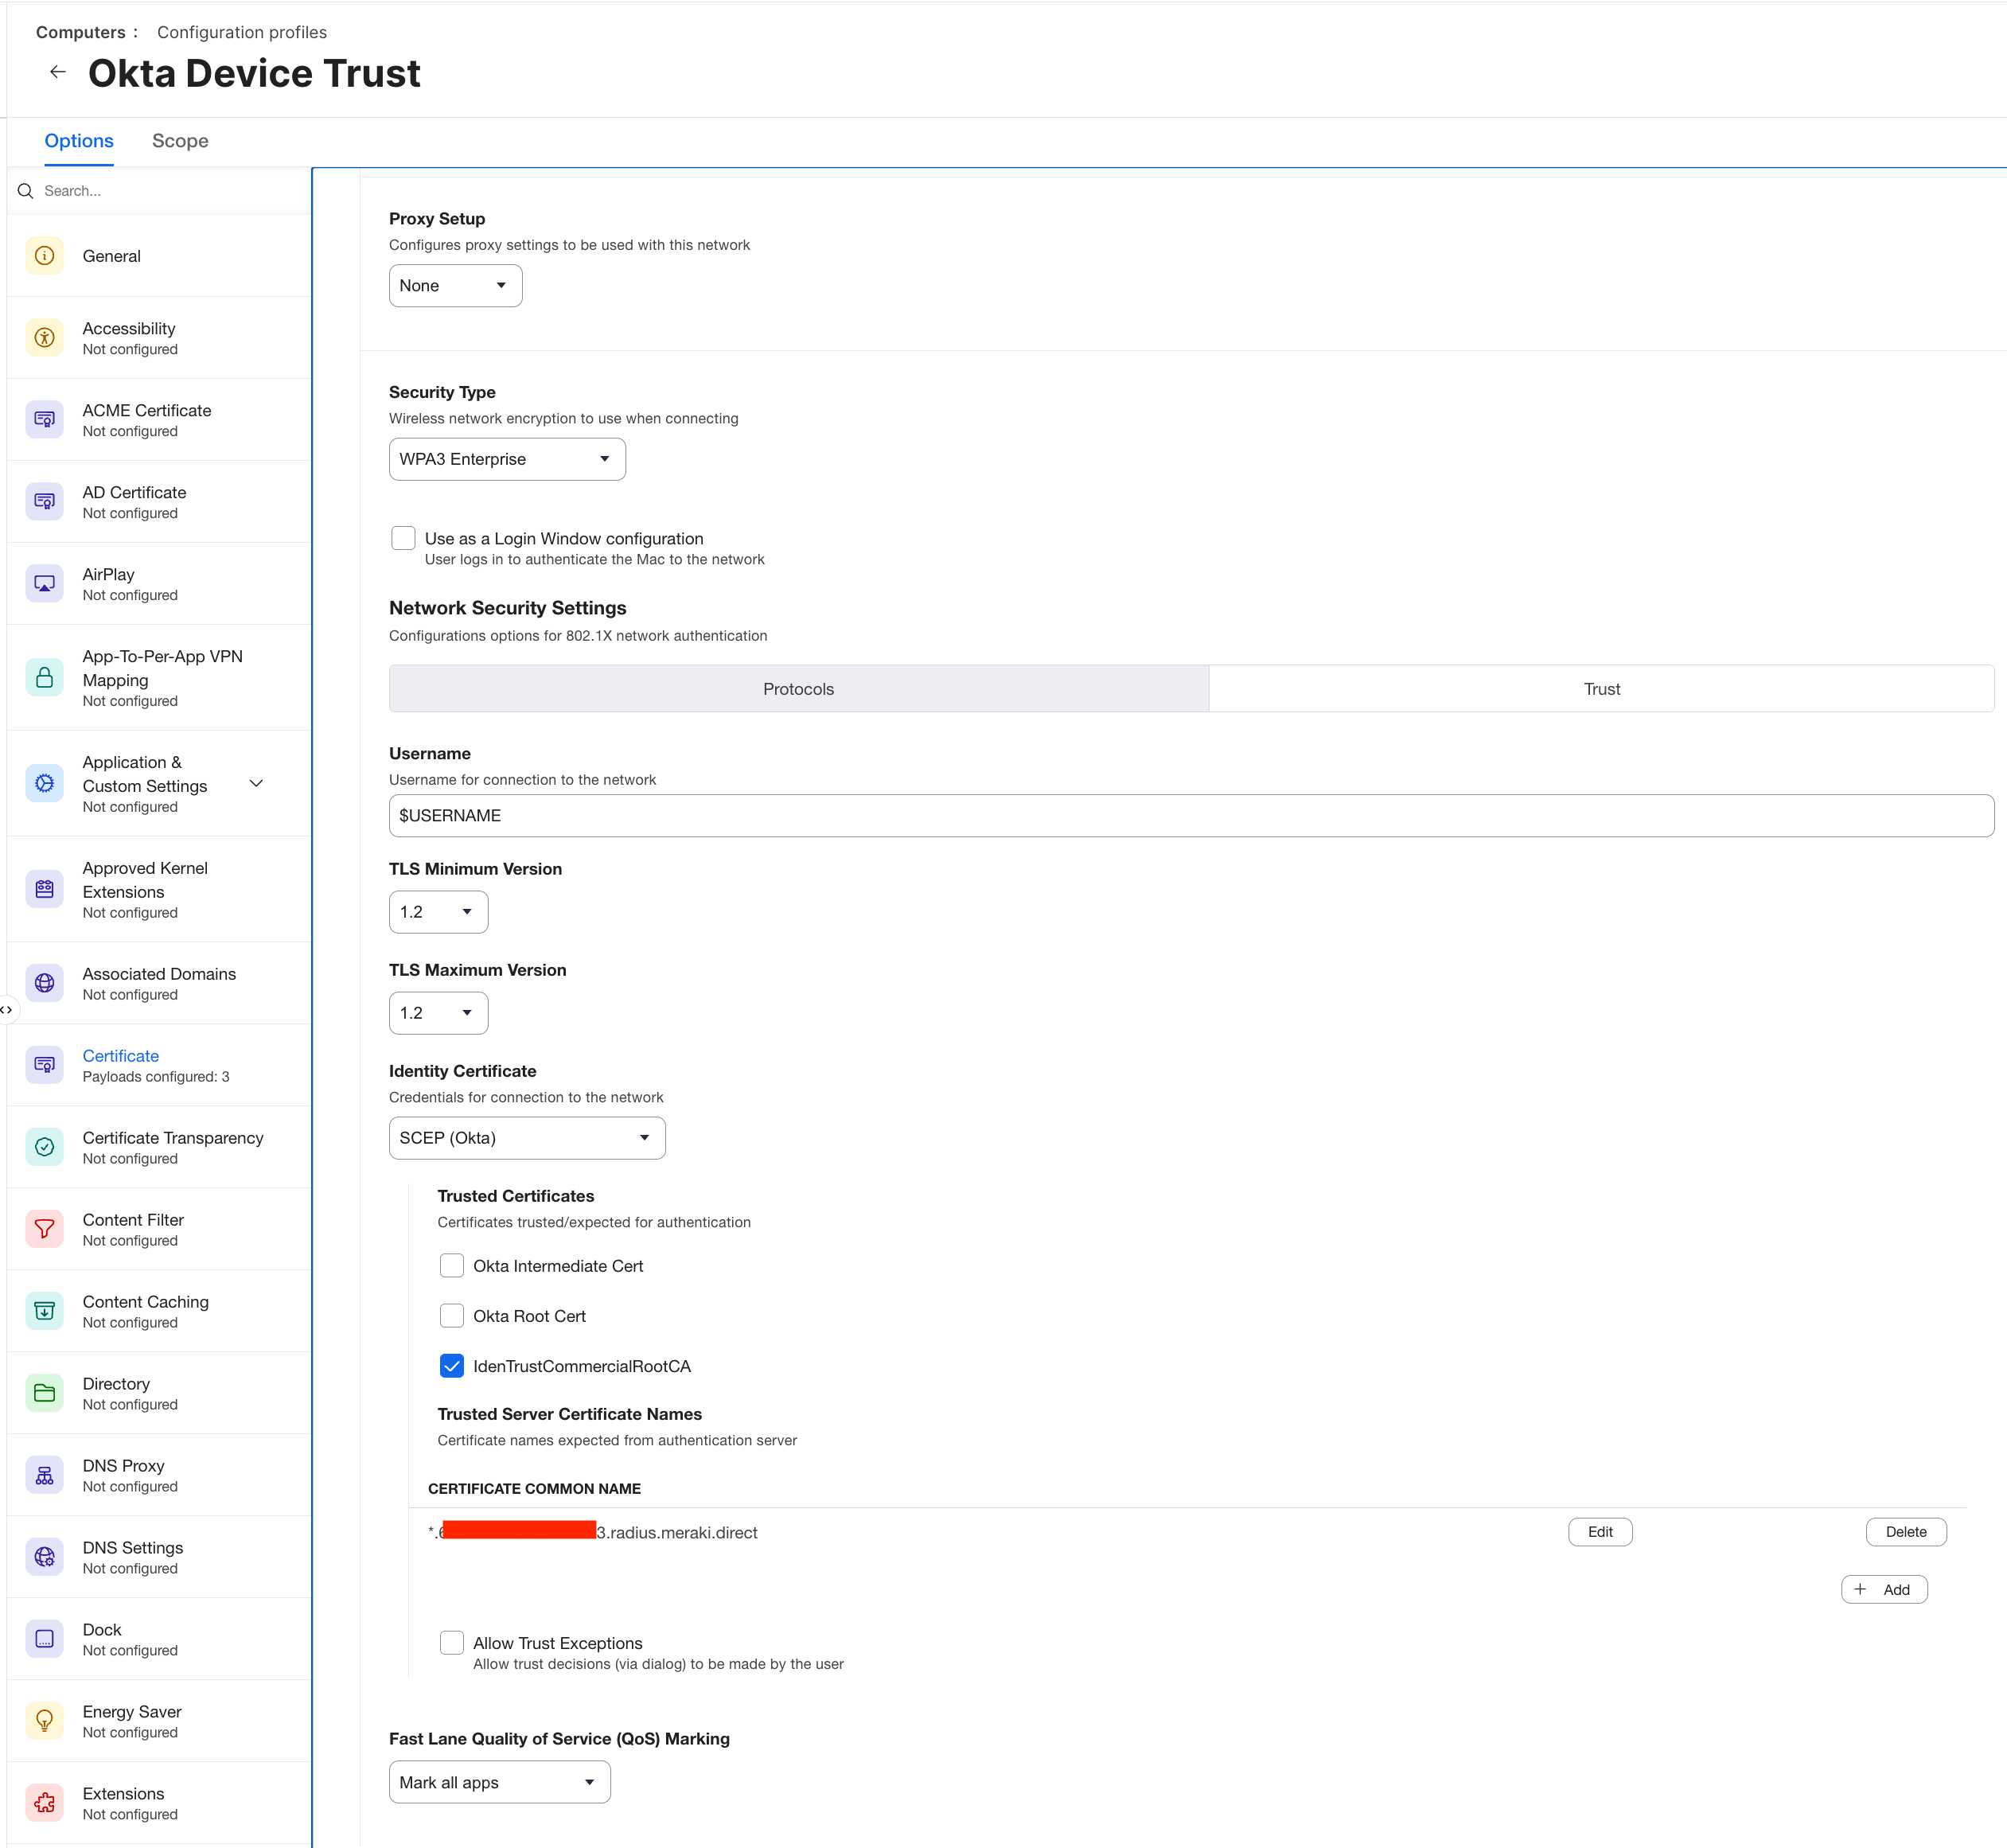
Switch to the Trust tab:

  • Username: $USERNAME
  • TLS Minimum Version: 1.2
  • TLS Maximum Version: 1.2
  • Identity Certificate: SCEP (Okta): this points at the SCEP payload already in this profile used for Okta Trust.
  • Trusted Certificates: check IdenTrustCommercialRootCA
  • Trusted Server Certificate Names: add the Current organization value you copied from Meraki (*.<org-id>.radius.meraki.direct)
  • Allow Trust Exceptions: unchecked
Jamf Trust tab showing the SCEP identity certificate, IdenTrust Commercial Root CA checked, and the pinned Meraki server certificate name

Leaving Allow Trust Exceptions unchecked is deliberate. With it enabled, a user could be prompted to accept an unexpected server certificate and click through it, which defeats the point of pinning the name in the first place.

Save the profile and scope it to a pilot group.


Part 4: Configure Intune

Before any of this, get Device Trust working in Intune first. Okta’s documentation covers the whole setup, including the SCEP connector and the certificate profile that issues the client identity certificate:

Once Device Trust is live and devices are receiving their SCEP certificate from Okta, pick up here.

What You’re Deploying

Four profiles, all under Devices › Configuration:

ProfileTypeCertificateStore
Company Okta Root CertificateTrusted certificatecompany-okta-root.cerRoot
Company Okta Intermediate CertTrusted certificatecompany-okta-intermediate.cerIntermediate
Meraki Local Auth Root CertificateTrusted certificateIdenTrust-Commercial-Root-CA.cerRoot
Company Wi-FiWi-Fi

The first two establish the chain for the client’s own identity certificate. The third is what the client uses to validate the Meraki RADIUS server, it’s the IdenTrust root you converted in Part 1, named here for the job it does rather than for its issuer.

Deploy the Okta Root Certificate

Go to Devices › Configuration › Create › New Policy. Set Platform to Windows 10 and later and Profile type to Templates, then search the template list for trusted and pick Trusted certificate.
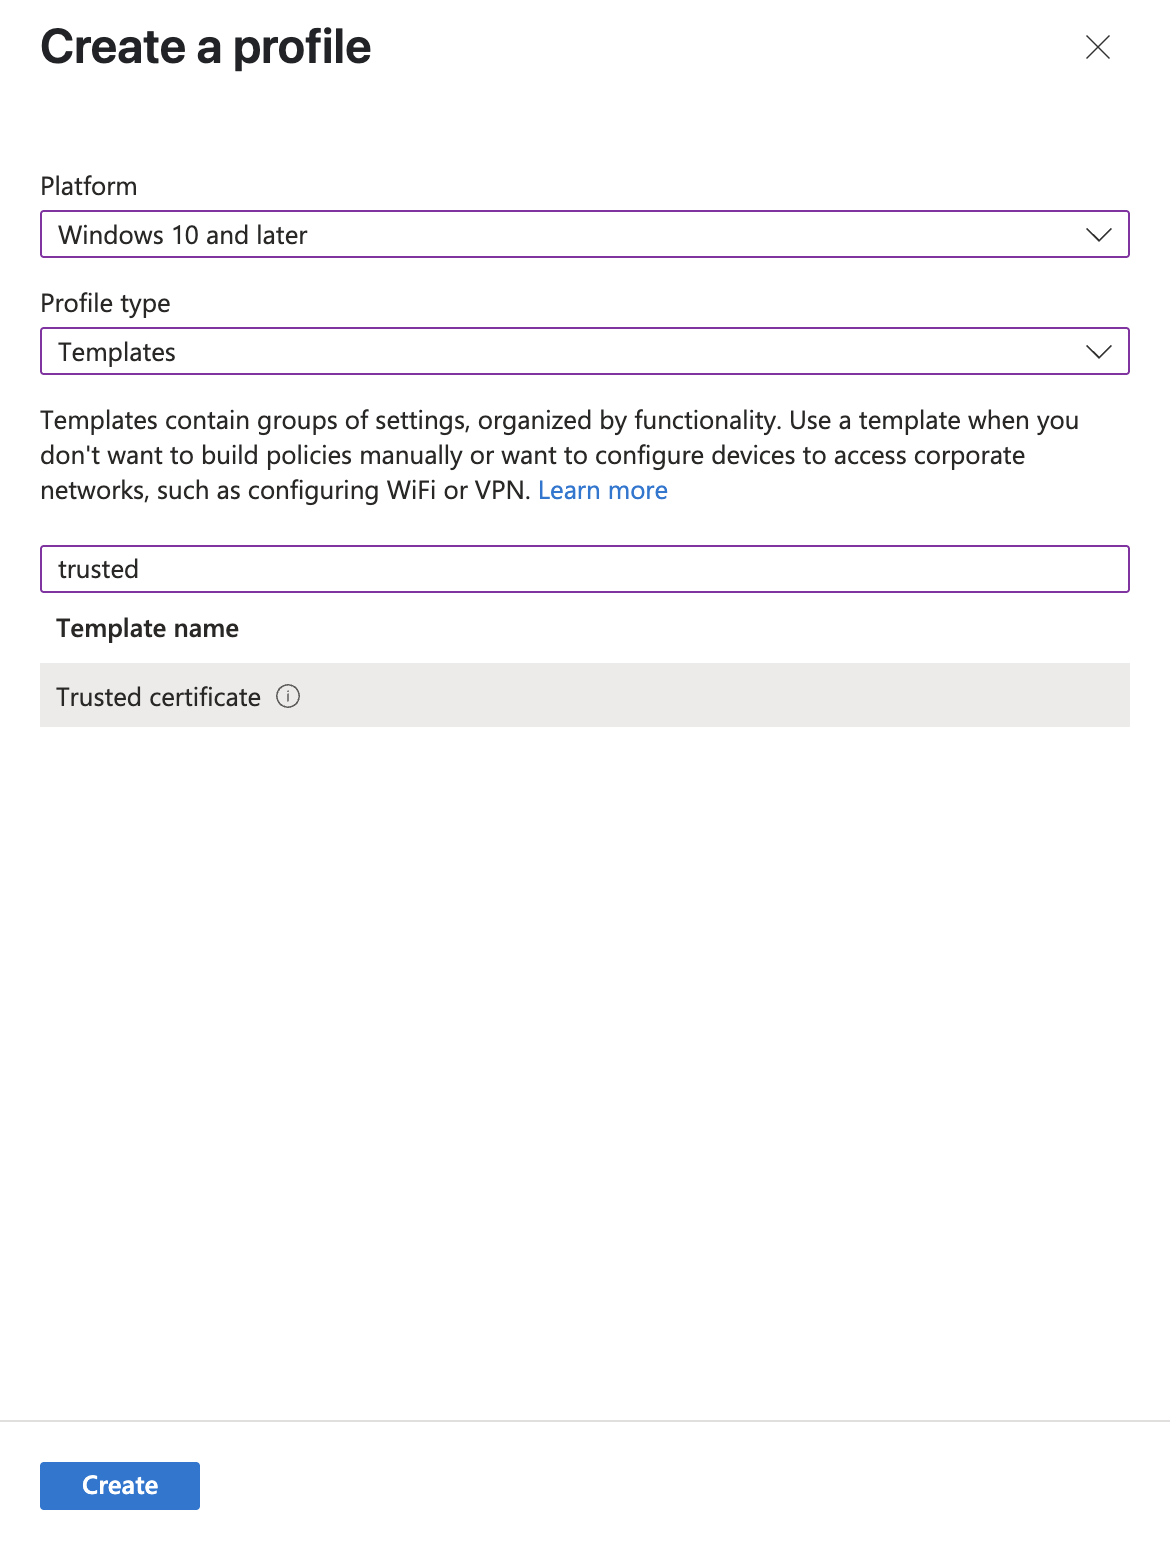
Intune Create a profile blade with Windows 10 and later, Templates, and the Trusted certificate template selected

On Basics, name it something you’ll recognize in a list of thirty policies, Company Okta Root Certificate works.
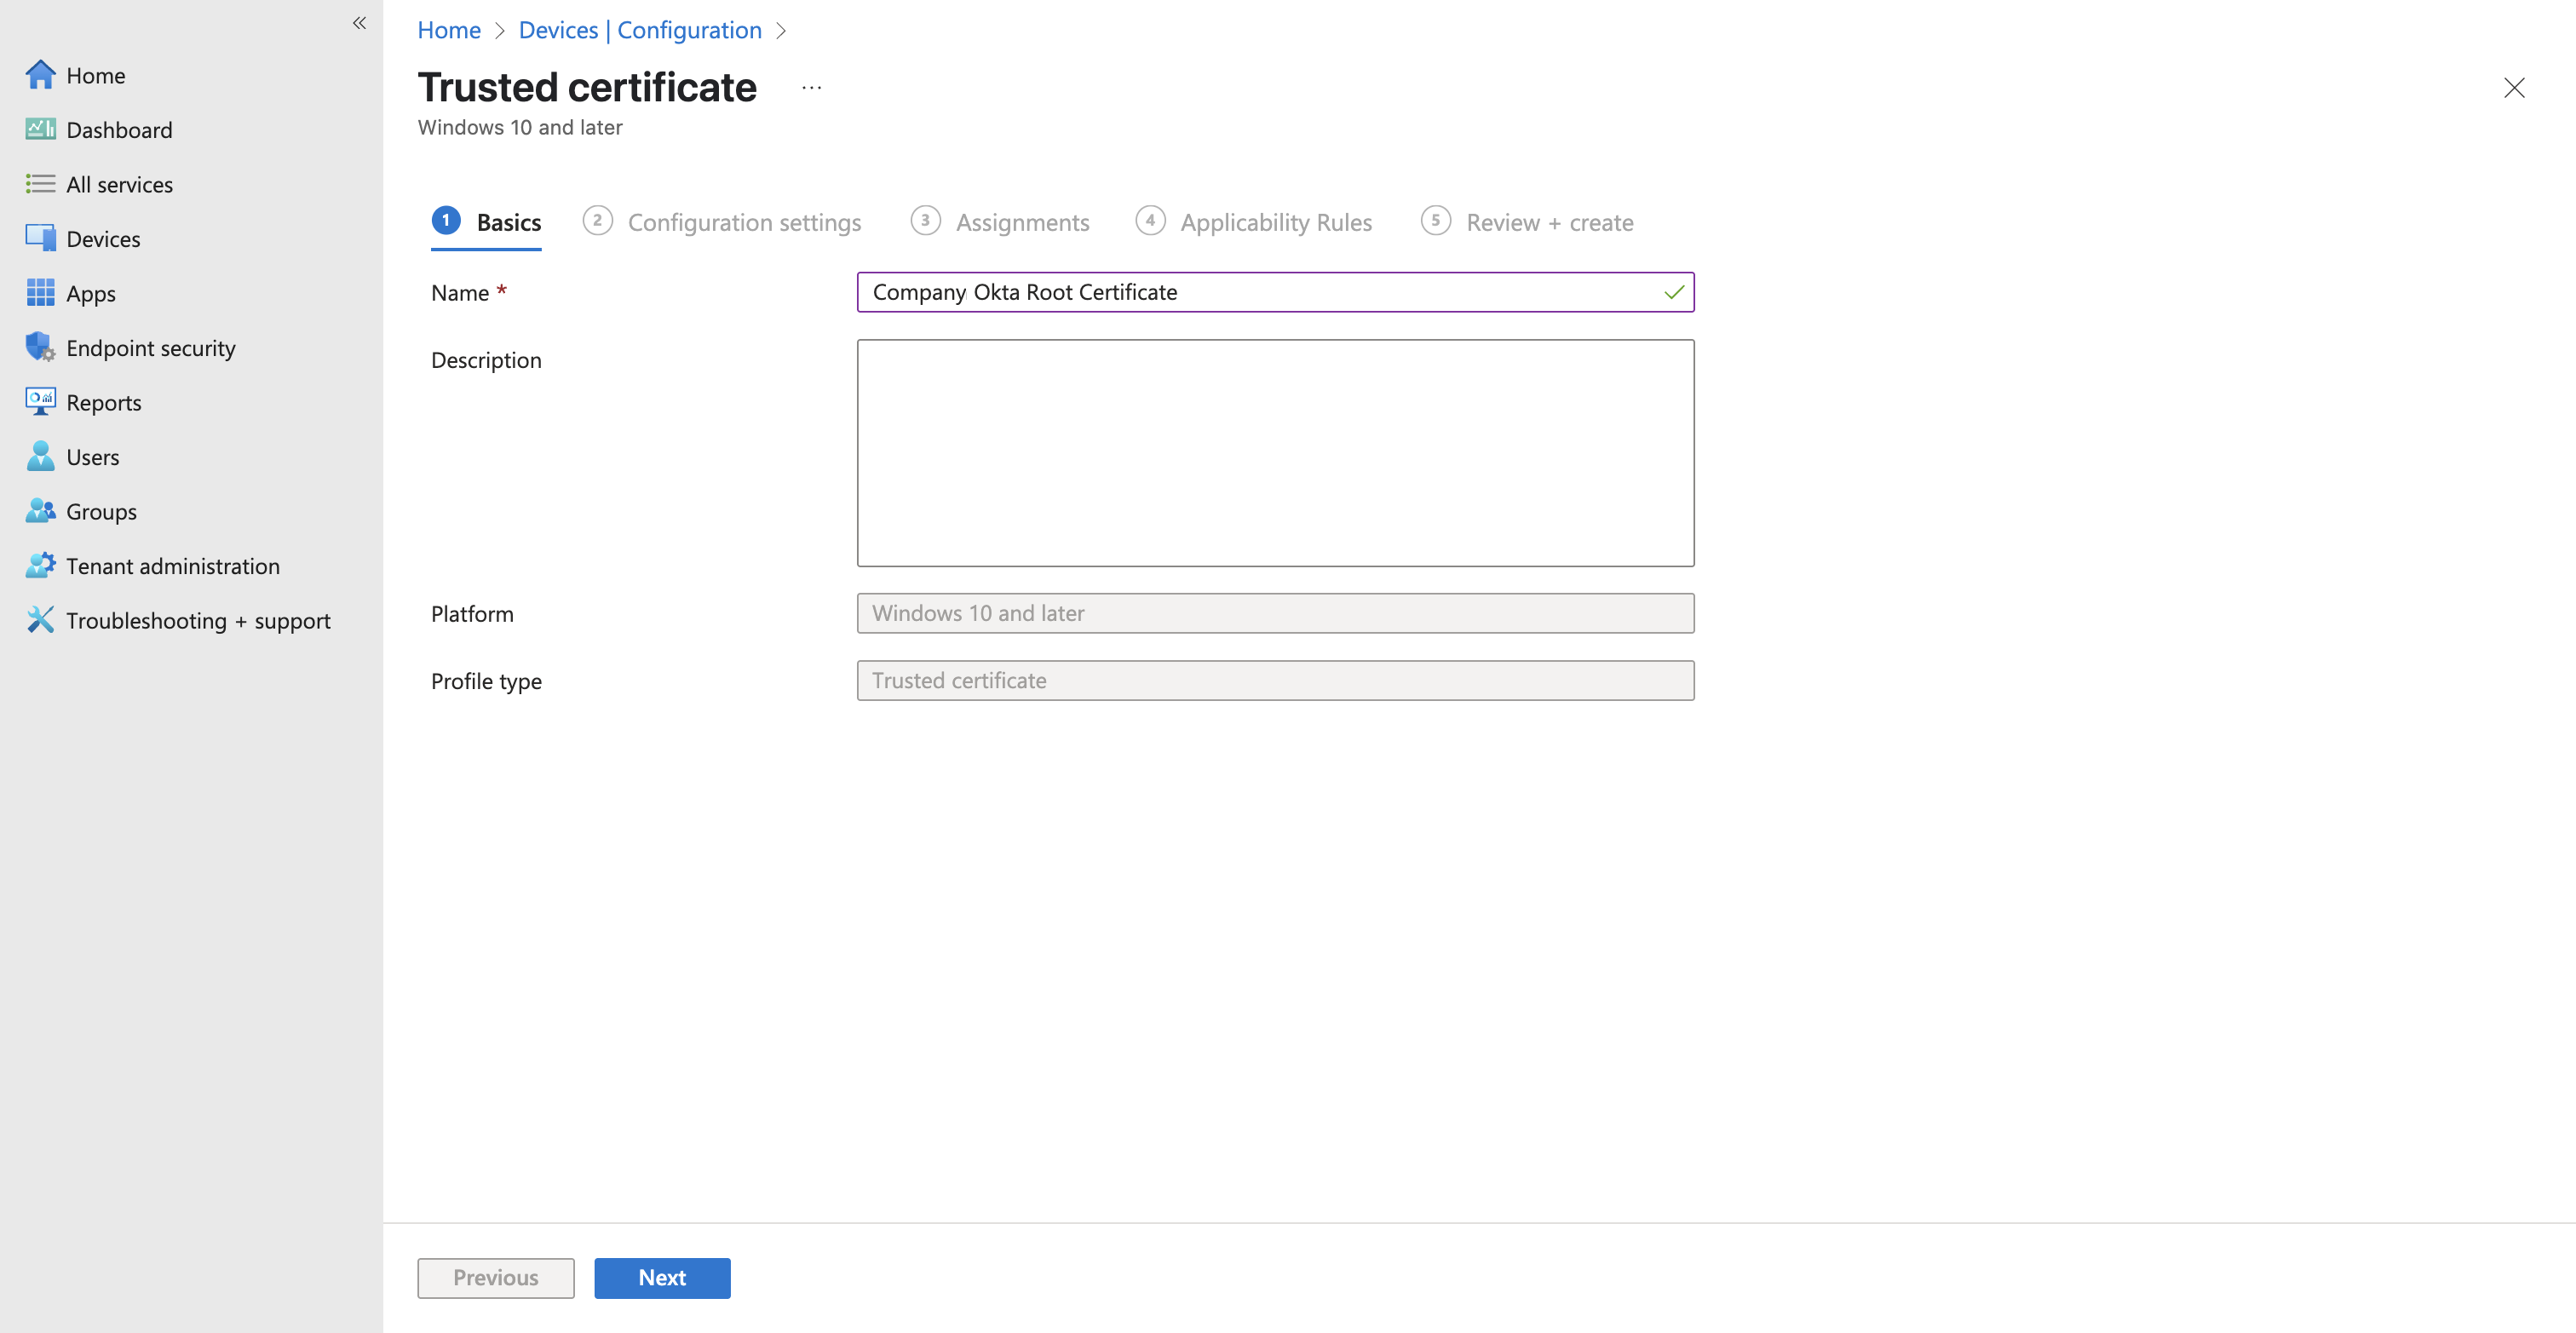
Basics tab of the Intune trusted certificate profile with the Okta root certificate name entered

On Configuration settings, upload company-okta-root.cer and set Destination store to Computer certificate store – Root.

On Assignments, use Add all users. Skip Applicability Rules entirely, there’s nothing to scope here, since the certificate is harmless on any Windows device.
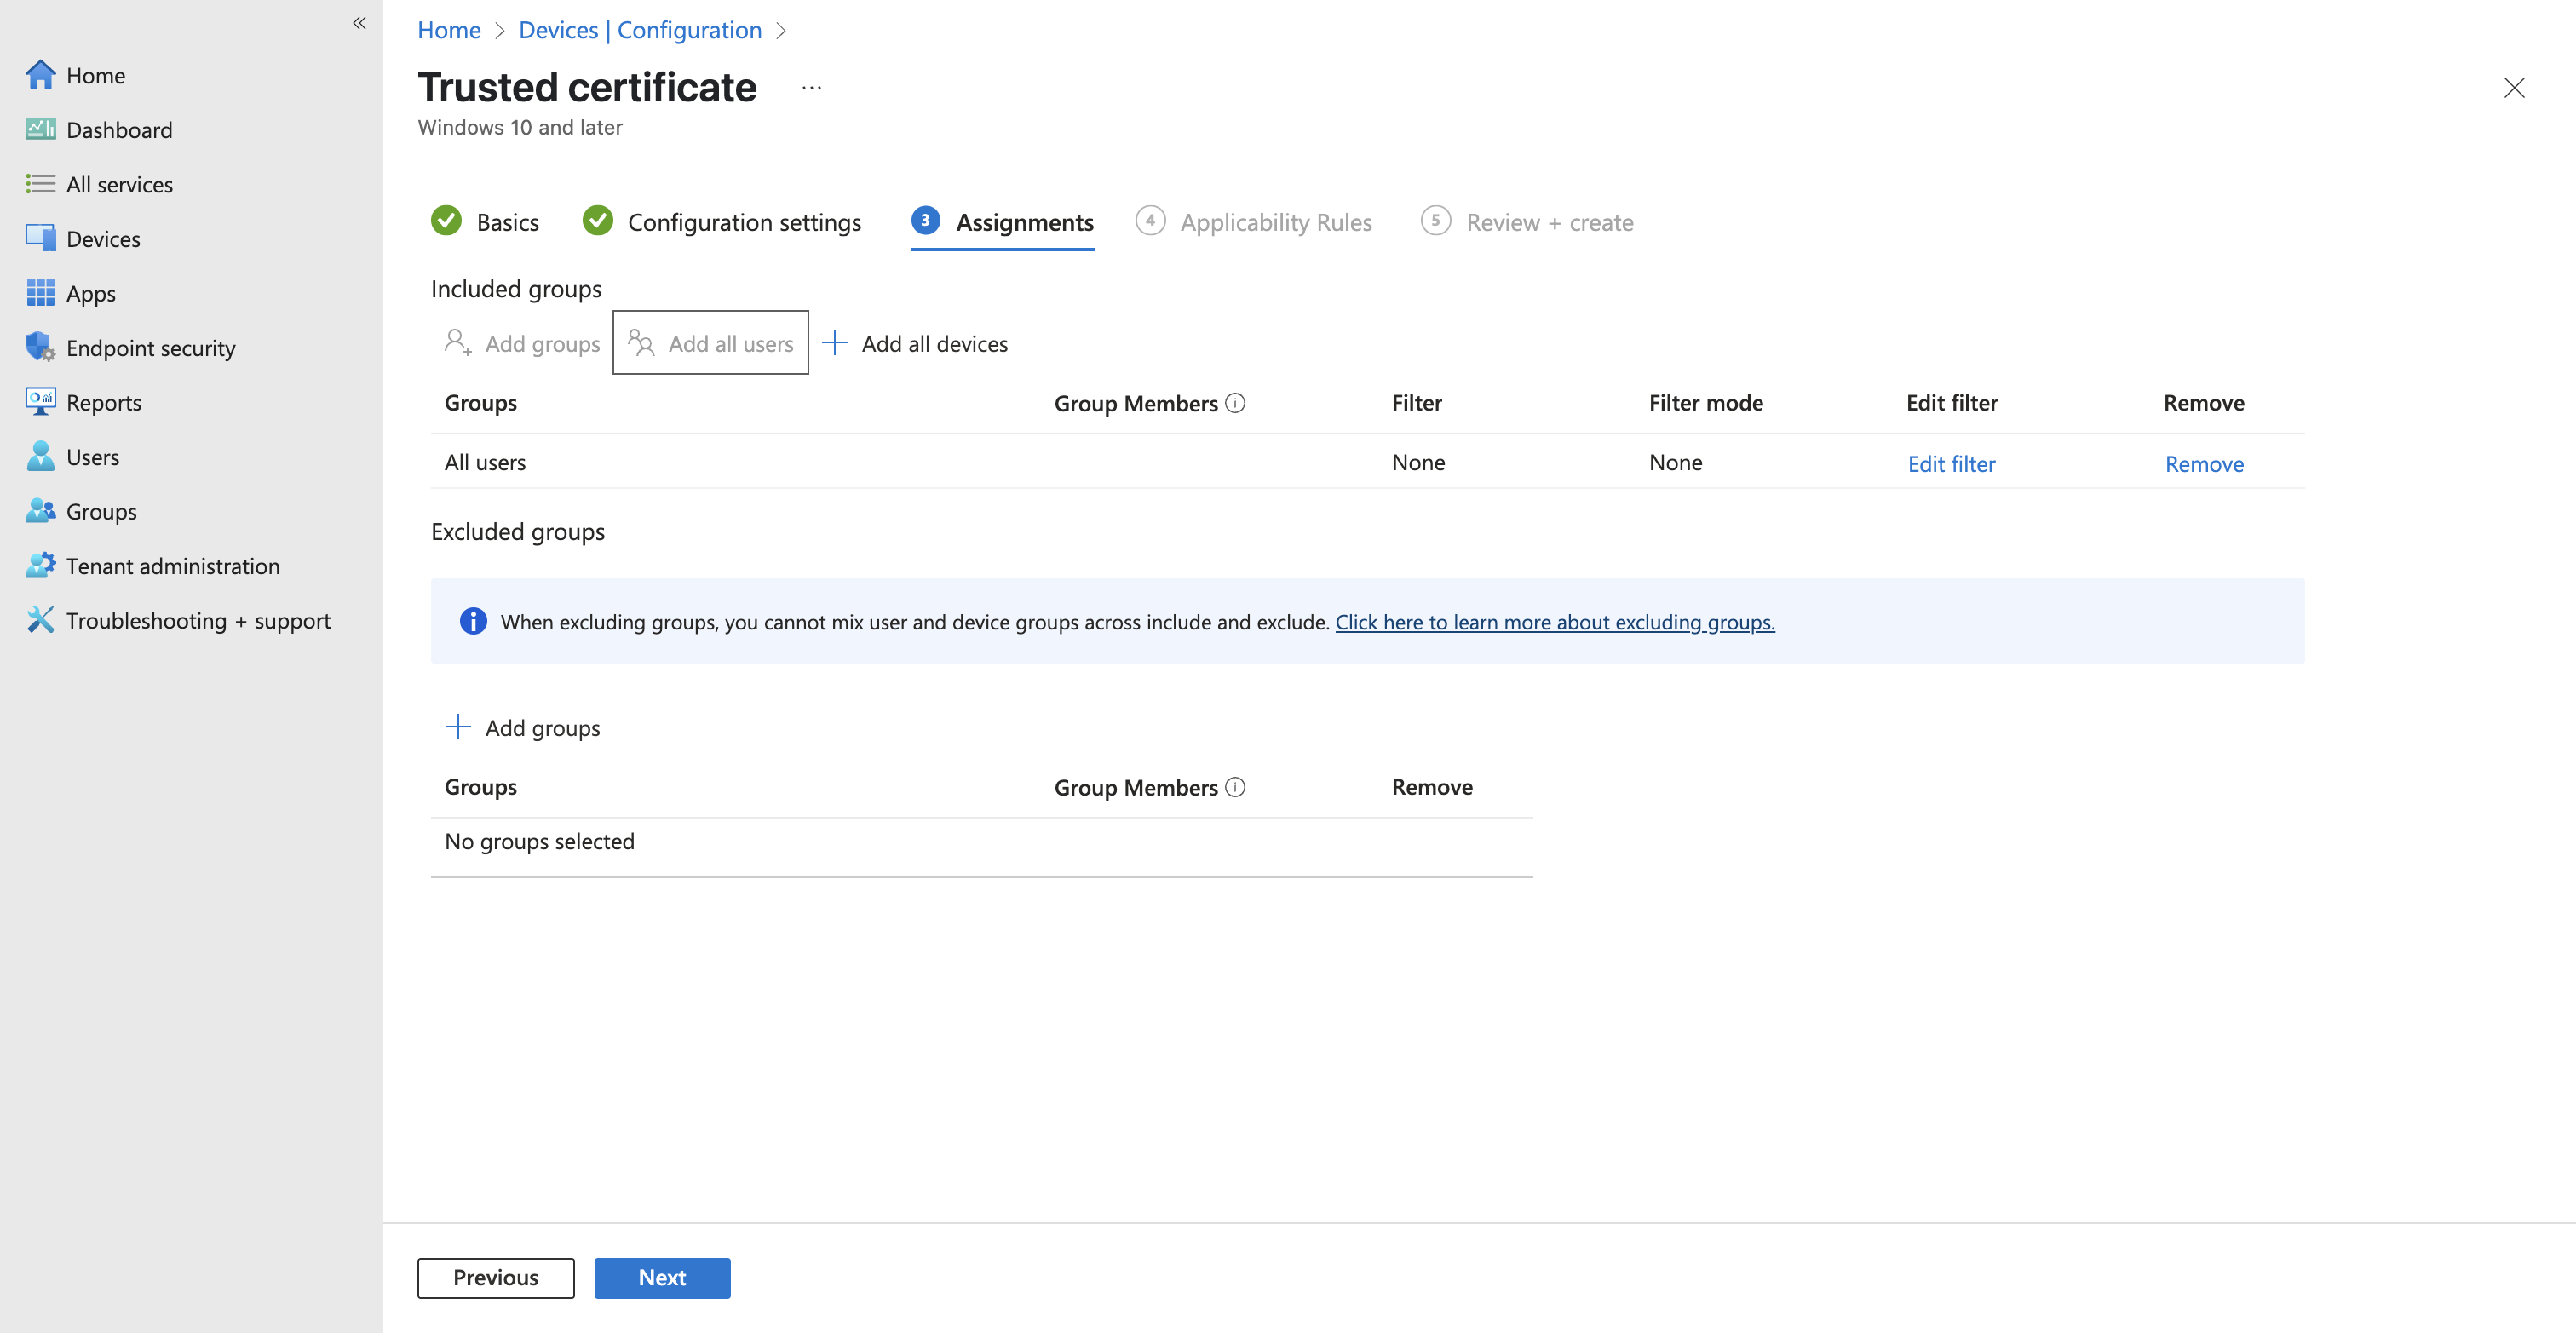
Assignments tab of an Intune configuration profile with All users added to included groups

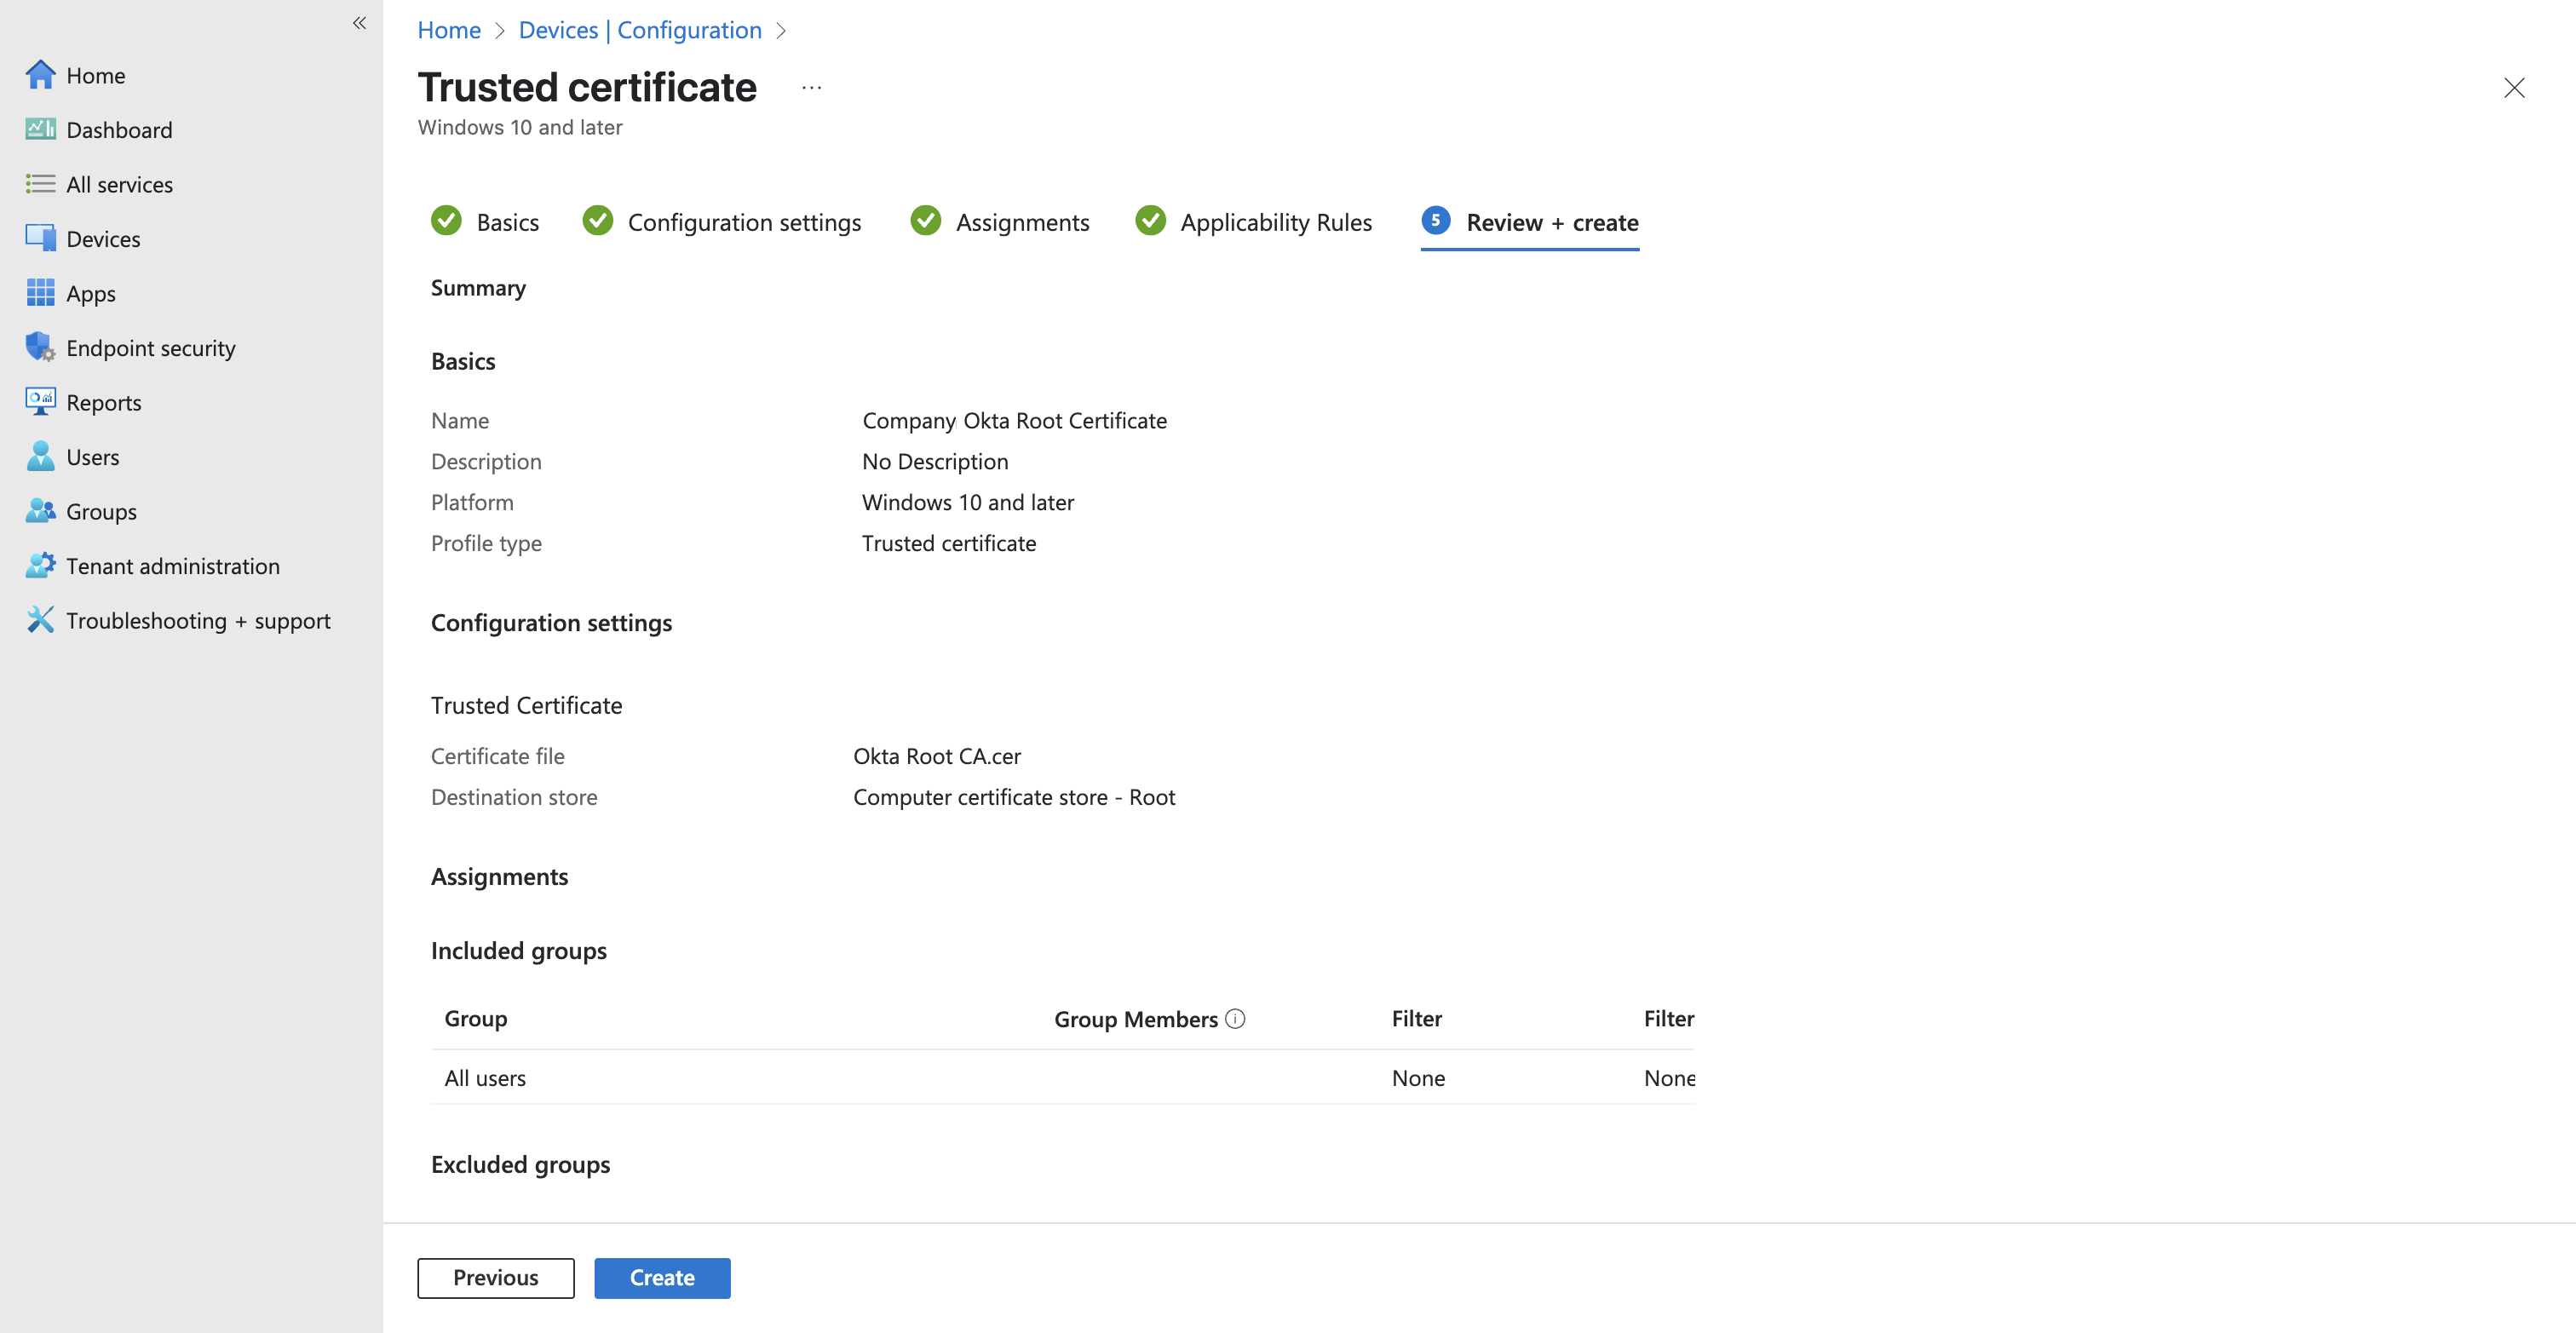
Review and create.

Review and create summary for the Okta root certificate profile, destination store set to Root

Deploy the Okta Intermediate Certificate

Same flow, one setting different. Create another Trusted certificate profile, name it Company Okta Intermediate Cert, upload company-okta-intermediate.cer, and set Destination store to Computer certificate store – Intermediate.

This is the easy one to get wrong. An intermediate CA dropped into the Root store will often appear to work and Windows will chain through it, but you’ve just told the machine to trust that CA as a root, which is not what you meant. Put it in Intermediate.

Assign to all users, review, create.

Deploy the IdenTrust Root for Server Validation

One more Trusted certificate profile. Name it for its purpose: Meraki Local Auth Root Certificate and upload IdenTrust-Commercial-Root-CA.cer, and set Destination store to Computer certificate store – Root.

Assign to all users, review, create.

Build the Wi-Fi Profile

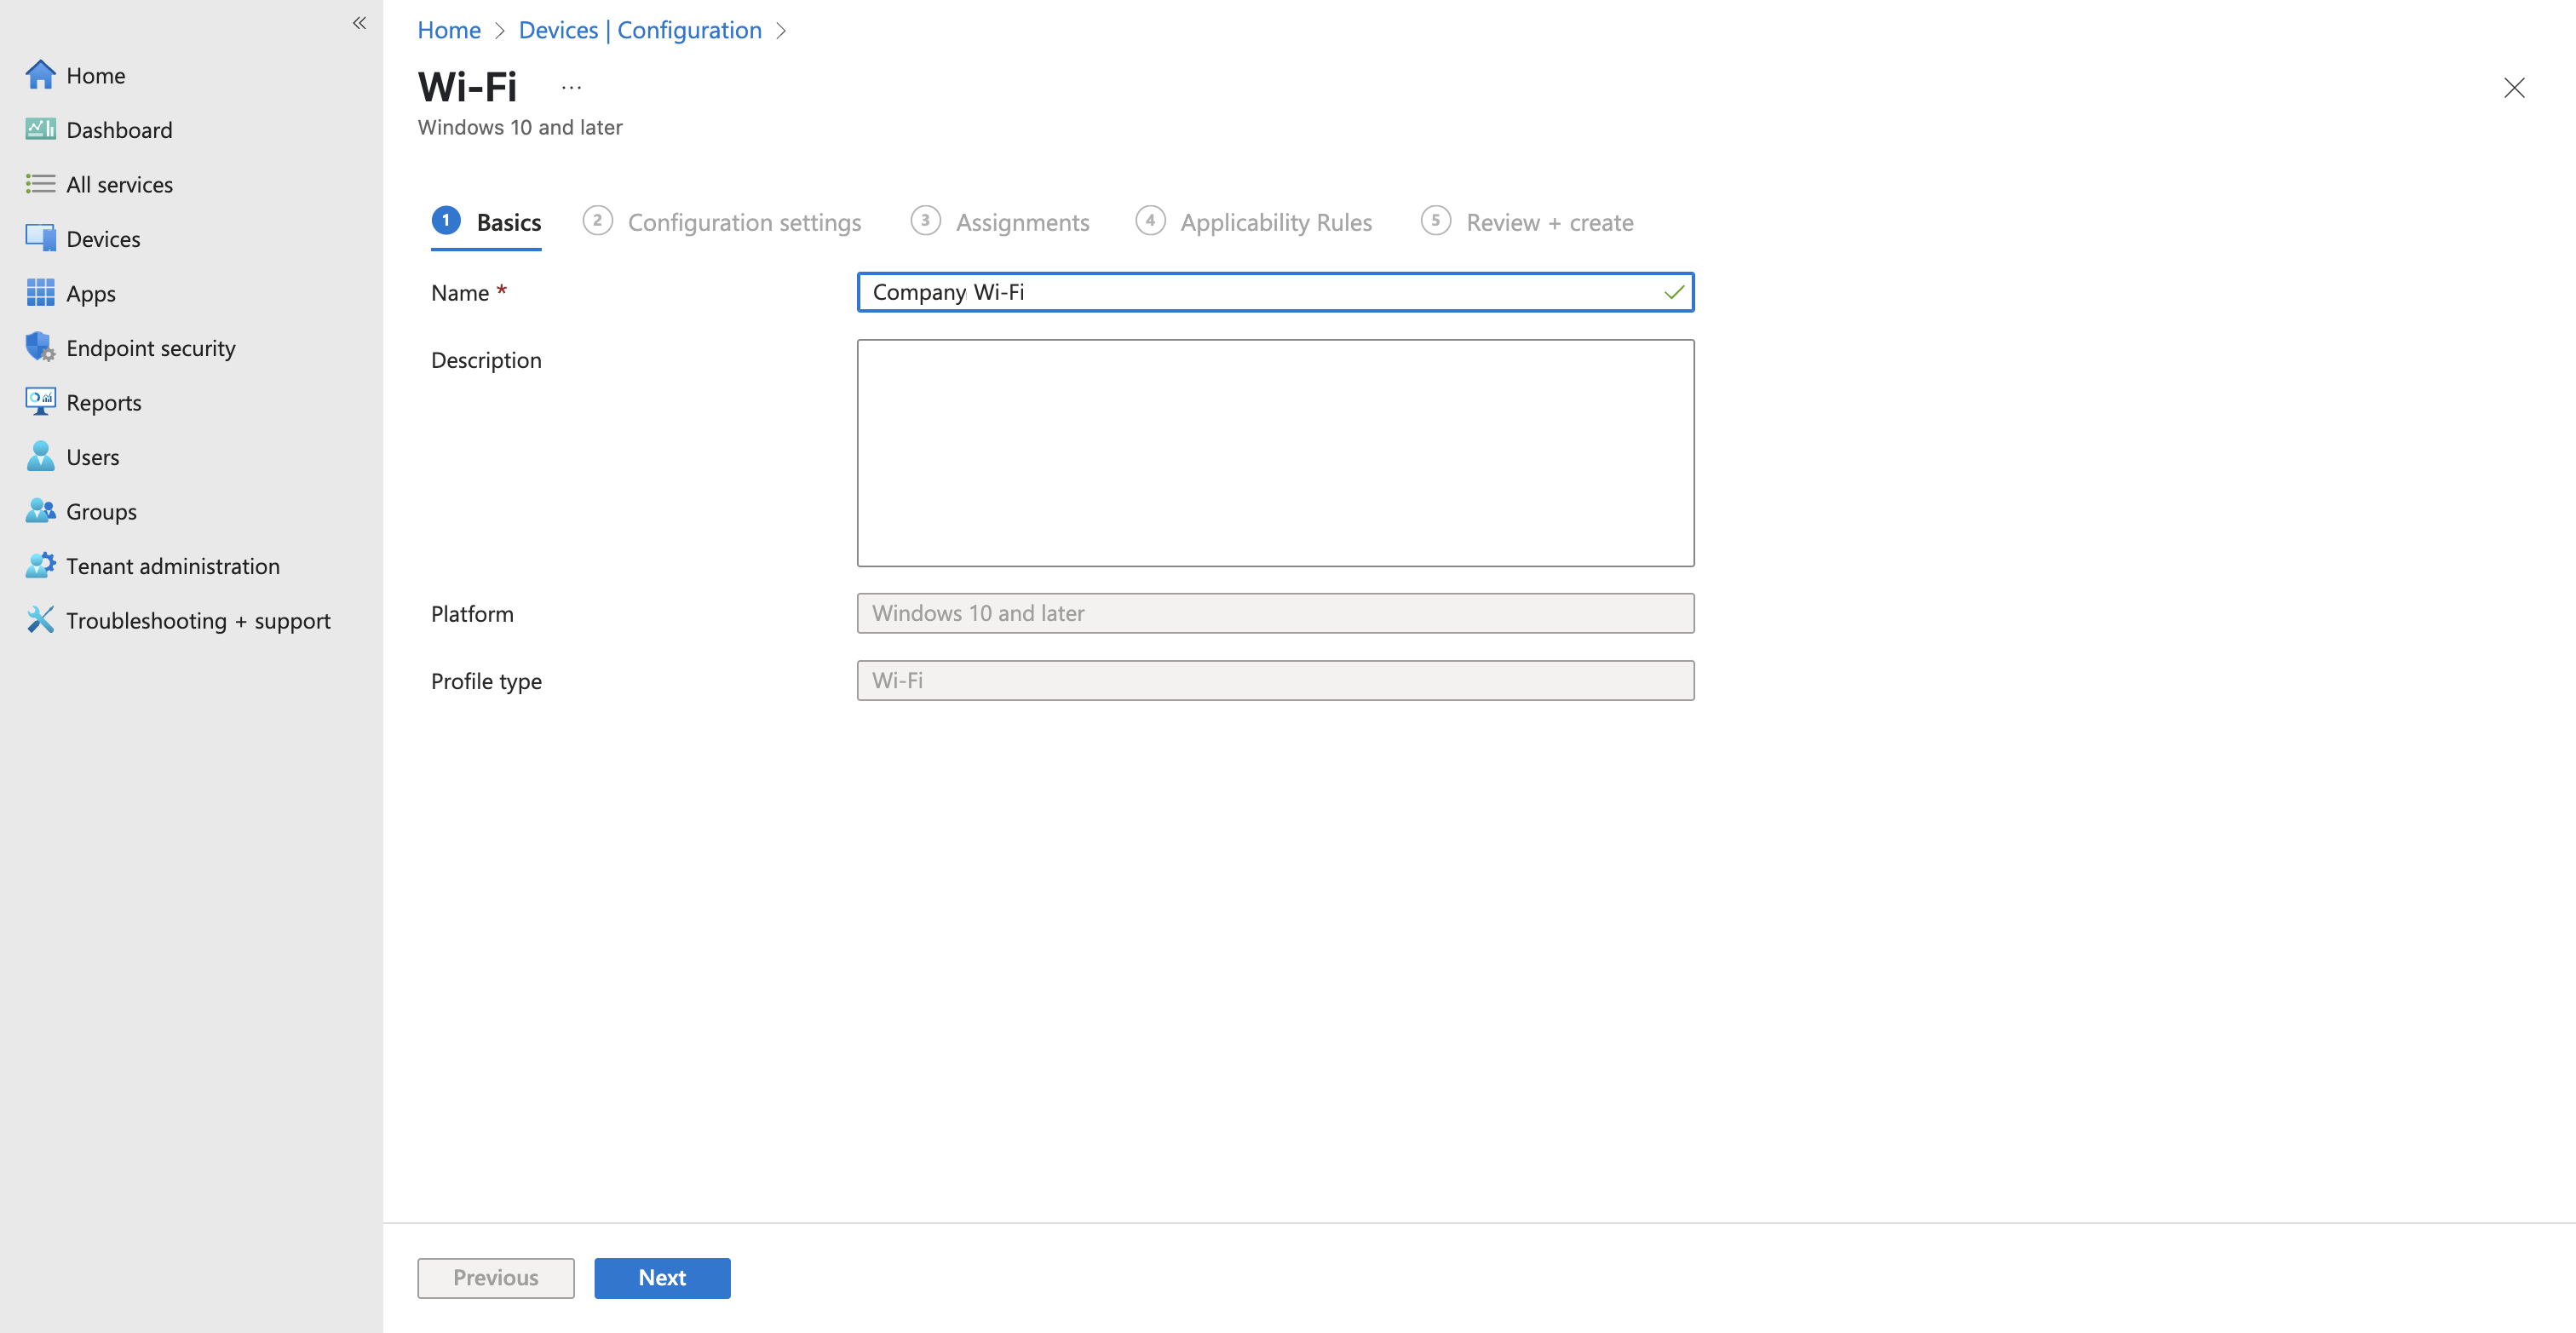
Create one more profile: Windows 10 and laterTemplatesWi-Fi. Name it Company Wi-Fi.

Basics tab of the Intune Wi-Fi configuration profile

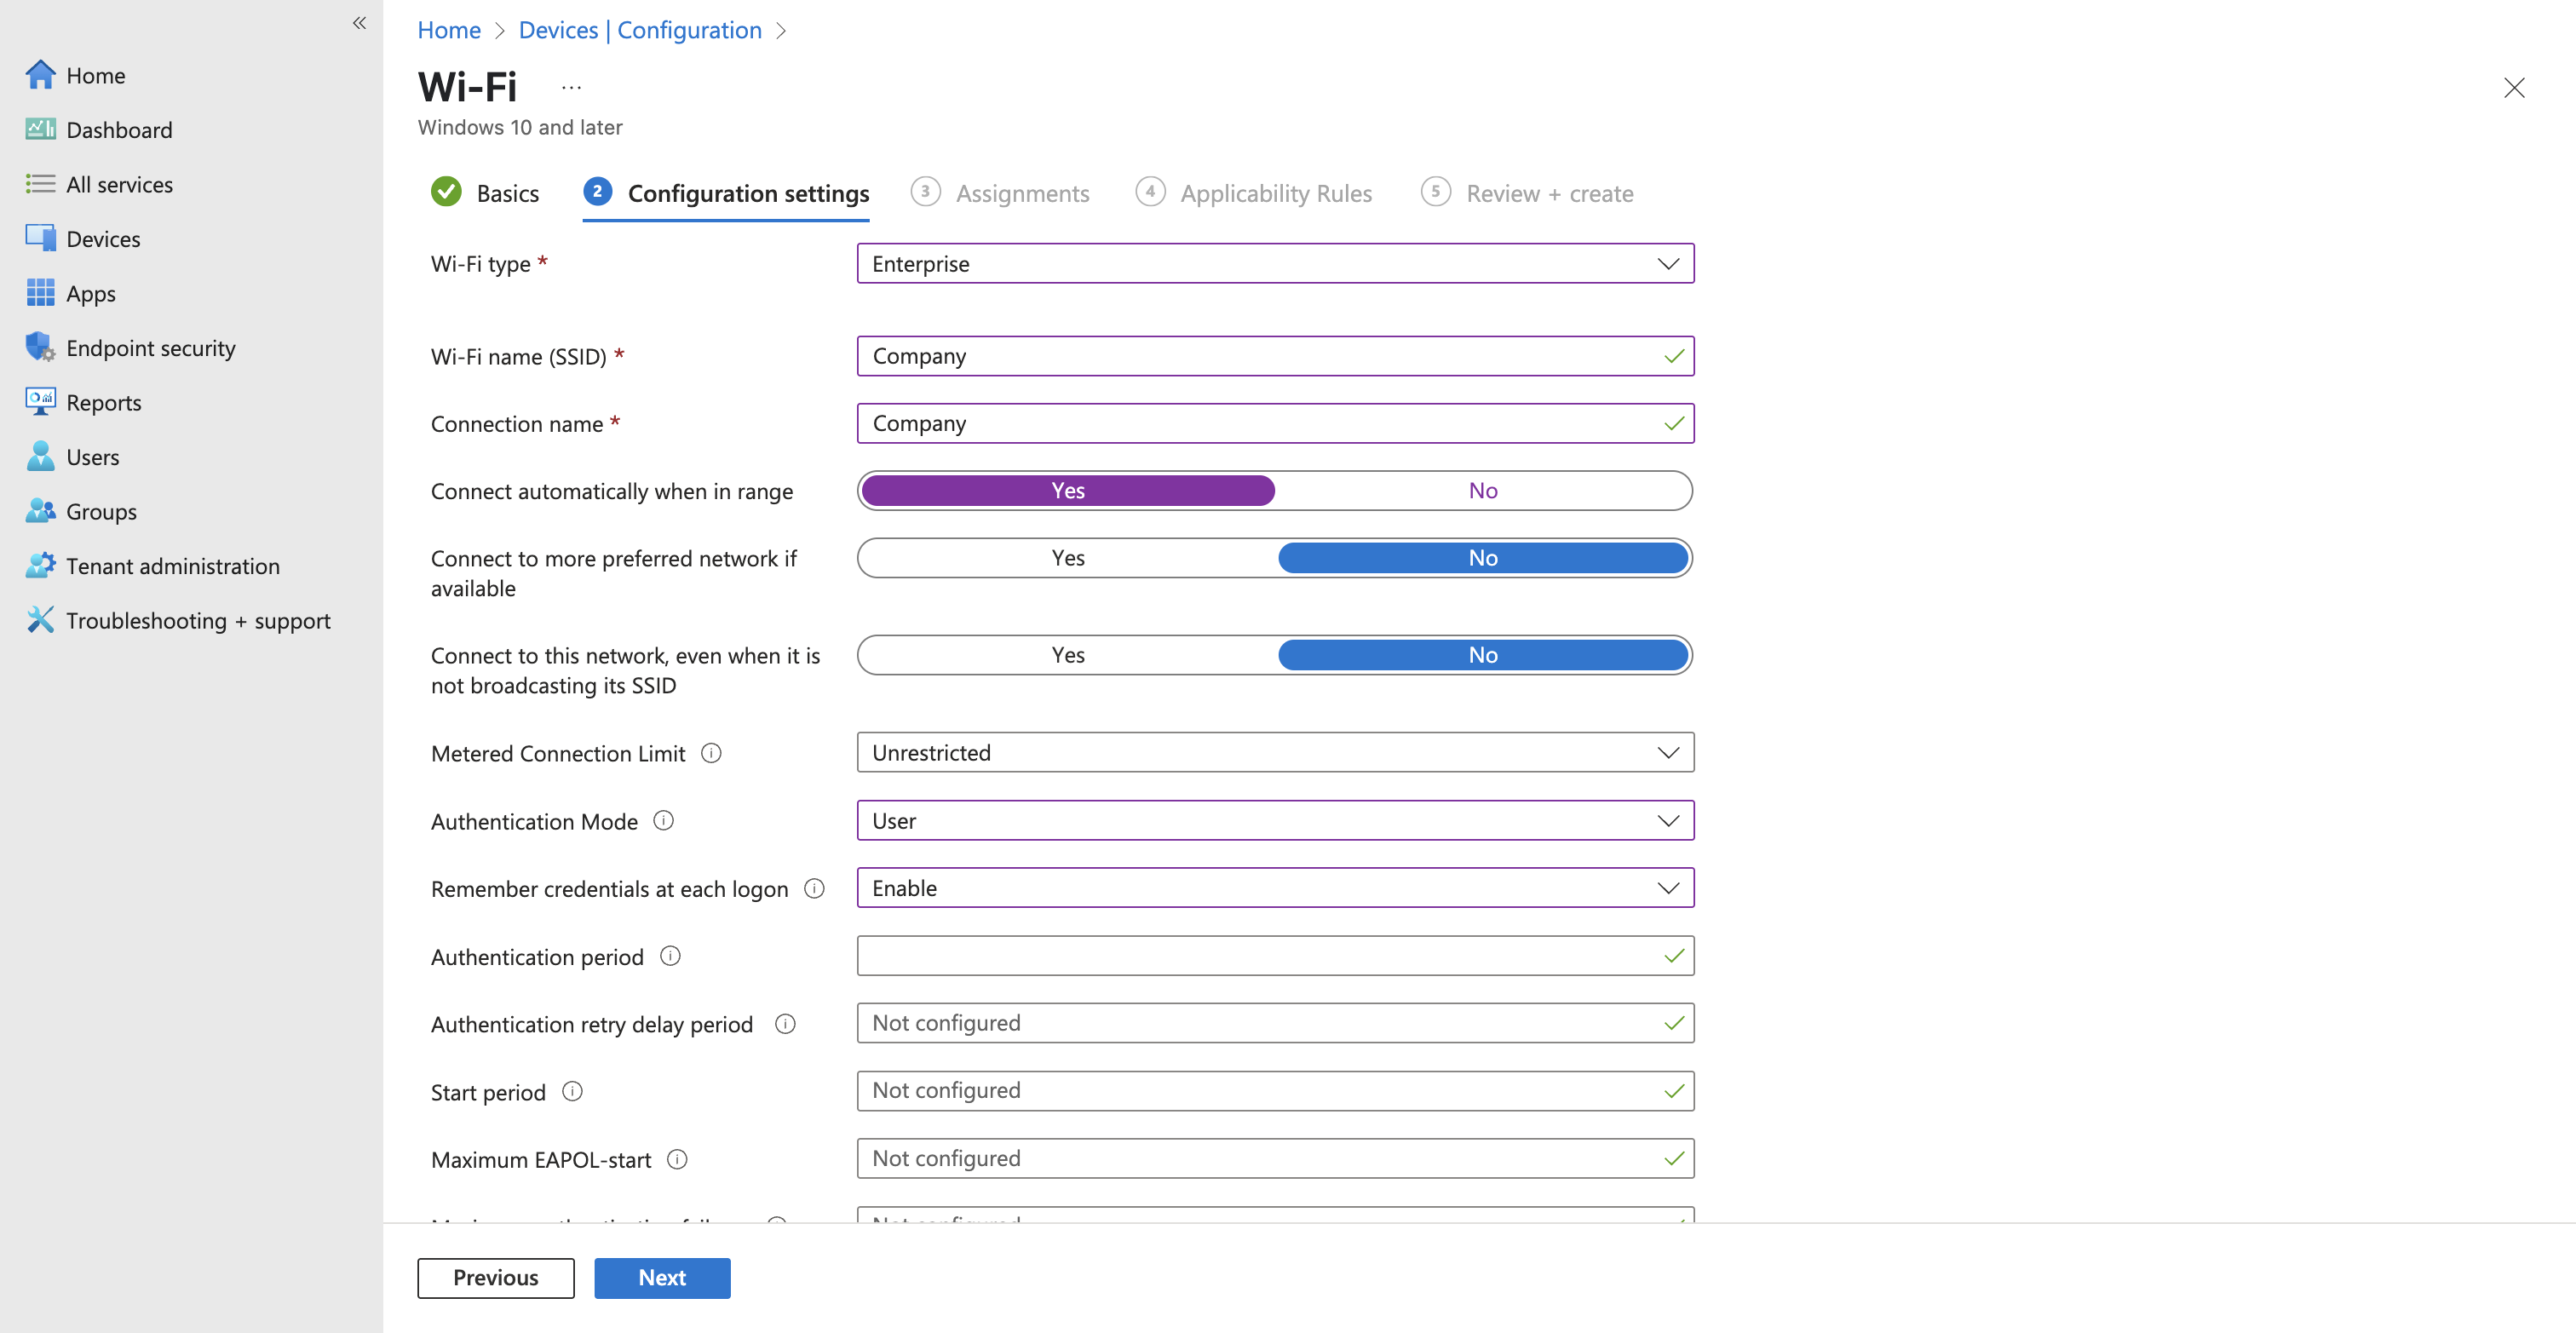
On Configuration settings:

SettingValue
Wi-Fi typeEnterprise
Wi-Fi name (SSID)your Meraki SSID
Connection namesame as SSID
Connect automatically when in rangeYes
Connect to more preferred network if availableNo
Connect to this network, even when it is not broadcasting its SSIDNo
Metered Connection LimitUnrestricted
Authentication ModeUser
Remember credentials at each logonEnable
Authentication period / retry delay / start period / EAPOL-startNot configured
Wi-Fi profile settings showing Enterprise type, SSID, connection behavior, and User authentication mode

Scroll to Fast roaming settings:

SettingValue
Enable pairwise master key (PMK) cachingYes
Maximum time a PMK is stored in cache840
Maximum number of PMKs stored in cache10
Enable pre-authenticationYes
Maximum pre-authentication attempts2

PMK caching is what keeps a full TLS handshake from firing on every roam between access points. On a certificate-based network the handshake is more expensive than PSK, so this matters more here than it would on a passphrase SSID.

Then under Extensible Authentication Protocol (EAP), set EAP type to EAP – TLS.
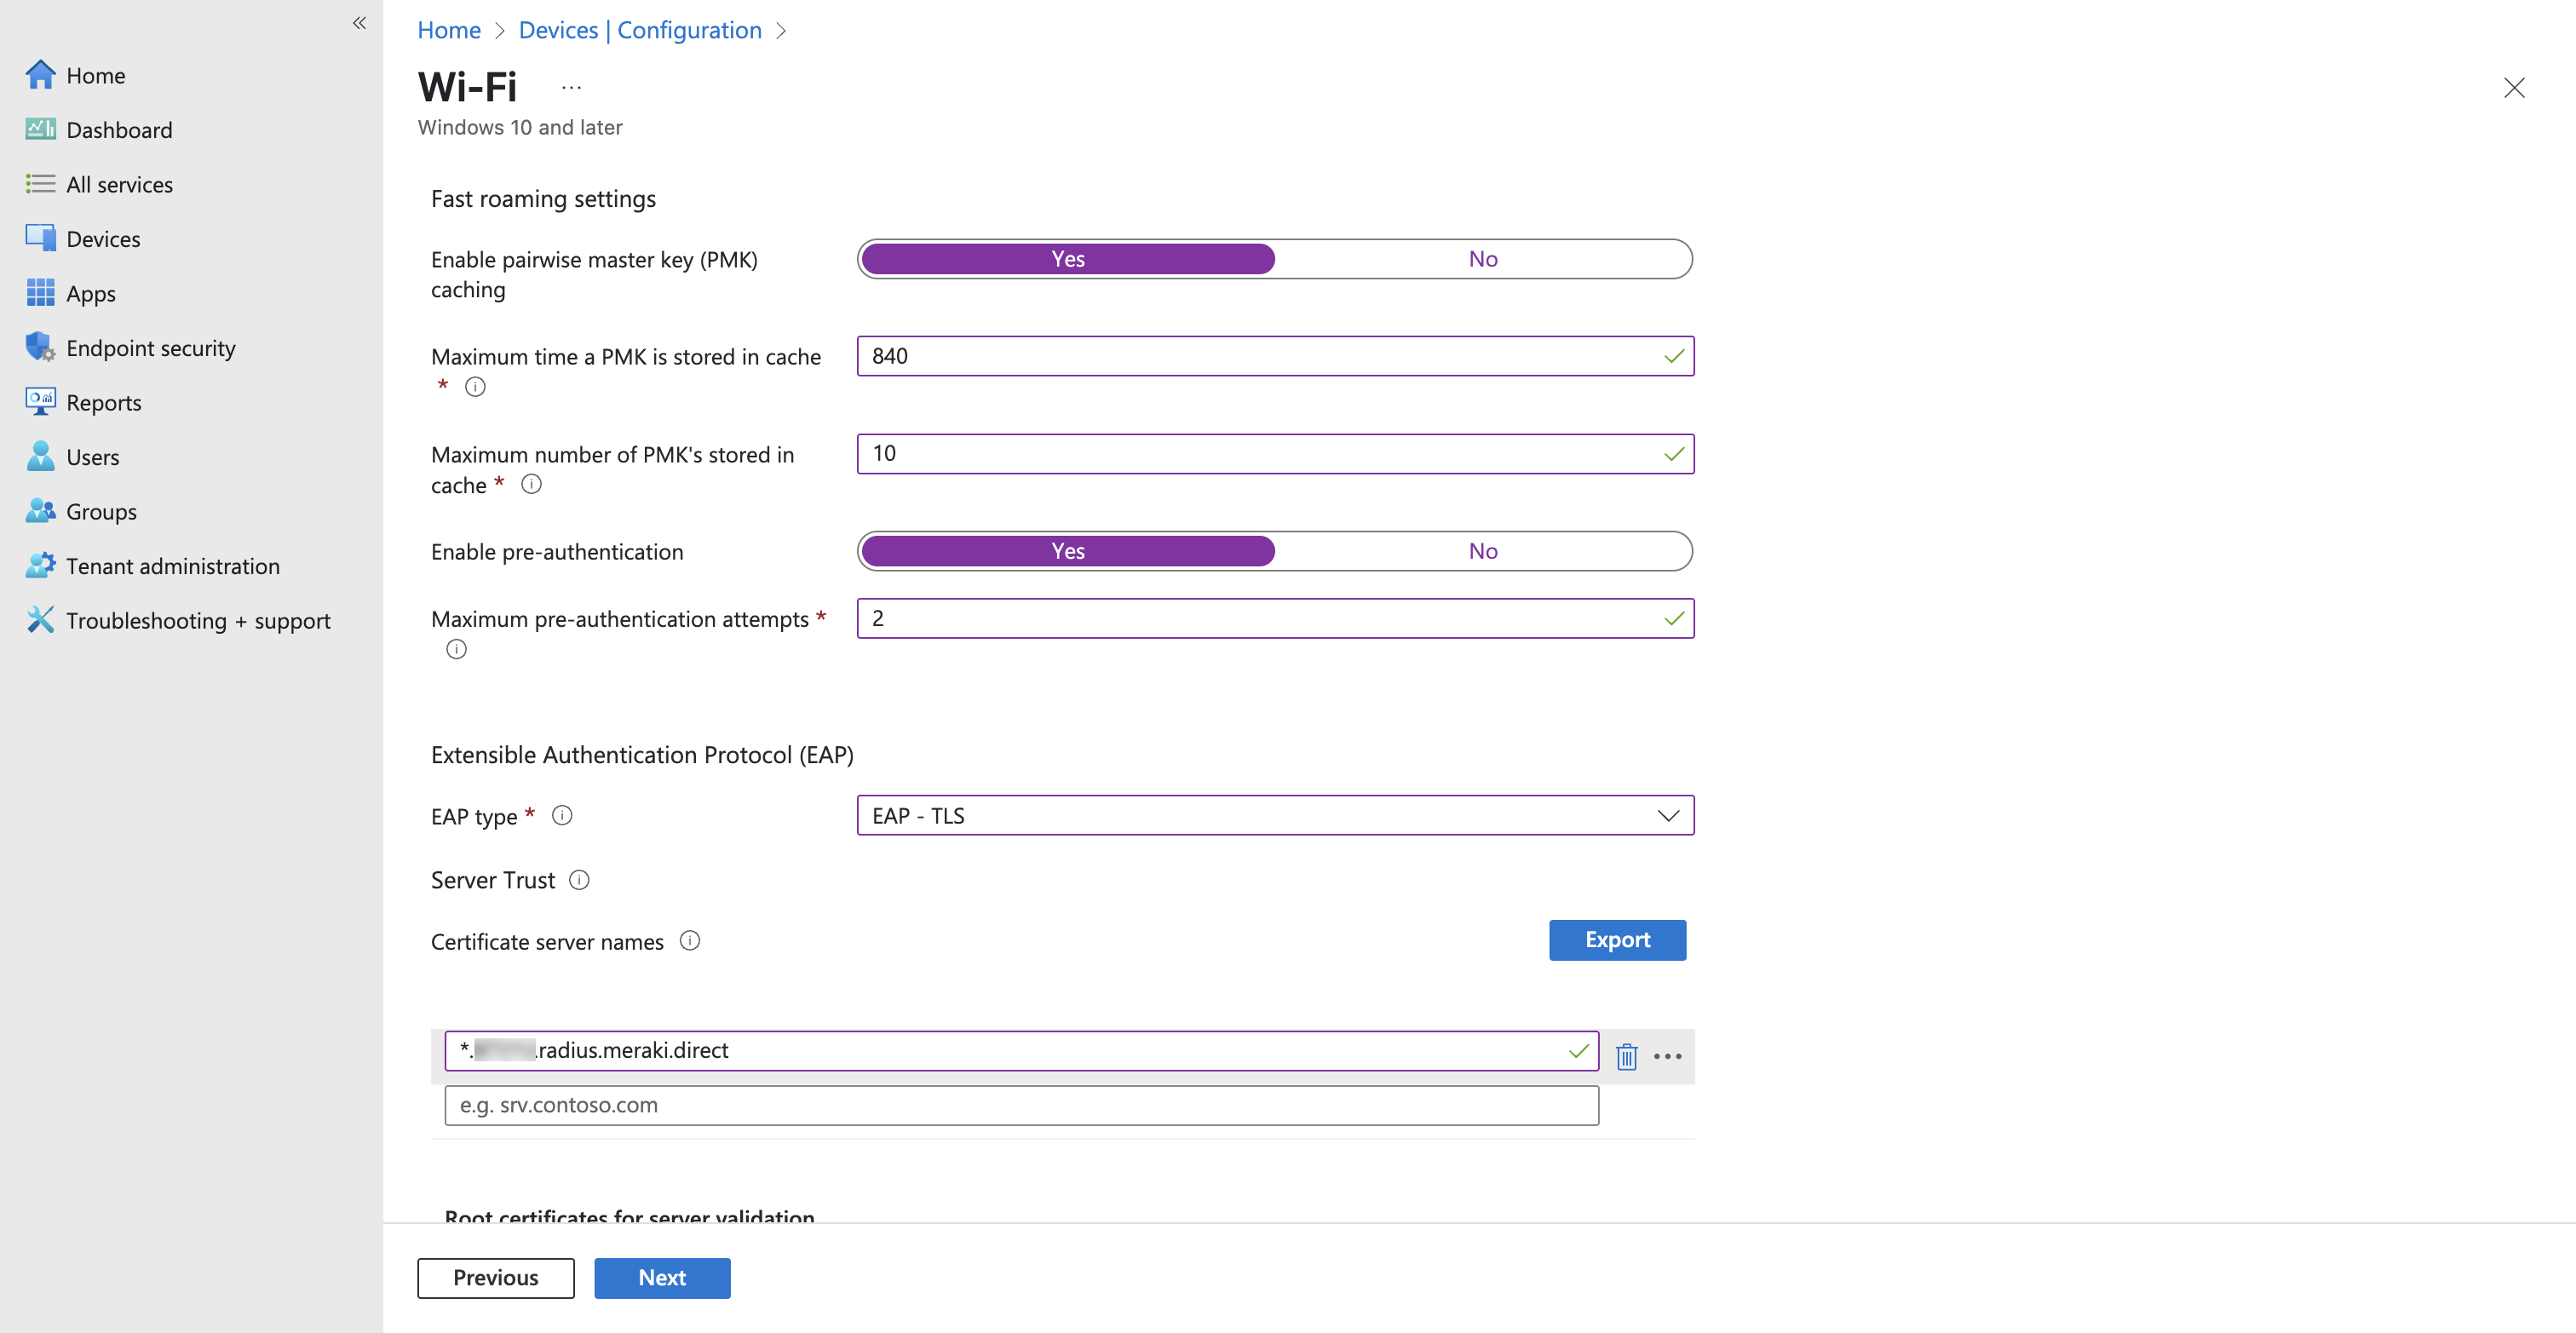
Fast roaming settings with PMK caching enabled and EAP type set to EAP-TLS

Server Trust and Client Authentication

This is the part that mirrors the Jamf Trust tab, and it’s where the Meraki values you copied in Part 2 come in.

Under Server Trust:

  • Certificate server names: paste the Current organization value from the Meraki RADIUS Client Trust settings: *.<org-id>.radius.meraki.direct
  • Root certificates for server validation: click Select one or more certificate profiles and pick the Meraki Local Auth Root Certificate profile you created above

Under Client Authentication:

  • Authentication method: SCEP certificate
  • Client certificate for client authentication (Identity certificate): select your Okta SCEP certificate profile
  • Company proxy settings: None
  • Force Wi-Fi profile to be compliant with FIPS: No
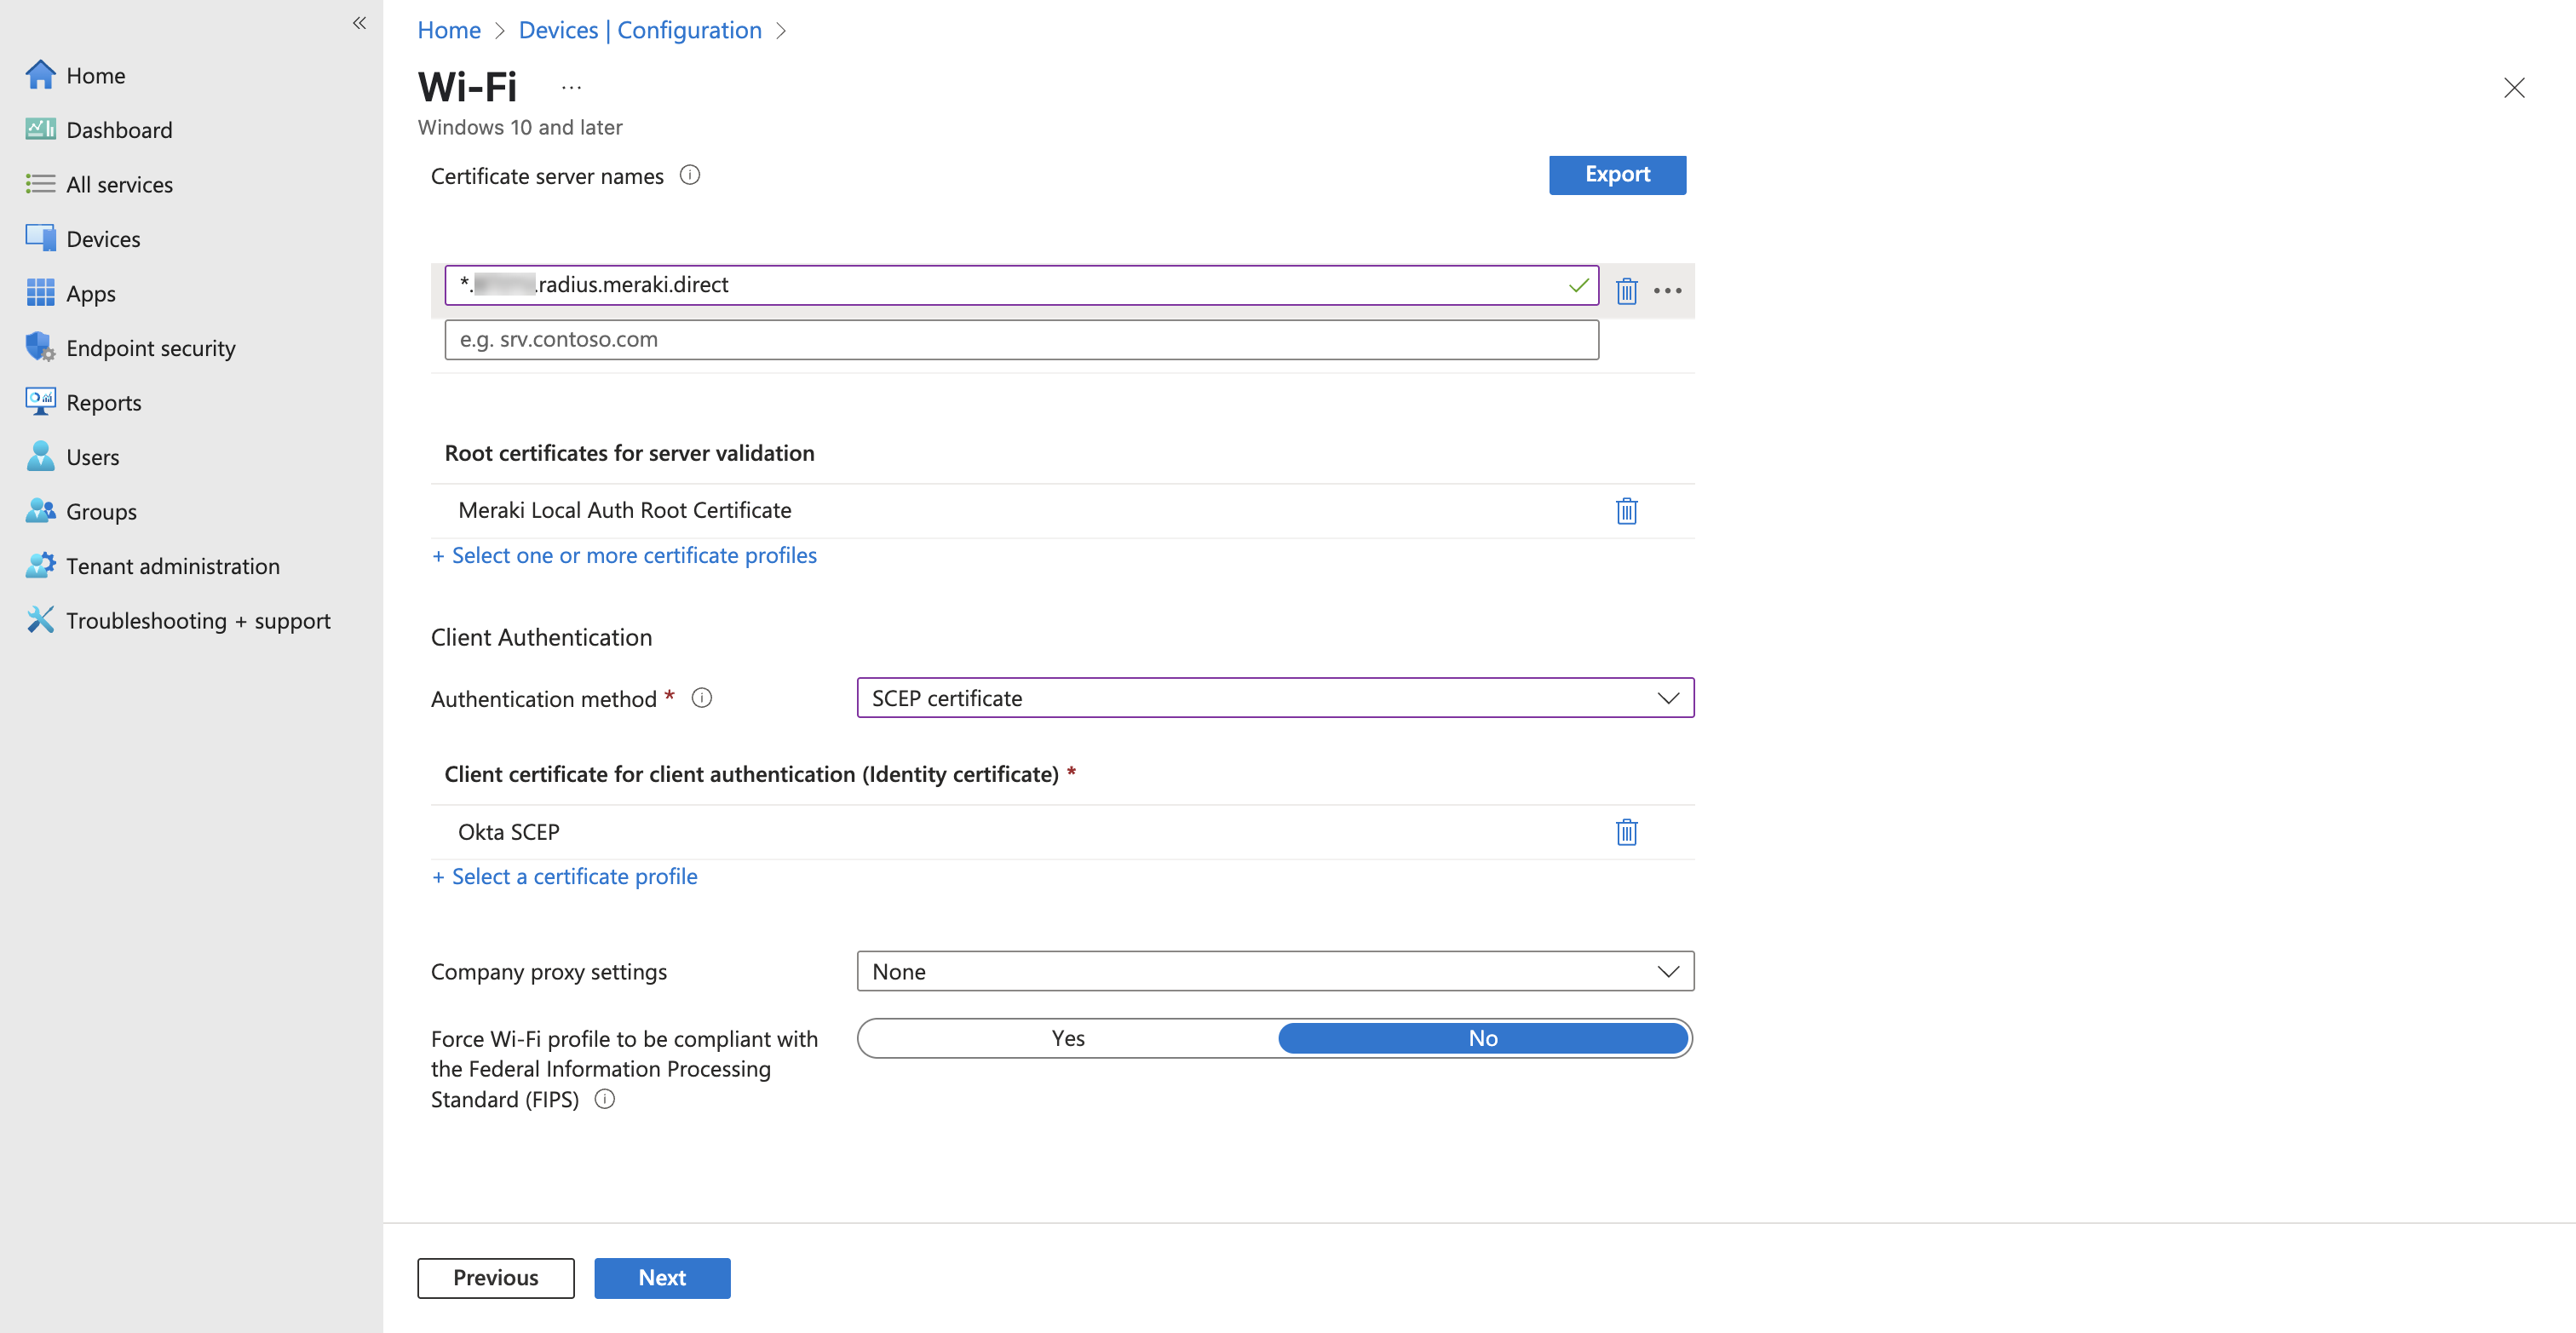
Certificate server names, root certificate for server validation, and SCEP identity certificate selection

Two things worth calling out. First, the Certificate server names field is the pin and without it, the client will accept any server presenting a certificate that chains to IdenTrust, which is a very large set of servers. Use the organization-scoped value, not the network-scoped one, for the same reason as in the Jamf profile.

Second, Authentication Mode: User combined with a SCEP identity certificate means the client presents the user’s certificate. If your Device Trust setup issues a device certificate instead, set Authentication Mode to Machine and point the identity certificate at the corresponding profile, otherwise the client will have nothing to present at logon.

Assign to all users, review, and create.
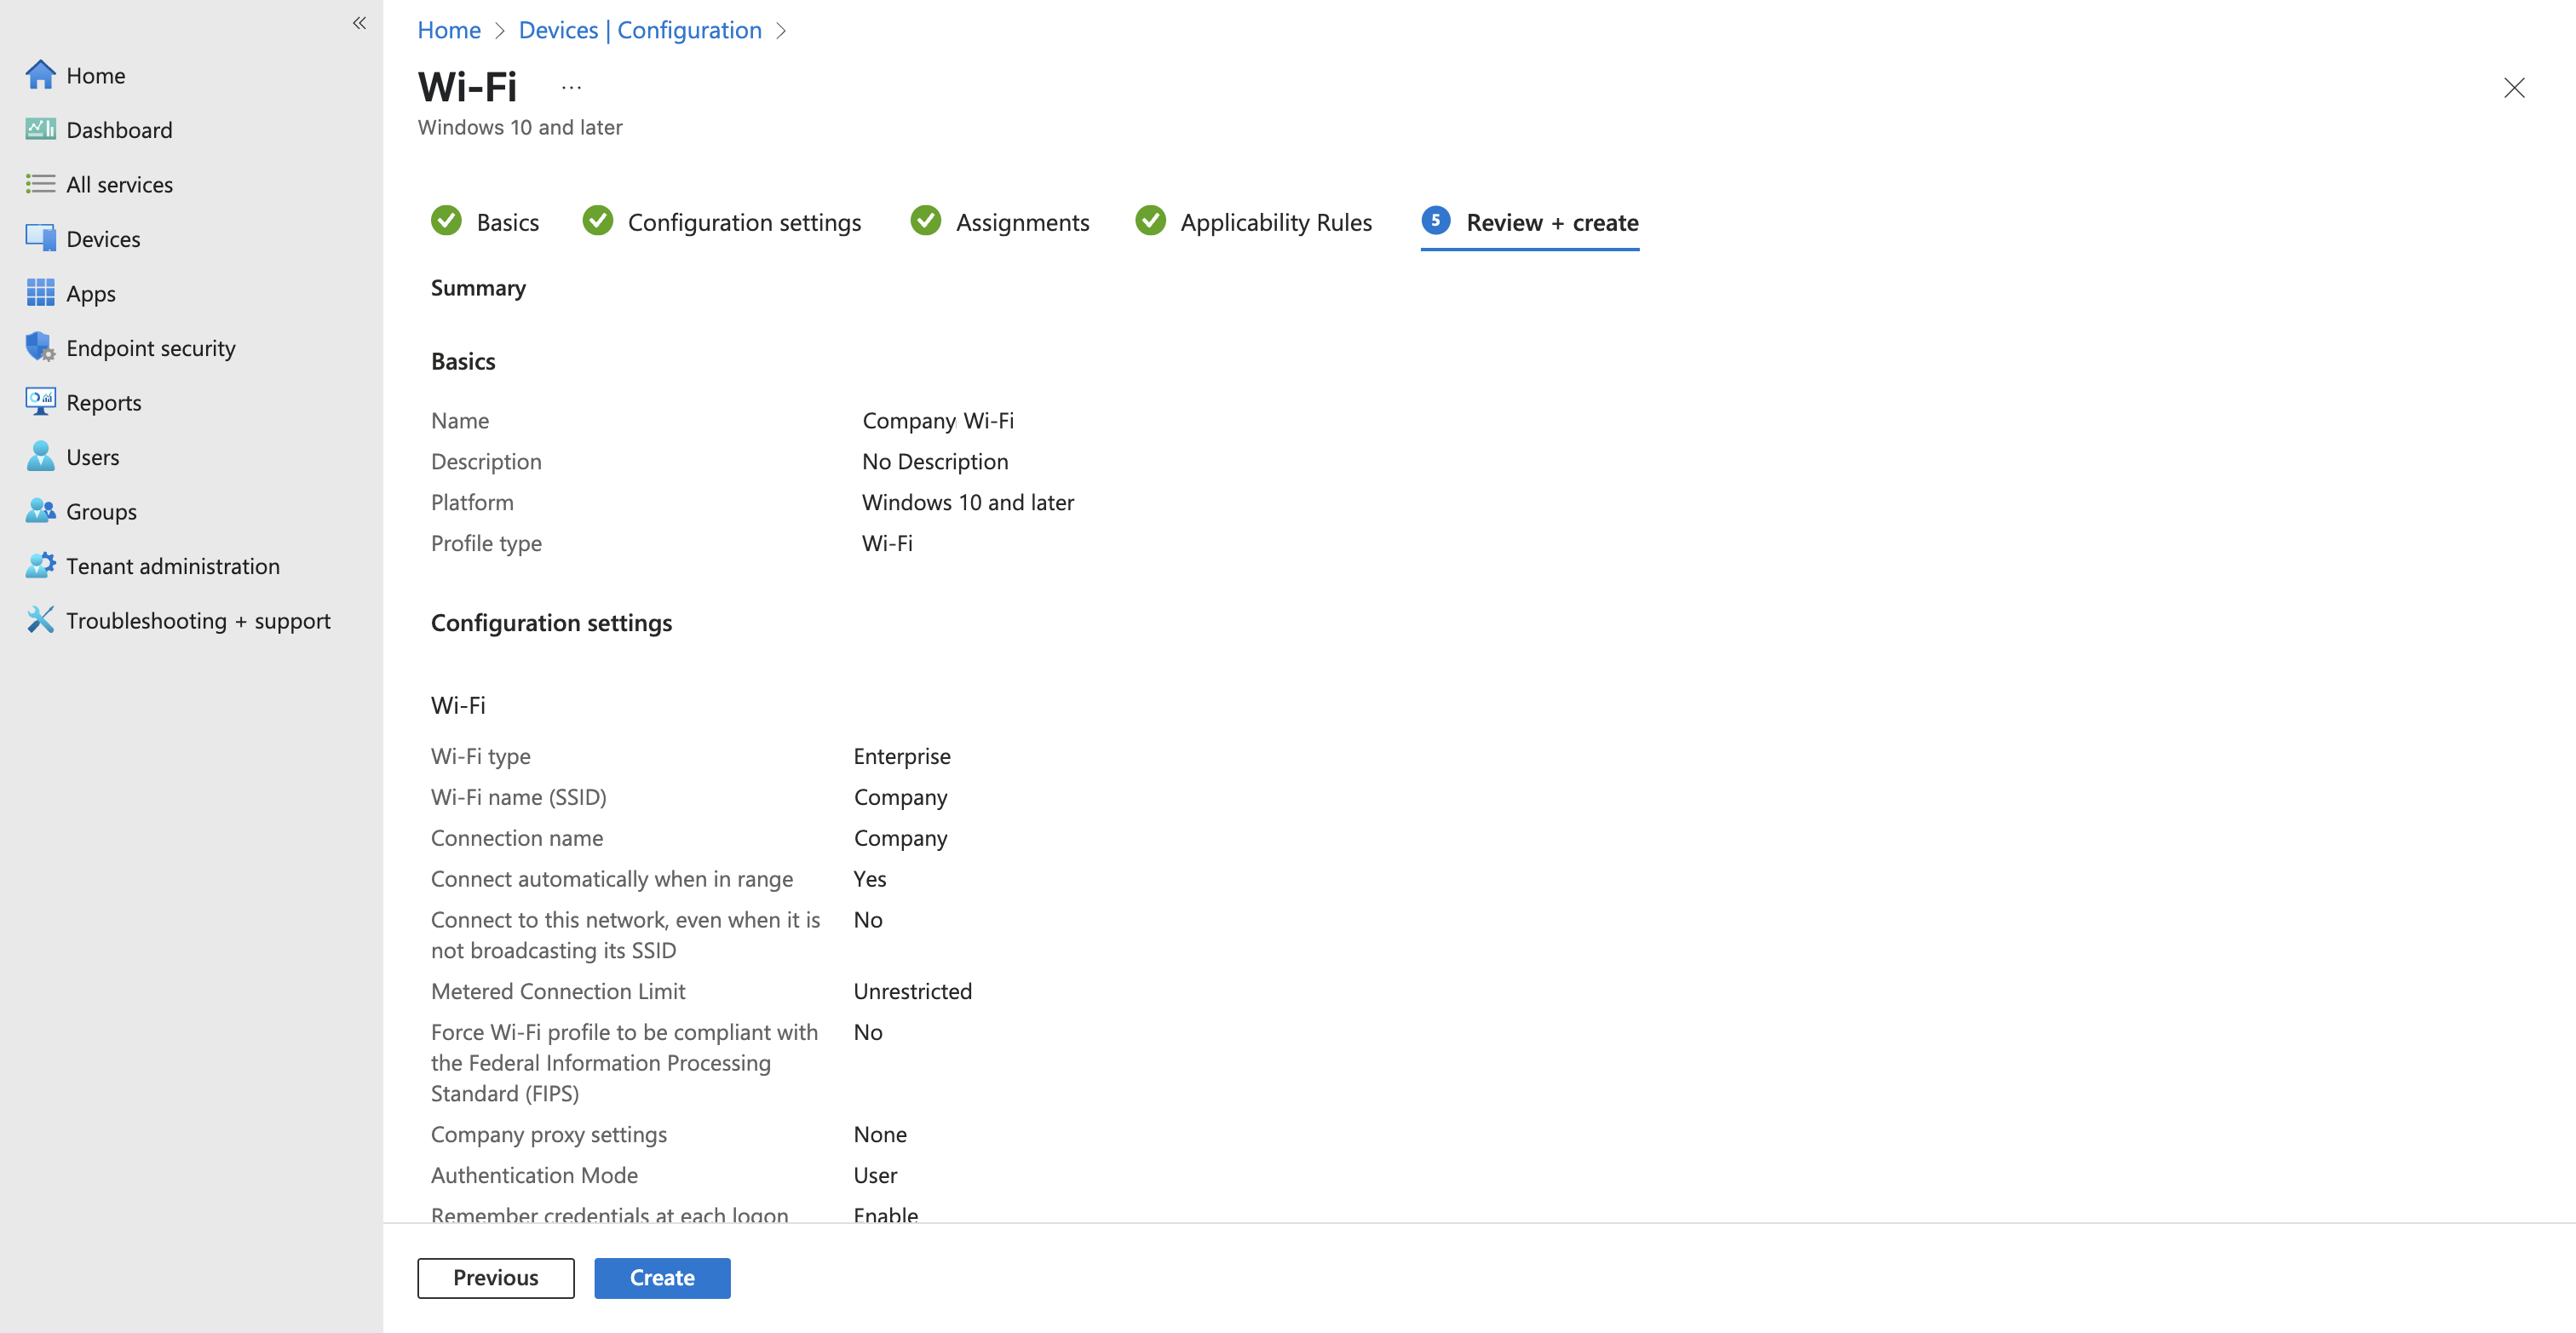
Review and create summary for the Intune Wi-Fi profile

Verifying on Windows

On a target machine, run certlm.msc and confirm all three certificates landed in the right stores: the Okta root and IdenTrust root under Trusted Root Certification Authorities, and the Okta intermediate under Intermediate Certification Authorities. Then check that the Okta SCEP client certificate is present under Personal.

If the client certificate is missing, the problem is upstream in Device Trust, not in anything above.

Once the certificates are in place, the SSID should appear and connect without a credential prompt. From an elevated prompt, netsh wlan show interfaces will confirm the authentication method in use.


Troubleshooting

Client won’t associate at all. Check that the profile actually installed, and that all three certificate payloads are present. A missing root in the chain is the most common cause.

Client associates, then immediately drops. Usually a name mismatch. Compare the Trusted Server Certificate Name in Jamf against the Meraki Current organization value character for character and it’s easy to grab the network value instead of the org value.

“Could not authenticate” with no useful detail. Verify the Identity Certificate in the Network payload is set to the SCEP (Okta) payload and not left at None. Also confirm the device actually received its SCEP certificate from Okta; if Device Trust never provisioned, there’s no client identity to present.

Certificate expired. Note the expiration dates when you upload certs, Okta’s intermediate and root have different lifespans, and the IdenTrust root has its own. Put the earliest one in your calendar.


Why This Approach

The usual path to certificate-based Wi-Fi is a RADIUS server: either self-hosted NPS/FreeRADIUS with the operational burden that implies, or a cloud RADIUS service with per-device pricing. This setup uses infrastructure you already pay for: Okta issues the certificates, Jamf delivers them, and Meraki validates them locally on the access point. No new servers, no new licenses, and no shared PSK sitting in a password manager waiting to leak.
Fixing MDM Communications With Apple Business Manager Migration

Introduced in macOS 26 Apple Business Manager (ABM) supports migrating devices from one MDM to another.  One unintended feature of this is the ability to use the migration to repair broken MDM communications, including mismatched APNs topics with expired MDM profiles. This saves IT from performing a device erase or going into recovery mode.

This guide will go over how to correctly set up Apple Business Manager and Jamf to repair MDM communications. At a high level we’ll be creating a 2nd Management Service in Apple Business Manager that links back to the same Jamf Pro Server. This will allow us to “migrate” devices from Jamf Pro to Jamf Pro which will force a reenrollment.

Interested in more MDM Communication fixes? Check our our JNUC Sessions Flawless MDM Communication and Flawless MDM Communications: Scripting Edition

Feedback has been sent to Apple to allow ABM to simply execute a fix.


Jamf – Download Jamf ADE Public Key

Login to Jamf Pro and navigate to Settings > Global > Automated Device Enrollment and download the Public Key at the top right

ABM – Create Device Management Service

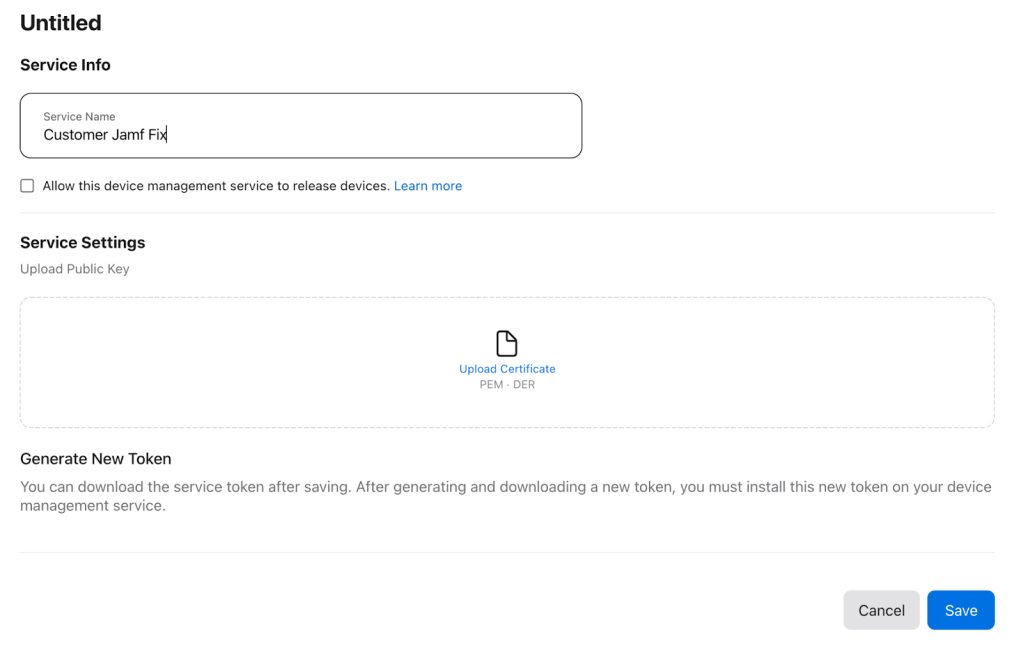
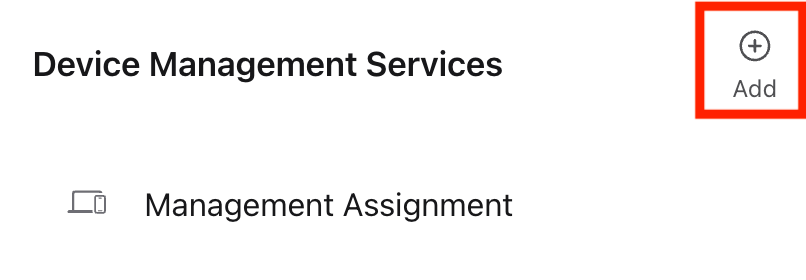
Login to Apple Business Manager account and navigate to Preferences > Device Management Services and Click Add

Service Info: Company Jamf Fix

UNCHECK Allow this device management service to release devices.

Upload the public Key previously downloaded.

Click Save

Click Download Token

Jamf – Create ADE Enrollment

Login to Jamf Pro and navigate to Settings > Global > Automated Device Enrollment and click New

Display Name: Company Apple Business Manager Fix

Upload the token from above.

Supervision identity for user with Apple Configurator: None

Jamf – Clone Computer PreStage

Login to Jamf Pro and Navigate to Computers > PreStage Enrollment

Click on the primary PreStage enrollment for computers

Click Clone at the bottom

Add “fix” to the end of the display name

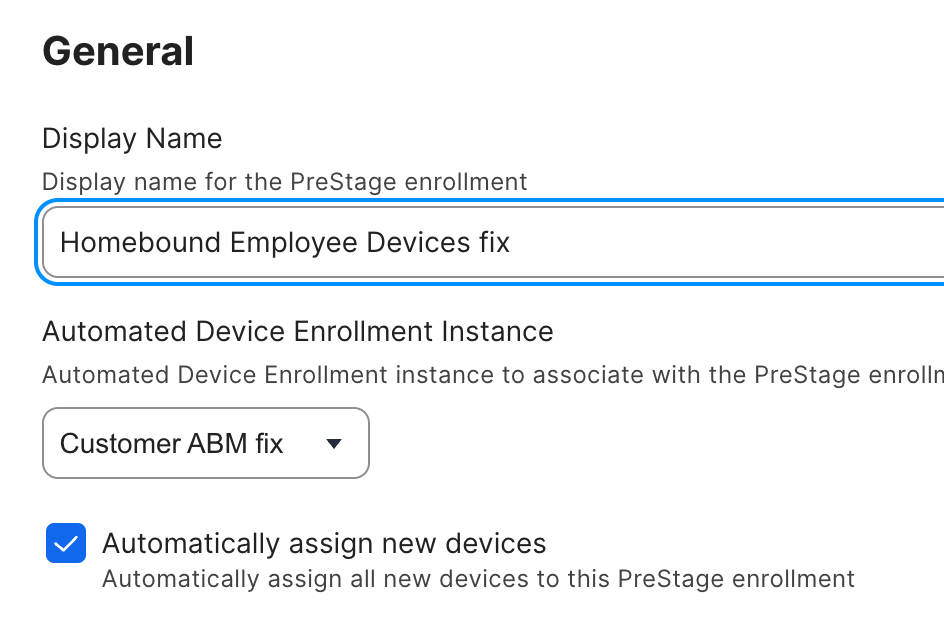
Change Automated Device Enrollment Instance to ABM fix

Check Automatically assign new devices.

Click Save

Jamf – Clone Device PreStage

Login to Jamf Pro and Navigate to Devices > PreStage Enrollment

Click on the primary PreStage enrollment for devices

Click Clone at the bottom

Add “fix” to the end of the display name

Change Automated Device Enrollment Instance to Company ABM fix

Check Automatically assign new devices.

Click Save

Repairing a device

Jamf – Identify Device serial and eligibility

When you’ve identified a device that needs to be repaired, go into Jamf and get its serial number. Also verify that it’s running at least macOS 26 Tahoe.

ABM – Assign Device

Login to the ABM and click Devices.

Search for the Serial number

  • If the serial number isn’t here then the device isn’t in Apple Business Manager and isn’t eligible for repair. But it can be automatically repaired using Mann’s APNs fix workflow.

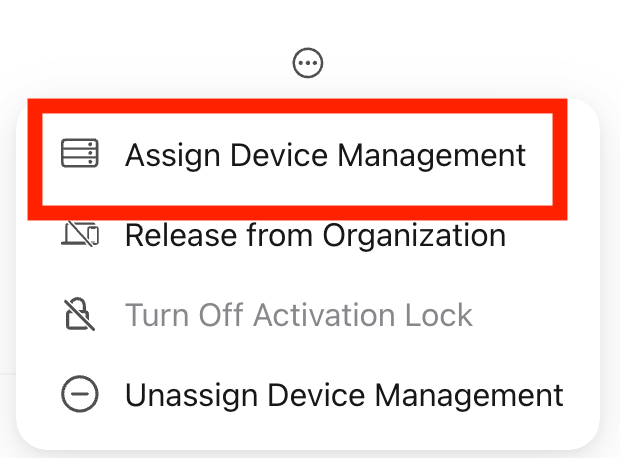
Click the … in the upper right corner of the record and then Assign Device Management

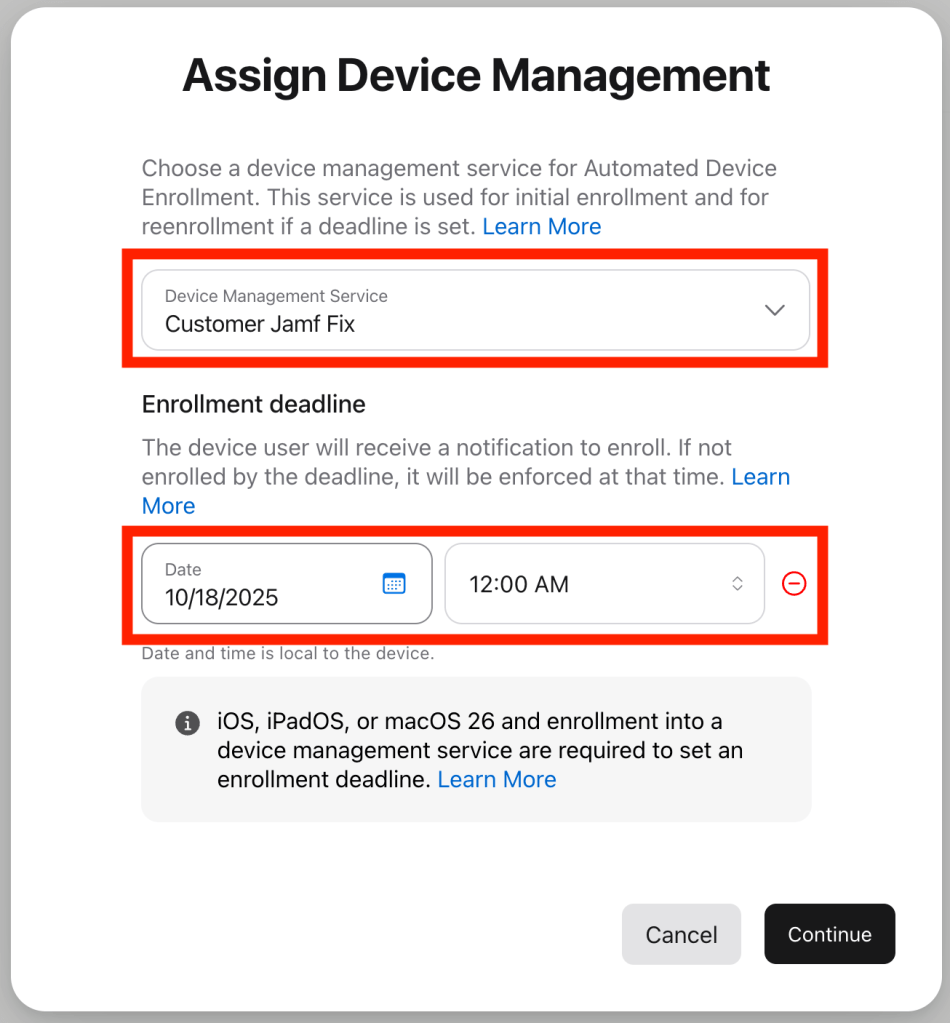
Select the Company Jamf Fix instance and set a deadline, usually 1 week away at 8:30am local time is best. 

Once you click continue the device will be forced to move through the process.

Employee Experience

macOS user experience

As the deadline approaches, users will get notifications informing them that management of their device needs to be updated by a specific date. These appear every 24 hours then hourly leading up to the deadline.

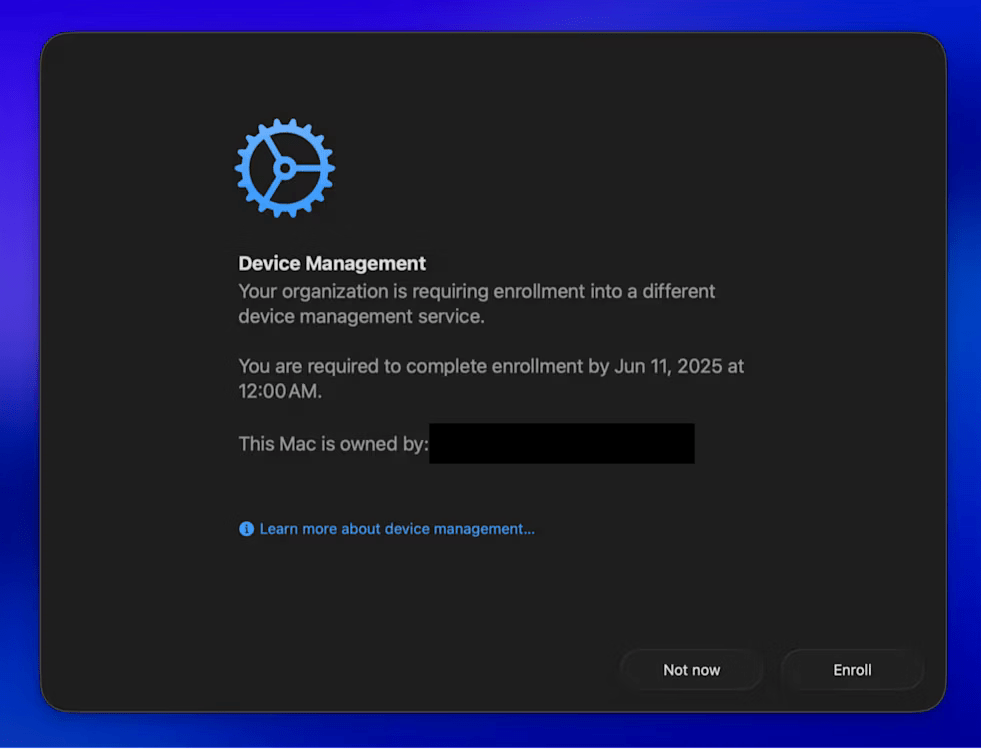
When the user clicks Start Enrollment, they will get a full screen pop-up where they can click Enroll. If the user clicks this before the deadline, they will have the option to defer with Not now. 

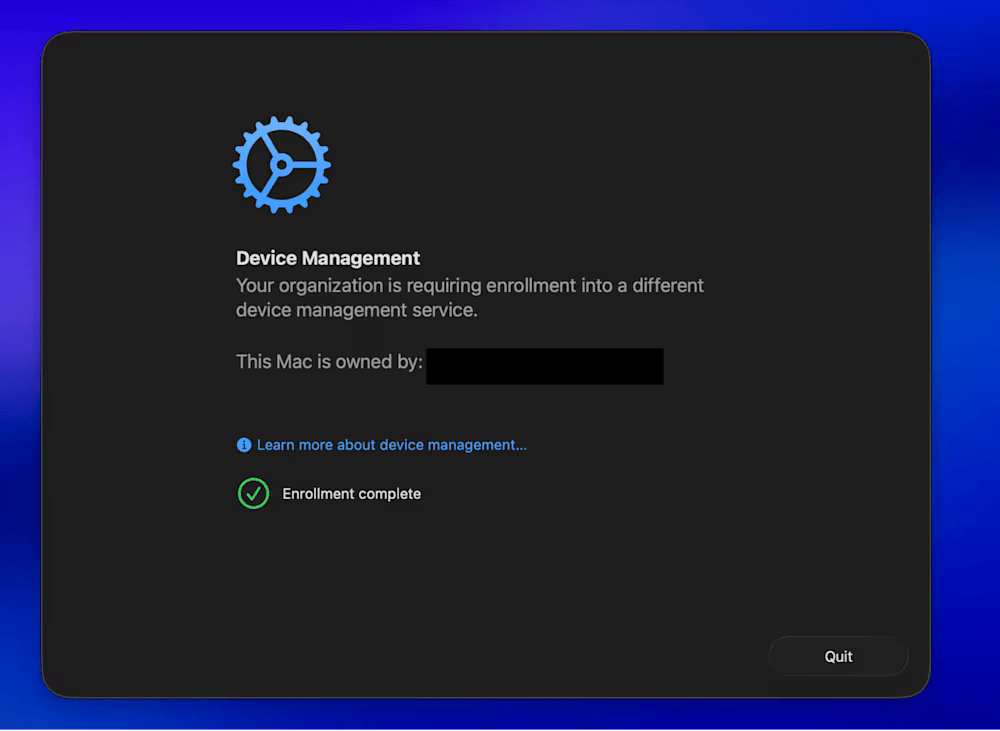
Once Enroll is clicked profiles start installing, after a few moments when everything is downloaded and Enrollment complete messages appears

Once quit is clicked no restart is necessary.

iOS user experience

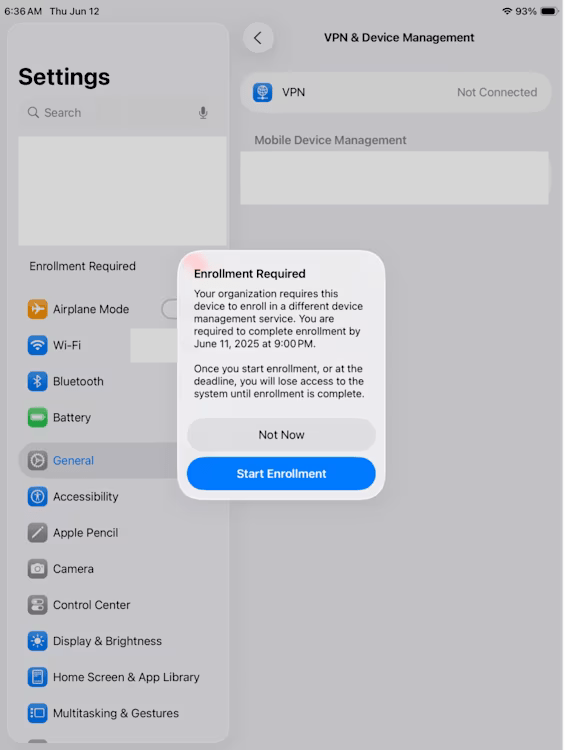
The user will receive a prompt that enrollment is required.

Following this prompt will bring the user to the Settings app:

Selecting Start Enrollment will show a subsequent prompt notifying the user that a restart is required:

After selecting Restart, the device will promptly reboot and complete the enrollment in the new MDM service. The migration is now finished.

If the user elects to exit this flow at any point by selecting Not Now, they will be able to re-initiate it through Settings by tapping the Enrollment Required notice.

Details button not working in Jamf Pro policy logs

Starting with the 11.13 update Jamf Pro administrators have reported that the details button in policy logs isn’t working as intended. Instead of showing the details of the policy clicking this button no longer does anything. This can make troubleshooting policy errors difficult.


Fortunately after some discussions on Mac Admins Slack https://www.macadmins.org it’s been identified that clearing all the browser cache will fix this issue. As a bonus Jamf has now fixed PI120308, introduced in November 2024 that resulted in the policy logs no longer having a horizontal scroll bar!

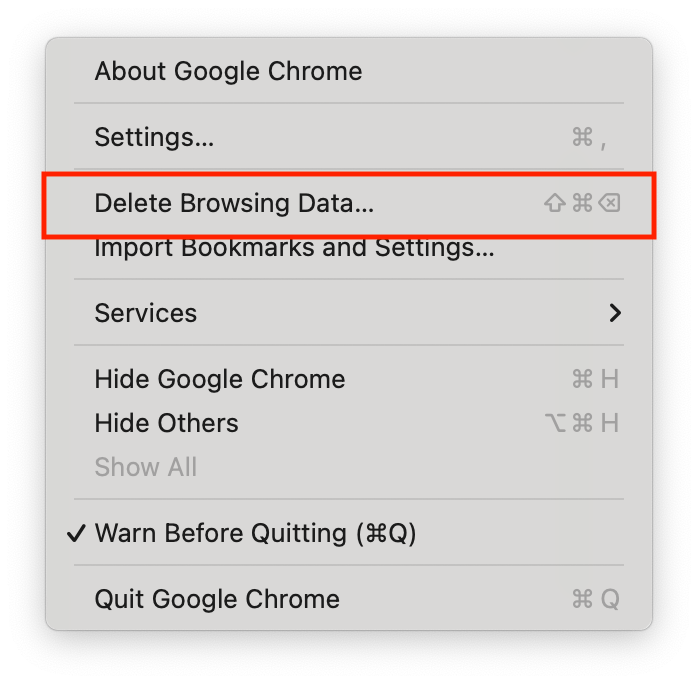
Google Chrome Fix

For Google Chrome simply choose Chrome from the Menu Bar, then “Delete Browsing Data…”

Select only “Cached images and files” then click Delete data.

Refresh the Jamf Pro console and the Details button should now work!

Major macOS deferrals may rollback security fixes

Apple provides the ability to defer major macOS upgrades to prevent early adoption of major OS versions on managed devices.  Having a major deferral in place that’s longer than an existing minor deferral may leave computers with an immediately pending macOS update after a macOS Upgrade, which could cause computers to rollback already applied security fixes. Computers will be left vulnerable to previously patched flaws until the available update is applied.

This article is written based on the following configuration:

  • Today’s date: December 16th, 2024.
  • Upgrade: Major version change, example: macOS 14 -> macOS 15.
  • Update: Minor version change, example macOS 15.0.1 -> macOS 15.1

How the rollback happens:

macOS 15 was released 91 days ago on September 16, 2024, so a Major deferral of 90 days has now expired. Computers running macOS 14 will now see the macOS 15.0 available update in System Settings. Note I say macOS 15.0, not macOS 15.0.1 or macOS 15.1.1. This is because the 90 day Major deferral logic fully defers all major versions for 90 days of their release. macOS 15.0.1 was released 74 days ago on Thursday, October 3, 2024 which is less than 90 days ago, so it remains deferred. 

Since we have a 14 day minor deferral in place most of our computers should be on macOS 14.7.1 with Safari 18.1.1 update applied. Safari 18.1.1 Fixes CVE-2024-44308 and CVE-2024-44309, both of which are considered under active exploit for Intel systems. These vulnerabilities were also fixed in macOS 15.1.1, but our computers will be upgrading to macOS 15.0… So computers will go from a patched state to a vulnerable state on upgrade.  After the upgrade the computer will need to then perform a minor update to macOS 15.1.1, which is allowed under the minor deferral configuration in place.

How to fix this:

Organizations should immediately reduce their major deferral to match their minor deferral. Systems will then upgrade to the version of macOS 15 with a similar patch level of their existing macOS 13 and macOS 14 systems. This needs to be done every release cycle.

Long term fix:

To avoid having this happen on an annual basis Apple would need to update the deferral logic.  I’ve filed FB16108783 with Apple, and I encourage you to do the same.  The current request is:

Major Deferrals decide if a computer can go between major OS versions (i.e. can the computer go from macOS 14 to macOS 15?) but it doesn’t decide the minor version available. Instead it uses the Minor deferral, if set, to decide which minor version of the upgrade is allowed (i.e. can it go from macOS 14 to macOS 15.1.1 or macOS 15.2?).

With this in our scenario of 90 days major/14 day minimum computers would upgrade directly to macOS 15.1.1 and assume similar security patches.

Thanks to Adam Codega and Eric Carr for assistance writing this!

Undocumented change in Jamf Pro 11.11 limits policy logs

In Jamf’s November 2024 Jamf Pro 11.11 update Jamf silently added in a 25 KB limit to policy log output. This will limit the your ability to troubleshoot scripts that fail to run with an output more than 25 KB.

Jamf support notes that this is to prevent “server degradation”. There is no public documentation on the new limitation, nor is it included in the Jamf Pro 11.11 release notes. Jamf’s suggestion is to modify scripts to limit output or send any additional data to a local log file instead.

Jamf Premium cloud customers can request this limit be increased.

Credit to Eric Carr of Mann Consulting for identifying this issue.

Testing

Testing this is quite simple, create a policy that uses this script which outputs ~27 bytes of data 1,000 times:

#!/bin/zsh

for i in {1..1000}; do
  echo "ThisStringIsAbout25Bytes $i"
done

Run the policy and check the log output. As shown in the image below you’ll see the log output is truncated at 25KB with …Output Truncated…

Next steps

Unless you’re on cloud premiums your options are limited, but include:

  • Setup external logging to Datadog or Splunk.
  • Rewrite the log files located in /Library/Application Support/JAMF/tmp/ before Jamf submits them.
  • Reduce your logging statements in scripts.

How to run unsigned apps in macOS 15.1

Apple uses code signatures to verify app are created by a specific developer and haven’t been tampered with. This is done through Apple’s Gatekeeper process which blocks execution of known bad code or code with no signature at all. In versions of macOS prior to 15.1 you bypass this block by going to System Settings > Privacy and Security after an app is blocked allow it to open.

Apple introduced a change in macOS 15.1 that blocks running all unsigned code. This can be an issue for those wishing to run Open Source applications where the $99/year developer fee may not be feasible. It’s not clear if this change is on purpose or a bug, but you can work around this with a a simple terminal command… and you don’t even need to be admin to do it!

Note: Gatekeeper and code signing is a very important security mechanism in macOS, bypassing it may result in harmful code execution on your computer. Before you exempt an application from Gatekeeper you should be confident of it’s source as well as decide if it’s worth risking the integrity of your system.

Gatekeeper uses the extended attribute com.apple.quarantine to decide if a file should be checked. Manually removing this flag will tell Gatekeeper to skip checking the application on launch and let it execute. This will allow for running unsigned applications again without disabling System Integrity Protection.

First we need to find an app that’s not signed, in this case we’re using Alacritty as our example now.

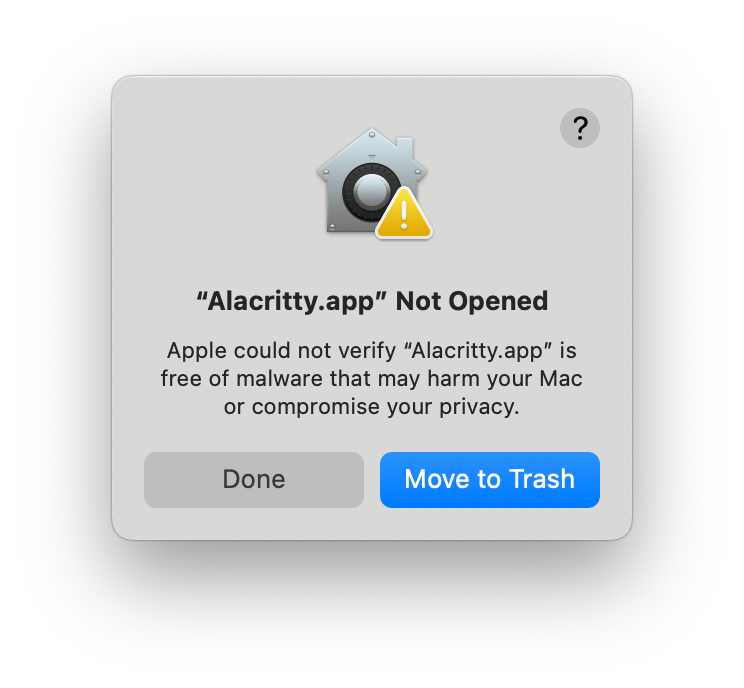
After you’ve downloaded Alacritty and dragged it into your Applications folder, double click on it to run. You’ll get the following error:

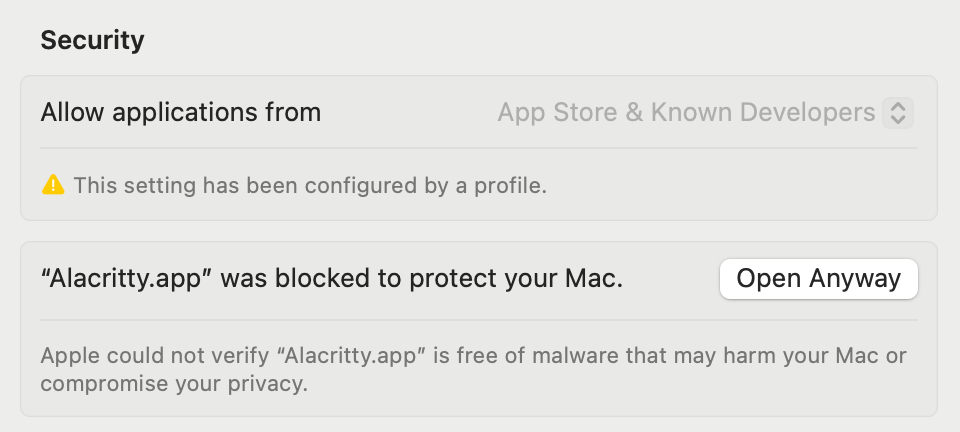
Even going to System Settings > Privacy and Security and clicking open anyway will result in the same error.

Next open Applications > Utilities > Terminal, once you get a command prompt enter the following and press return.

xattr -r -d com.apple.quarantine /Applications/Alacritty.app

Try opening Alacritty from your Applications folder again, it should load without an issue!

Modify the command to use the path of the app you want to remove the quarantine extended attribute from. Note that you have to have write access to the file to remove the quarantine flag.

Tricking require an admin password to access system-wide settings

Summary

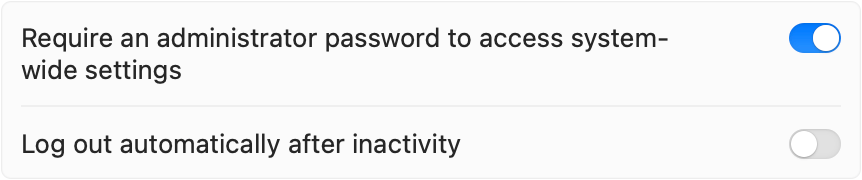
macOS has a setting under System Settings > Security and Privacy > Advanced called “Require an administrator password to access system-wide settings” (I’m going to call it “require admin setting” from here out). The help section describes this option as “Prevent users from changing locked system settings without an administrator’s password.” Unfortunately the setting doesn’t work as documented, and it can be set to “enabled” while still allowing standard users to modify system-wide settings.

You can see an example of what this looks like in this video.

On a fresh computer out of box the system administrator password is already required to unlock many system wide preference panes, like network for example. Enabling the require admin setting simply prevents that authentication from being shared with another pane. For example if an admin account unlocks the battery preference pane then leaves the computer a standard account could modify the network preference pane. In this write up we’re going to go over methods on how this setting can be modified so that both system settings and most compliance checks will incorrectly assume an administrator’s password is required to change settings, when in fact either a standard account’s password or no password at all will modify them.

A number of compliance benchmarks like CIS, STIG and NIST recommend enabling this feature to avoid standard accounts from changing some settings, like disabling content filtering or changing DNS settings. 

  • macOS 14 Sonoma STIG: “The system must be configured to require an administrator password in order to modify the systemwide preferences in System Settings. Some Preference Panes in System Settings contain settings that affect the entire system. Requiring a password to unlock these system wide settings reduces the risk of a nonauthorized user modifying system configurations.”
  • CIS Apple macOS 14 Sonoma Benchmark, control 2.6.8: “By requiring a password to unlock system-wide System Preferences, the risk of a user changing configurations that affect the entire system is mitigated and requires an admin user to re-authenticate to make changes. Users will need to enter their password to unlock some additional preference panes that are unlocked by default like Network, Startup and Printers & Scanners. ​​Run the following command to verify that accessing system-wide preferences requires an administrator password.”

Notes:

This has been reported to Apple Platform Security and it’s been considered a “Feature Request”. FB13705715 has been filed with Apple as a feature enhancement.

This has been reported to the macOS Security and compliance project and fixed.

This has been reported to the CIS team to update checks and remediations.

What the require admin setting changes

First let’s look at what the setting does, when enabling it in System Settings the authorizations database is edited for a number of system setting panes to set the “shared” key to the value “false”.

These preference panes are:

  • system.preferences
  • system.preferences.energysaver
  • system.preferences.network
  • system.preferences.printing 
  • system.preferences.sharing
  • system.preferences.softwareupdate
  • system.preferences.startupdisk
  • system.preferences.timemachine

To validate what the setting changes you can use the following command with the setting both on and off, you’ll see the shared key change from true to false.

Command:

/usr/bin/security authorizationdb read system.preferences.network

Output (shared key in bold):

<?xml version="1.0" encoding="UTF-8"?>
<!DOCTYPE plist PUBLIC "-//Apple//DTD PLIST 1.0//EN" "http://www.apple.com/DTDs/PropertyList-1.0.dtd">
<plist version="1.0">
<dict>
	<key>allow-root</key>
	<true/>
	<key>authenticate-user</key>
	<true/>
	<key>class</key>
	<string>user</string>
	<key>group</key>
	<string>admin</string>
	<key>modified</key>
	<real>731951705.60508299</real>
	<key>session-owner</key>
	<false/>
	<key>shared</key>
	<false/>
	<key>timeout</key>
	<integer>2147483647</integer>
	<key>tries</key>
	<integer>10000</integer>
</dict>
</plist>

Apple’s authorizations documentation on the shared key is as follows, note that there is nothing in it about requiring an admin password: 

If shared is set to true, then the Security Server marks the credentials used to gain this right as shared. The Security Server may use any shared credentials to authorize this right. For maximum security, set sharing to false so credentials stored by the Security Server for one application may not be used by another application.

So according to Apple’s documentation it prevents a user from entering a password in one preference pane and sharing that authorization with another preference pane after.

Tricking the require admin setting

Reviewing the output in the previous section you’ll notice there are some other keys present that aren’t modified when enabling or disabling the require admin setting. Specifically the following are of interest to us:

  • group: The group of users allowed to modify settings after authentication. (Default admin)
  • session-owner: true/false if the current session owner is allowed to modify the setting. (Default false)
  • authenticate-user: true/false if authentication is necessary before making modifications. (Default true)
  • timeout: The credential used by this rule expires in the specified number of seconds. For maximum security where the user must authenticate or consent every time, set the timeout to 0. (default 2147483647)
    • Note: Timeout only applies when the shared key is set to true

So for example setting the key “group” to the value “everyone” will allow any user on the system to modify settings or setting the “session-owner” key to “true“ will allow the currently logged in user to modify System Settings. You will need to modify authorizations for both the root system.preferences and the individual pane, otherwise the authorizations for the system.preferences will take precedence.

Some examples of false pass configs. Once applied, sign in as a standard user, open System Settings > Network and modify the DNS server.  When prompted for “Administrator credentials” just enter the standard username and password and the settings will be applied. You’ll need to quit and re-open 

First save these snippets as system.preferences.changes.plist file then run the following command to apply them. 

sudo /usr/bin/security authorizationdb write system.preferences.network < system.preferences.changes.plist

sudo /usr/bin/security authorizationdb write system.preferences < system.preferences.changes.plist

Any user (standard or admin) can edit the network preferences with their password:

<?xml version="1.0" encoding="UTF-8"?>
<!DOCTYPE plist PUBLIC "-//Apple//DTD PLIST 1.0//EN" "http://www.apple.com/DTDs/PropertyList-1.0.dtd">
<plist version="1.0">
<dict>
	<key>authenticate-user</key>
	<true/>
	<key>class</key>
	<string>user</string>
	<key>group</key>
	<string>everyone</string>
	<key>session-owner</key>
	<false/>
	<key>shared</key>
	<false/>
</dict>
</plist>

The currently logged in user (standard or admin) can edit the network preferences without any authentication, even though admin group is required:

<?xml version="1.0" encoding="UTF-8"?>
<!DOCTYPE plist PUBLIC "-//Apple//DTD PLIST 1.0//EN" "http://www.apple.com/DTDs/PropertyList-1.0.dtd">
<plist version="1.0">
<dict>
	<key>authenticate-user</key>
	<false/>
	<key>class</key>
	<string>user</string>
	<key>group</key>
	<string>admin</string>
	<key>session-owner</key>
	<true/>
	<key>shared</key>
	<false/>
</dict>
</plist>

Properly requiring admin to unlock system-wide settings

If you’d like to properly require that an administrator is required to unlock system-wide settings then you’ll need to make sure all the following settings are set for each preference pane, in this example we’re only setting the root system.preferences and system.preferences.network

<?xml version="1.0" encoding="UTF-8"?>
<!DOCTYPE plist PUBLIC "-//Apple//DTD PLIST 1.0//EN" "http://www.apple.com/DTDs/PropertyList-1.0.dtd">
<plist version="1.0">
<dict>
	<key>authenticate-user</key>
	<true/>
	<key>class</key>
	<string>user</string>
	<key>group</key>
	<string>admin</string>
	<key>session-owner</key>
	<false/>
	<key>shared</key>
	<false/>
</dict>
</plist>

Breaking the require admin setting

It’s also possible to put the authorizations in a state where the setting is no longer able to be toggled on/off. This will cause a failure and the slider in system settings will never stay “on” when you enable it. This occurs when the “class” key is set to a value other than “user”, in this example we’re setting the “class” key to “allow” which will always allow anyone to modify this setting:

<?xml version="1.0" encoding="UTF-8"?>
<!DOCTYPE plist PUBLIC "-//Apple//DTD PLIST 1.0//EN" "http://www.apple.com/DTDs/PropertyList-1.0.dtd">
<plist version="1.0">
<dict>
	<key>class</key>
	<string>allow</string>
</dict>
</plist>

Why change this setting?

If you’re asking “This setting requires admin to change, what’s the big deal?” then great question! There are a number of cases this setting could be changed without organizational knowledge:

  • Another current or previous administrator followed steps online to allow standard users to modify printers or modify network settings.
  • An application or application installer that runs as an admin installer modified the database without your knowledge.

For some organizations these are valid use cases and they should be taken into account.

How did you end up going down this rabbit hole?

I work at Mann Consulting, we co-manage Jamf instances for customers with high security needs. When implementing CIS Controls we found some computers weren’t providing us with consistent results. We found this was a result of changes made by a previous consulting firm that had since been removed from Jamf but the setting remained changed on the computers.

Special thanks to Bob Gendler for assistance in testing, documenting, providing feedback and listening to me curse this setting.

The following site also provided insights into all the setting available for authorizations.

Jamf Pro Framework Not Installing or Redeploying

Starting on or around Monday June 26th we recently ran into some issues where the Jamf Pro Binary located at /usr/local/bin/jamf was missing on newly enrolled computers. The computers would be MDM enrolled but and would receive configuration profiles but the Jamf Management Framework, including Self Service and the jamf binary would be missing. Because of this check-in and inventory were not fully taking place.

This was easily reproducible on computers by using the API to issue the redploy command curl -X POST "https://COMPANY.jamfcloud.com/api/v1/jamf-management-framework/redeploy/{id}".

After further review we found errors in the install.log during enrollment:

[******/com.jamfsoftware.enrollment.dep.quickadd] Failing installation after receiving error: Error Domain=PKInstallErrorDomain Code=100 "Authorization is required to install the packages." UserInfo={NSLocalizedDescription=Authorization is required to install the packages.}

After some digging we identified there was a Configuration Profile with a Restrictions payload that enabled the setting “Require admin password to install or update apps“. Excluding a computer from the this group or unchecking this box and reinstalling resulted in the Jamf Management Framework to properly install.

It’s unclear if this was caused by the macOS 13.4.1 update or if changes to Jamf in the 10.47 upgrade caused this issue. I’ll post more after testing. For now if you use restrictions to prevent standard users from installing from the Appstore we recommend scoping this profile to computers after their enrollment is over a day ago.

Update: This issue also blocks the installation of Jamf App Catalog apps. We tested with Discord, at 15:17:00 Jamf Pro issued the InstallEnterpriseApplication - Discord - 0.0.275 command to a device, after which we saw the following error in the logs:

2023-07-03 15:17:10-07 MacBook-Pro installd[21959]: PackageKit: Install rejected with error: Error Domain=PKInstallErrorDomain Code=100 "Authorization is required to install the packages." UserInfo={NSLocalizedDescription=Authorization is required to install the packages.}