The ZoomIT installer installs a modified IT version of Zoom which the standard installer packages will not update. Instead the users will see this error, even if this is pushed down from MDM.
The following command can be used to identify if the IT version of Zoom is installed or not.
If it returns 1, it’s the IT version, if it’s zero or null it’s the normal version.
This is an updated version of my previous article to utilize Jamf Pro’s built in automatic installation workflows instead of uploading your own package file.
One issue with these provided workflows is that they run “once per computer”, when a plan configuration profile is push to a computer. This means it will attempt to install Jamf Protect once and only once. This is problematic for organizations trying to enforce Endpoint Protection when one of the following conditions occurs:
A local computer admin user uninstalls Jamf Protect
A Jamf Protect upgrade fails
The Jamf Protect installation becomes corrupted
Jamf Protect fails to install correctly
The point of this article is not to discuss proper initial configuration of Jamf Protect, please refer to the Jamf’s documentation on how to deploy plans and the Jamf Protect PKG to machines.
It’s always best practice to scope installation policies to smart groups of computers that don’t have the software installed. This way if the software is removed for any reason it’s automatically installed. This is especially important when you have compliance or regulations that require endpoint protection always be installed and operational. Since Jamf Protect isn’t reinstalled upon removal you’ll need to trick Jamf Pro into removing the plan configuration profile from the device then push it again so the Jamf Protect package is reinstalled.
Extension Attributes
Jamf Protect Last Check-in Days Extension Attribute
Our first part of this workflow is an Extension Attribute that will calculate how many days since the last checkin. Below is the code for this, the Data Type needs to be set to Integer.
#!/bin/zsh
jamfProtectBinaryLocation="/usr/local/bin/protectctl"
if [ -f "$jamfProtectBinaryLocation" ]; then
    jamfProtectLastCheckin=$("$jamfProtectBinaryLocation" info | grep Check-in | awk '{ print $3 " " $4 " " $5}')
    jamfProtectLastCheckin=$(((`date +%s` - `date -u -j -f "%m.%d.%Y %H:%M:%S %p" "$jamfProtectLastCheckin" +%s`)/86400))
fi
echo "<result>$jamfProtectLastCheckin</result>"
Jamf Protect Fix Extension attribute
This extension attribute will check for the existence of a file called ProtectFix, we can use this to then create a smart group of computers that require the fix.
#!/bin/zsh
###############################################################################
# Name:     Jamf Protect Fix
# Creator:  Mann Consulting
# Summary:  Extension Attribute to check if Jamf Protect needs to be fixed
##
# Usage:   Install as an Extension Attribute
#
# Note:     This script is part of Mann Consulting's Jamf Pro Maintenance subscription
#           If you'd like updates or support sign up at https://mann.com/jamf
#           or email support@mann.com for more details.
###############################################################################
if [[ -f /Library/Application\ Support/JAMF/ProtectFix ]];then
  echo "<result>Yes</result>"
else
  echo "<result>No</result>"
fi
Jamf Protect Awaiting Alerts Extension Attribute
There are cases where Jamf Protect will stop communicating with the console. As of writing this has cause issues with high CPU utilization for some computers we manage. This extension attribute will calculate how many Awaiting Alerts there are. Note that reinstalling in this state will clear all awaiting alerts, consider your risk before doing this automatically.
#!/bin/zsh
###############################################################################
# Name:     Jamf Protect Awaiting Alerts
# Creator:  Mann Consulting
# Summary:  Extension Attribute to check if Jamf Protect has awaiting alerts
##
# Usage:   Install as an Extension Attribute
#
# Note:     This script is part of Mann Consulting's Jamf Pro Maintenance subscription
#           If you'd like updates or support sign up at https://mann.com/jamf
#           or email support@mann.com for more details.
###############################################################################
protectctlOut=$(protectctl info -v)
awaitingAlerts=$(echo $protectctlOut | sed -e '/Awaiting Send/,/Alerts.*$^/!d' | grep Alerts | awk '{print $2}' | awk '{count+=$1} END{print count}')
if [[ -n $awaitingAlerts ]]; then
  echo "<result>$awaitingAlerts</result>"
else
  echo "<result>0</result>"
fi
Smart Groups
Jamf Protect Fix = Yes
This smart group is used to detect computers that need Jamf Protect fixed membership will be controlled via a Policy. We’ll use this group as an exclusion in the config profile so that Jamf Pro reissues the config profile triggering a reinstall
Jamf Protect = No Smart group
This smart group is the foundation of your workflow, the goal is to get a list of computers that don’t have the Jamf Protect System Extension running. The easiest way to do this is by checking of the 483DWKW443.com.jamf.protect.security-extension is being reported as a “Running Service” on computers. Adding in “Last Check-in” less than 14 days ago helps keep the group membership clean of inactive computers.
Jamf Protect Last Check-in Days > 5 Smart Group
This will create a group that shows us which computers haven’t completed a Jamf Protect check-in during the last 5 days but have completed a Jamf Pro inventory update in the last two and they also have the 483DWKW443.com.jamf.protect.security-extension service running.
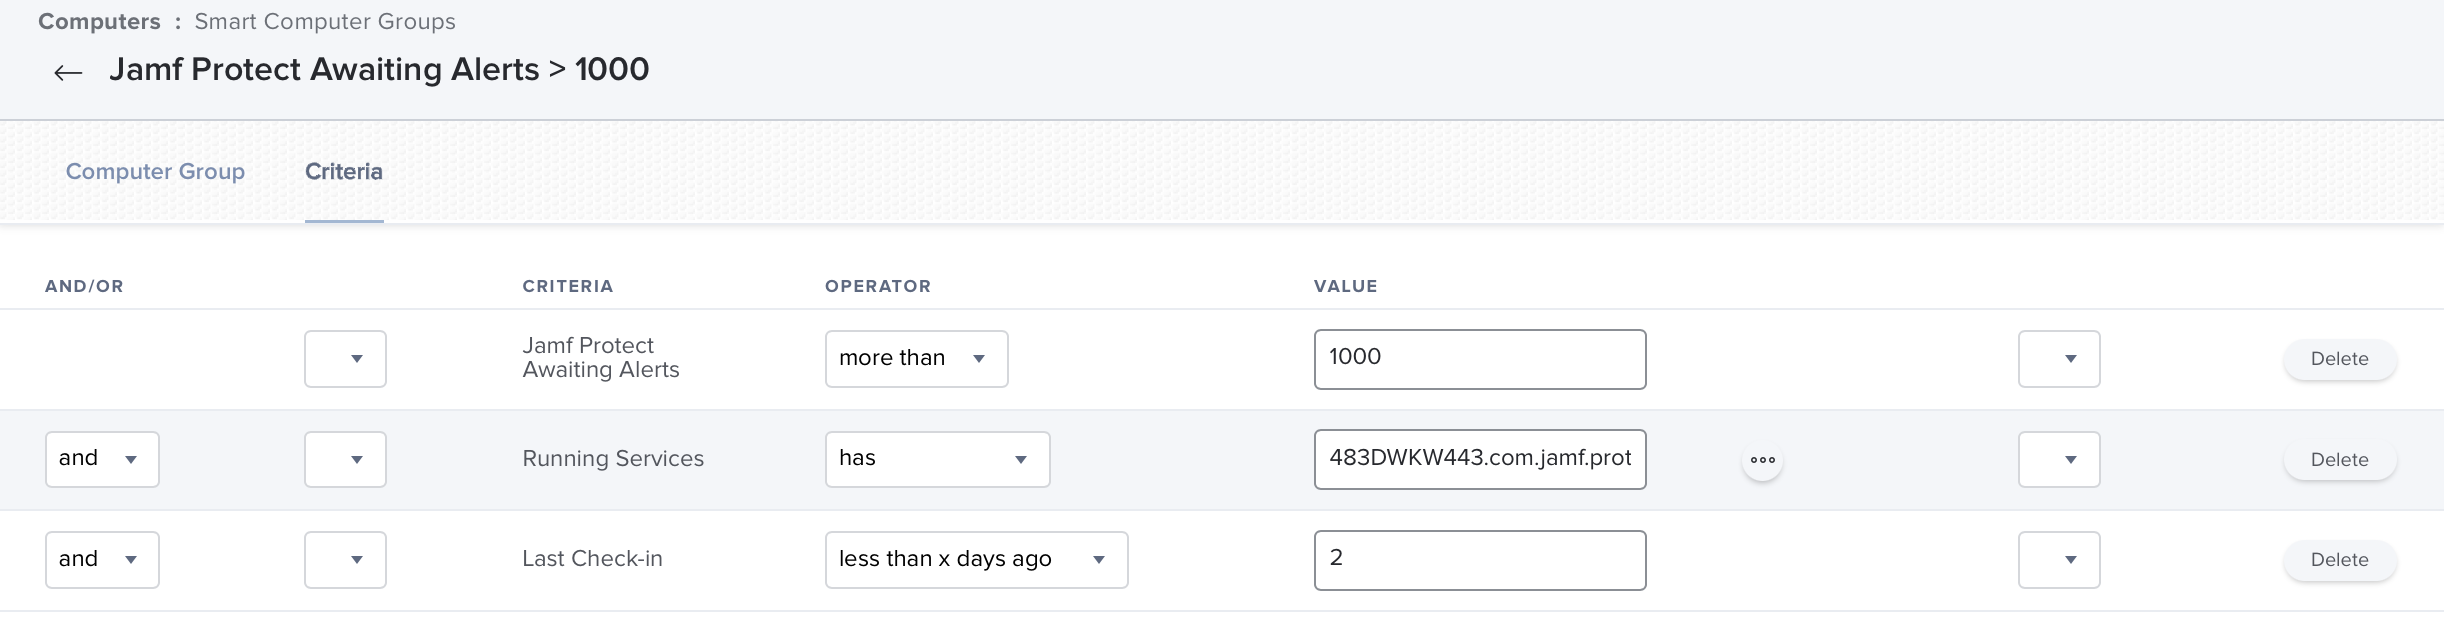
Jamf Protect Awaiting Alerts > 1000 Smart Group
This group of computers can be used to detect computers who have too many pending Awaiting Alerts.
Policy
Jamf Protect Fix Policy
Finally we can take action against all computers we consider broken by creating a policy that uninstalls Jamf Protect and then reinstalls it. This is done with the Uninstall package then running the following command to put the computer in the fix group then remove it which will trigger the plan to install/uninstall. Scope this to the Jamf Protect = No smart group, the Jamf Protect Last Check-in Days > 5 smart group and then Jamf Protect Awaiting Alerts > 1000 smart group.
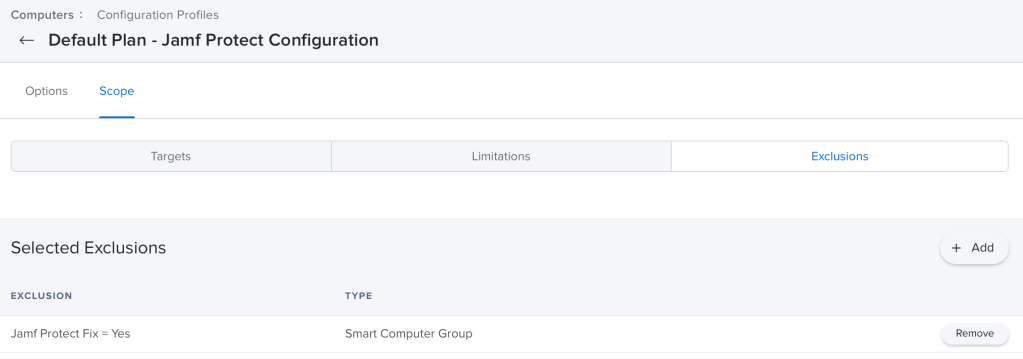
For the Reinstall process to work you’ll need to add the “Jamf Protect Fix = Yes” group as an exclusion to all of your Jamf Protect Configuration profiles. This way when the Jamf Protect Fix Policy above runs the config profile is removed and re-pushed to the computer. This will trigger a reinstall.
Final Notes
That is it! You should now require that all computers are both running Jamf Protect AND actively checking in. Have any more remediation ideas? Let me know!
It’s important to identify devices that are owned by previous employees and take action on them, either removing or quarantining them so that they don’t continue to have access to company resources. I you have Okta’s LDAP configured in Airwatch you can do this via a User Group and some custom filters in the devices list.
How Okta flags Users
Okta has a number of states for users, these are saved in the organizationalStatus LDAP field. Thus far I’ve observed the following, there may be more.
ACTIVE – User account is active
DEPROVISIONED – User account is deprovisioned
RECOVERY – User account is in password recovery mode
Creating the User Group in AirWatch
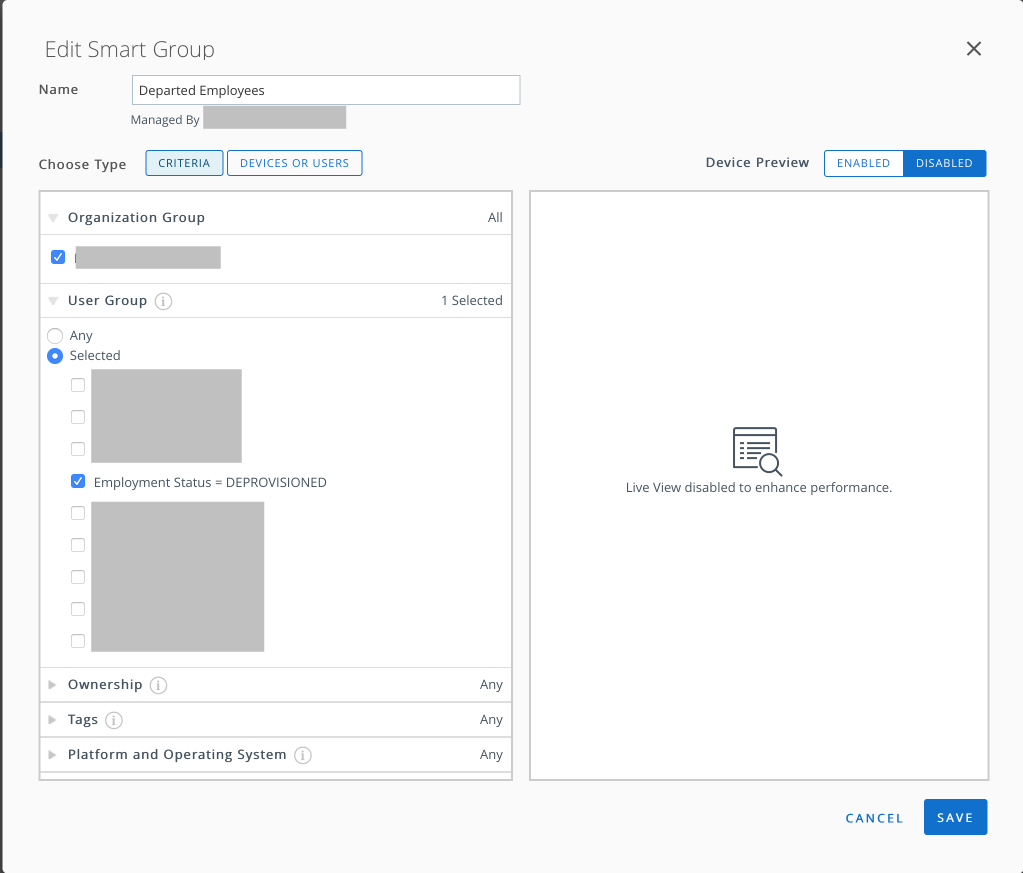
Creating a smart group in the WorkspaceONE dashboard under Accounts > User Groups > List View. From here click the Add button at the top of the page to add a new group. We’re looking to create a Custom Query group with the following custom query
You’ll note in the screenshot below we’ve added the custom logic of (organizationalStatus=DEPROVISIONED) and removed some of the default Query details. Once we test we should have a number of members found so we can save.
Finding Devices assigned to DEPROVISIONED user
AirWatch uses Assignment Groups to logically group computers, this is similar to Jamf’s Smart Computer Groups. You can create a new one under Groups & Settings > Groups > Assignment Groups. Clicking Add Smart Group at the top will get you started.
Your newly created User Group will be on the list available under User Group, select this and optimally add any other filters for device platform. Click save and you’ll have a newly minted group showing you devices that assigned to users who are inactive in Okta.
Taking action on devices
At the far right of the Smart Groups table you’ll find the Devices column. There will be a number of how many devices are a member of each specific group here. Clicking on this will bring up all the devices that match this criteria. From this page you can take actions like delete, enterprise wipe, or change the device’s ownership.